Creating/Editing a Release
To create a new release, navigate to the Search Releases screen using the Releases menu.

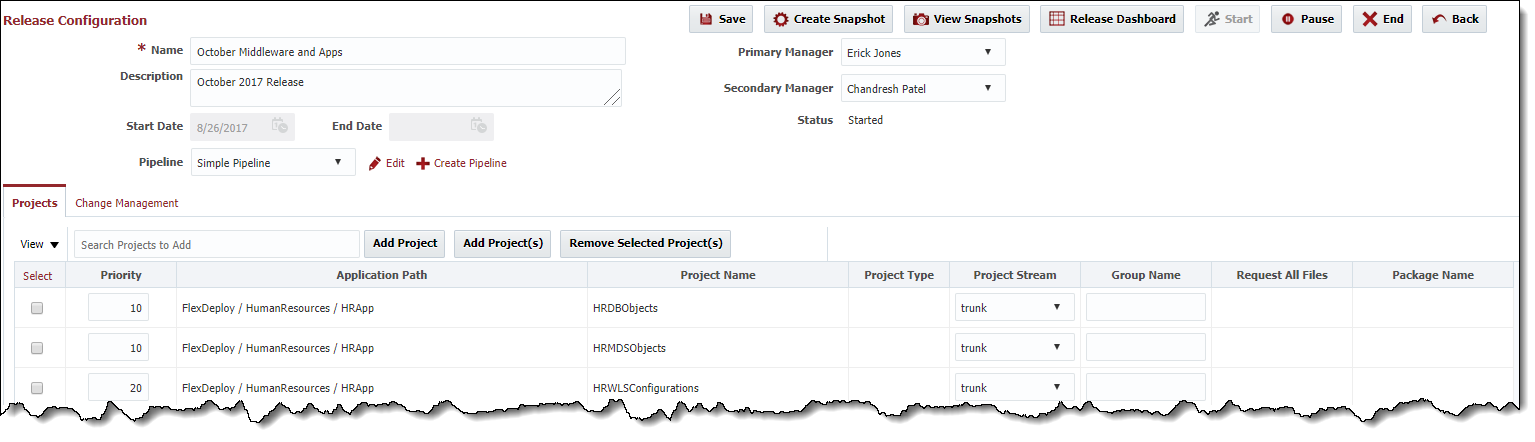
Click on the  button to create a release. To edit a release, click on the release name link in the Name column.
Field | Description |
|---|---|
Name | The name of the release. |
Description | An optional description for the release. |
Start Date | The date and time in which the release was started (read-only). |
| End Date | The date and time in which the release was ended/completed (read-only). |
| Pipeline | The pipeline which is used to process snapshots for the release. |
| Primary Manager | The Release Manager used for notifications. |
| Secondary Manager | A secondary Release Manager used for notifications. |
| Status | The current status of the release (read-only). Status are:
|
To add a project to the release, enter the project name in the Search Projects to Add input field, and click the  button. Configure the project details as defined below.
Column | Description |
|---|---|
Priority | The name of the release. |
Application Path | The fully-qualified path of the project (read-only). |
Project Name | The name of the project. |
| Project Type | The type of the project (read-only)
|
| Project Stream | The stream used for the project/package. Only one stream per project/package per release may be used. |
| Group Name | An optional group name for the project/package, so that multiple projects/packages can be "grouped" together. Optionally used by Deploy All, Test All, and Execute All pipeline stage steps. |
| Request All Files | Identifies whether the project is using selected files or all files for the release. Only applies to partial deployment projects. See also Managing Files for Partial Deployment. |
| Package Name | The package name for the project (required for partial deployment projects if not Request All Files). |
To add multiple projects at a time to the release using filter criteria, click on the  button.

Optionally enter a criteria in the Project Name or Path field to filter the project list, and click the  button to filter button. Next, select one or more projects to add to the release, and click
  the button, or simply click the
  button to add all projects displayed to the release.
You can add multiple packages to the release for the same project. Simply add the same project to the release and provide the package name.
Click the  button to save your changes. To start the release, and allow snapshots to be created and sent to the pipeline for execution, click the
  button.
To temporarily pause the application so that no snapshots can be created and sent for execution, click the  button. A paused release can be resumed by clicking the button again.
Once a release is completed, click the  button to end the release. Like paused/suspended releases, snapshots can be created and sent for execution once ended. Ended releases cannot be resumed, and at this point you would need to create a new release.
- style