/
Installation for GlassFish
The following macros are not currently supported in the header:
- style
Installation for GlassFish
- Copy Page Tree
- Karl Henselin
- Chandresh Patel
Owned by Copy Page Tree
Last updated: Apr 03, 2017 by Karl Henselin
Requirements
- GlassFish 3.1.2 (GlassFish 4 is NOT supported at this time)
- 4GB of RAM
- 1 CPU
- JDK – refer to 3.1.2 Certification Matrix
GlassFish Setup
If FlexDeploy is being installed for first time, setup GlassFish server and Data Source as explained in following steps. If only updating new EAR file, skip to EAR Installation.
Install GlassFish
- Download Glassfish 3.1.2 from this link: http://www.oracle.com/technetwork/middleware/glassfish/downloads/index.html
- Install a supported version of the JDK following the install procedures provided with the JDK
- Set the JAVA_HOME to the location the JDK was install into
- Launcher the installer using a utility like vnc (change
$JAVA_HOMEto JDK install location):
./glassfish-3.1.2.2-unix.sh -j $JAVA_HOME
- Follow the install dialog to complete the base GlassFish install
- When prompted, recommend setting DOMAIN NAME to fddomain
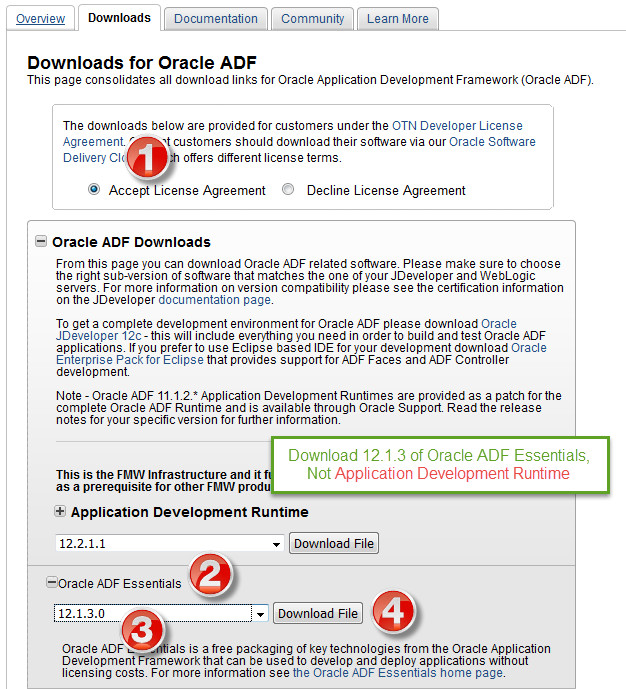
Install ADF Essentials
- Download the ADF Essentials 12.1.3 from this link - http://www.oracle.com/technetwork/developer-tools/adf/downloads/index.html
- Unzip the adf-essentials.zip file to a temporary location
- unzip -j adf-essentials.zip -d /oracle/adf
- Copy all of the files from /oracle/adf to the
$GLASSFISH_HOME/glassfish/domains/$DOMAINNAME/lib directory.
Install Additional Libraries
- From the extracted FlexDeploy_GlassFish.zip or Glassfish_Complete.zip, navigate to the GlassFish directory and locate these directories:
- lib
- modules
- Copy the files inside lib (do not copy the lib folder itself) into the lib directory to
$GLASSFISH_HOME/glassfish/domains/$DOMAINNAME/lib - Copy the files inside modules (do not copy the modules folder itself) into the modules directory to
$GLASSFISH_HOME/glassfish/modules
Configure GlassFish Server
- Start glassfish:
- Set GLASSFISH_HOME to the install location of glassfish
- Set DOMAIN_NAME to the name of your domain (like fddomain)
- cd
$GLASSFISH_HOME/glassfish/bin - asadmin
- start-domain
$DOMAIN_NAME
- Login into GlassFish Administration Console (http://hostname:4848)
- Create Data Source
- Go to Resources – JDBC - JDBC Connection Pools
- Set following values, then next
- Pool Name: FlexDBDSPool
- Resource Type: javax.sql.DataSource
- Database Driver Vendor: Oracle
- Scroll down to properties
- Set the following values, then Save
- Name: URL Value: <jdbc URL for database>
- Name: user Value: fd_admin
- Name: password Value: <password for fd_admin>
- Go to General tab and then Save
- Go to Resources – JDBC - JDBC Resources
- Set following values, then Save
- JNDI Name: jdbc/flexdbDS
- Pool Name: FlexDBDSPool
- Go to Resources – JDBC - JDBC Connection Pools
- Add the following JVM arguments to the server (click on Configurations, server-config, JVM Settings, JVM Options)
-verbose:gc |
-Xms1024m |
-Xmx2048m |
-Doracle.jdbc.autoCommitSpecCompliant=false |
-Doracle.mds.cache=simple |
-Djava.awt.headless=true |
-Dflexagon.fd.install.root=/opt/flexdeploy/application |
-Dflexagon.fd.repository.root=/opt/flexdeploy/repository |
Please make sure to modify the arguments for Server working directory (-Dflexagon.fd.install.root) and Artifacts repository (-Dflexagon.fd.repository.root) as per your installation. Be careful in copying arguments due to potential character changes.
- Setup Logger Configurations.
- From the extracted zip directory, navigate to the GlassFish directory and locate this file:
- FDGlassFishLogFormatter.jar
- Copy the FDGlassFishLogFormatter.jar to the lib sub-directory of the domain.
EAR Installation
Locate FlexDeploy GlassFish ear in extracted zip of download files.
- Login into GlassFish Administration Console
- http://<hostname>:4848
- Click on Applications.If FlexDeploy_GlassFish_[version] is already installed.
- Select the FlexDeploy_GlassFish_[version].
- Click on Undeploy and click on OK.
- Click on Applications and then click Deploy.
- Click on Choose File.
- Find your downloaded EAR file and select it.
- Click OK, EAR will be installed.
- Recycle the GlassFish server.
- Go to server (Admin Server).
- Click Restart and OK.
, multiple selections available,
Related content
Installation for GlassFish
Installation for GlassFish
More like this
FlexDeploy - GlassFish Plugin Guide
FlexDeploy - GlassFish Plugin Guide
More like this
FlexDeploy - GlassFish Plugin Guide
FlexDeploy - GlassFish Plugin Guide
More like this
FlexDeploy - GlassFish Plugin Guide
FlexDeploy - GlassFish Plugin Guide
More like this
FlexDeploy - GlassFish Plugin Guide
FlexDeploy - GlassFish Plugin Guide
More like this
FlexDeploy - GlassFish Plugin Guide
FlexDeploy - GlassFish Plugin Guide
More like this
The following macros are not currently supported in the footer:
- style