Build & Deploy Applications
- Copy Page Tree
- Greg Draheim
- Ben Hoffman
To build or deploy an application you must first open the application by double-clicking or right-clicking on it in the Project Explorer and selecting Open.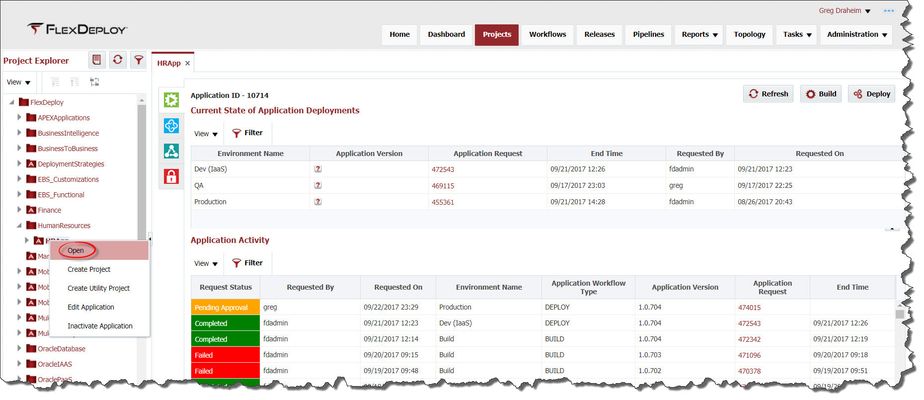
On the Execute tab you will see two sections titled Current State of Application Deployments and Application Activity.
The Current State of Application Deployments indicates which environments contain which application requests. If an application has not been deployed to an environment it will not appear in the list. This provides an easy to access summary of this application's current deployment state across all environments.
The Application Activity identifies all build and deployment requests along with the execution status for each request, whether completed/failed or in progress. The Request Status column provides details pertaining to the build or deployment request that was submitted. The table below describes the status lifecycle of an application request.
Object Type | Status | Description |
|---|---|---|
Application Request | Initiated | The initial status that a request receives when it has first been submitted. |
Pending Approval | Indicates that one or more approvals are required before the request will be sent for execution. | |
Scheduled | Indicates that the request has been scheduled for execution at some time in the future. | |
Rejected | Indicates that an approval task or scheduled task for the request has been rejected/cancelled. | |
| Aborted | The request was aborted by the user for one or more of the projects in the application. | |
Ready | Indicates that request is has received any required approvals or reached any scheduled time and is ready to begin execution. | |
| Completed | The request has successfully executed. | |
| Failed | The request failed for one or more of the projects in the application. |
Building an Application
From the Execute tab, click the Build button. This action will execute a build on every build/deploy project that is contained within this application, utility projects will not be executed during the build.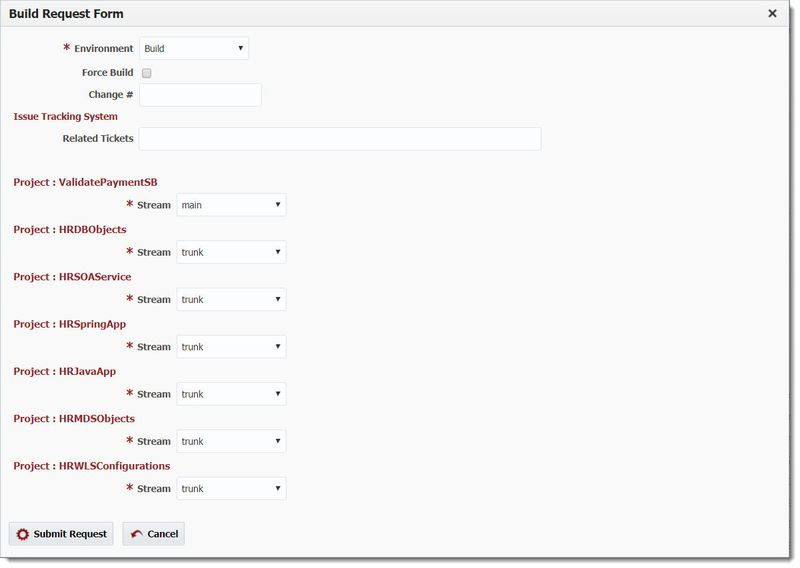
Enter values in the Build Request Form as described in the table below.
Field | Required | Description |
|---|---|---|
Environment | Yes | The environment to execute the build on. |
Force Build | No | If selected, this option forces the build even though no changes detected in the source. By default you can only build if there is any change from last build. Currently this option only appears when a SCM is configured on Project Configuration. |
| FlexFields | Depends | Change # above is an example of a FlexField configured on the Administration Tab. Any FlexFields that are configured for a Build Request will display here. |
| Related Tickets | Depends | Issue tracking tickets related to the build. |
Stream | Yes | Select Stream for each project. Defaults to main stream (trunk). You can select any branch stream configured for the project. |
Workflow Inputs | Depends | Enter values for any inputs that are configured for the contained projects build workflows. |
Click the Submit Request button to submit the build request for this application.
Deploying an Application
From the Execute tab, click the Deploy button. This action will execute a deploy operation on every build/deploy project and it will also execute every utility project that is contained within this application. 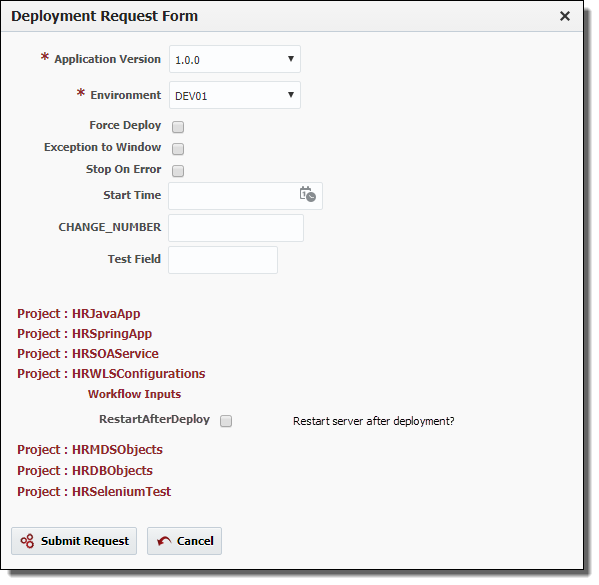
Enter values in the Deployment Request Form as described in the table below
Field | Required | Description |
|---|---|---|
Application Version | Yes | The version of the application to submit for deployment. |
Environment | Yes | The environment to execute the deployment on. |
Force Deploy | Yes | Force a deployment to occur even if the application version is already current in the selected environment. Defaults to No. |
Exception To Window | Yes | Indicate that the deployment is being requested to run outside of any defined deployment window, triggering an approval. Defaults to No. |
Stop On Error | Yes | If selected, any projects which are queued within the current application deployment request will not be executed when one or more running projects within the same application deployment request fail. Defaults to No. |
Start Time | No | An optional delayed start time for the deployment. |
FlexFields | Depends | CHANGE_NUMBER above is an example of a FlexField configured on the Administration Tab. Any FlexFields that are configured for Deploy / Utility Request will display here. |
Workflow Inputs | Depends | Enter values for any inputs that are configured for each contained project's deploy workflow. (e.g. RestartAfterDeploy input pictured above). |
Click the Submit Request button to submit the application deployment request.
Monitoring Application Workflow Requests
Once an application build or deployment request has been submitted it can be monitored by clicking the Refresh button and watching the statuses progress throughout the lifecycle, until it is either failed or completed. To view the Application Execution Details, including project-level detail, click the id in the Application Request column in the Application Activity section.
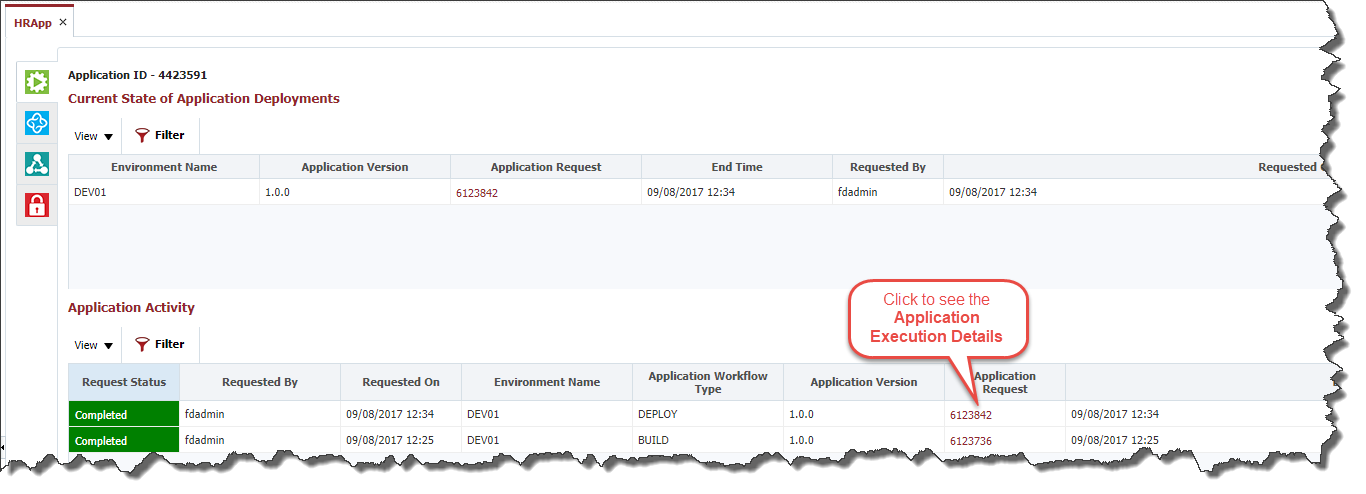
The Application Execution Details shows the status of the Application Request and the details of the request. The overall status of the request is based off both: any configured Approvals or Windows and the corresponding Tasks and each Project Workflow Executions, under the application, included in the request.
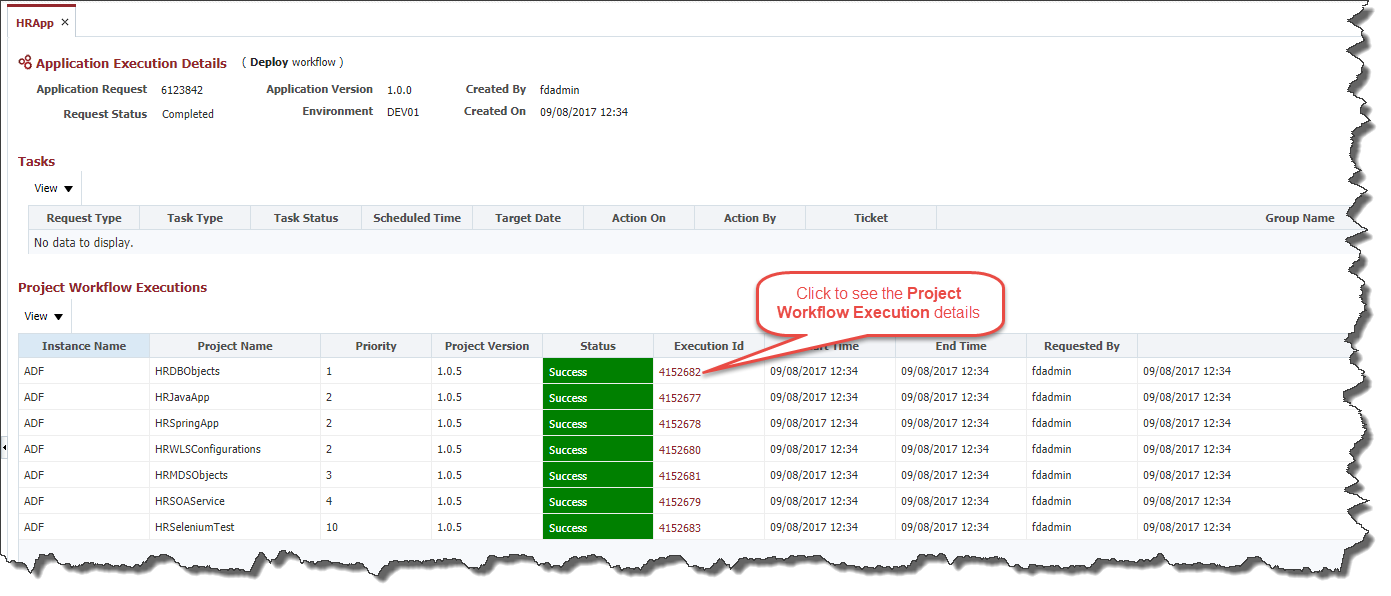
The Project Workflow Executions section provides the execution details for each project contained within the application. To view execution details for a specific project click on the id in the Execution Id column.
- style