Creating an SSH Endpoint
- Karl Henselin
- Erick Jones
- Dan Reynebeau
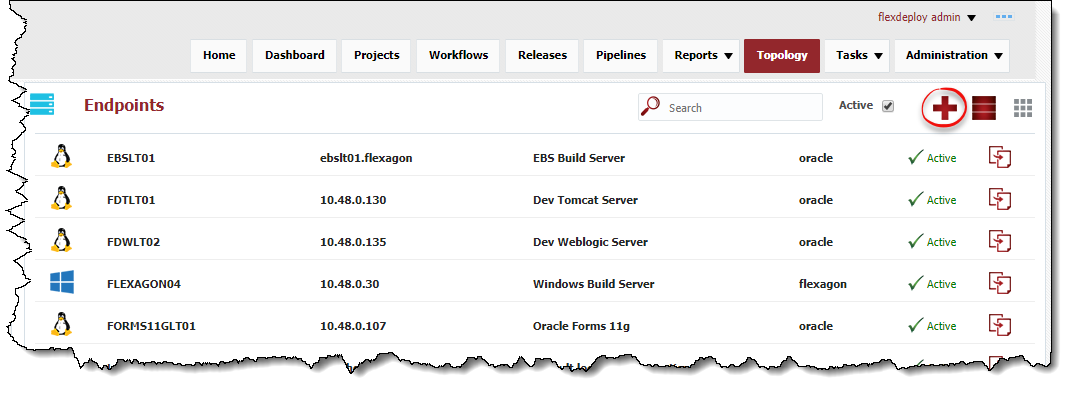
Click the  button to create a new Endpoint, or select an existing Endpoint by clicking on the desired row. Enter the required fields as defined in the table below.
See Endpoint Defaults to setup default values for new Endpoints to save time.
Field Name | Required | Description |
|---|---|---|
Endpoint Name | Yes | The name of the Endpoint. |
Description | No | An optional description for the Endpoint. |
Active | Yes | Whether or not the endpoint is active in the system. Defaults to "Yes". |
Connection Type | Yes | The connection type used for connection to the Endpoint. Currently SSH and localhost are supported. |
OS Type | Yes | The operating system of the Endpoint. Unix and Windows are the supported types. For Microsoft Windows, must have Cygwin installed, along with the openssh package. See the Cygwin Installation Guide for more information. |
Endpoint Address | Yes | The DNS name or IP address of the Endpoint. |
Port | Yes | The SSH port of the Endpoint (typically port 22). |
User Name | Yes | The user account on the Endpoint to connect with. All executions via this endpoint will run as this user. |
Password | No | The password for the User Name. Either password or Private Key File is required. |
Private Key File | No | Fully-qualified path of the SSH private key file. Either Private Key File or Password is required. ~ is not supported here. |
Passphrase | No | An optional passphrase used when the private key was generated. Only valid if a Private Key File is specified. |
| Run As (sudo) | No | An optional user to run as (using sudo) after establishing connection the endpoint.
|
Base Directory | Yes | A working directory on the Endpoint used by FlexDeploy. ~ is not supported here. For example, /app/flexdeploy. If you have two FlexDeploy installations that may connect to same Endpoint, you must use unique folders for both FlexDeploy Servers. In most cases, separate FlexDeploy is installed to perform testing of FlexDeploy patches, which may connect to same Endpoint, in which case you can use different folder like /app/flexdeploytest and /app/flexdeploy. |
Group | No | An optional group identifier which can be useful when searching for Endpoints. |
Subgroup | No | An optional subgroup identifier which can be useful when searching for Endpoints. |
JDK Home | Yes | The JDK Home directory on the Endpoint. For example, /usr/java. FlexDeploy will look for /bin/java under specified JDK Home folder. |
Optionally, click the Test Connection button to validate that the FlexDeploy server can connect to the configured Endpoint.
Click the Save button to save the changes to the Endpoint. Optionally click the Apply button to save the changes, but remain on the current screen until the Cancel button is clicked.
To inactivate an endpoint click the Active link on the desired Endpoint, and it will toggle to Inactive. This will hide that Endpoint after leaving the screen, until the Active checkbox is unchecked. To reactivate an Enpoint, click the Inactive link and it will toggle back to Active. This endpoint is now active in the system again and ready for use.
SSH Authentication
FlexDeploy utilizes SSH to connect to its configured Endpoints. SSH uses public-key cryptography to authenticate the remote computer and allow it to authenticate the user. FlexDeploy supports PasswordAuth and ppk.
Starting with 4.5.2, FlexDeploy also supports using sudo user. At this point User Interface does not have separate entry for sudo user, next release will provide better user experience for sudo user setup. See Configure sudo user for Unix Endpoint.
Supported Algorithms for SSH
ciphers
- aes{128,192,256}-{cbc,ctr}, blowfish-{cbc,ctr}, 3des-{cbc,ctr}, twofish{128,192,256}-{cbc,ctr}, twofish-cbc, serpent{128,192,256}-{cbc,ctr}, idea-{cbc,ctr}, cast128-{cbc,ctr}, arcfour, arcfour{128,256}
- Supported extended (non official) ciphers
- camellia{128,192,256}-{cbc,ctr}, camellia{128,192,256}-{cbc,ctr}@openssh.org
key exchange
- diffie-hellman-group1-sha1, diffie-hellman-group14-sha1, diffie-hellman-group14-sha256, diffie-hellman-group15-sha512, diffie-hellman-group16-sha512, diffie-hellman-group17-sha512, diffie-hellman-group18-sha512 diffie-hellman-group-exchange-sha1, diffie-hellman-group-exchange-sha256, ecdh-sha2-nistp256, ecdh-sha2-nistp384, ecdh-sha2-nistp521, curve25519-sha256@libssh.org
- Supported extended (non official) key exchange algorithms
- diffie-hellman-group14-sha256@ssh.com, diffie-hellman-group15-sha256, diffie-hellman-group15-sha256@ssh.com, diffie-hellman-group15-sha384@ssh.com, diffie-hellman-group16-sha256, diffie-hellman-group16-sha384@ssh.com, diffie-hellman-group16-sha512@ssh.com, diffie-hellman-group18-sha512@ssh.com
signatures
- ssh-rsa, ssh-dss, ecdsa-sha2-nistp256, ecdsa-sha2-nistp384, ecdsa-sha2-nistp521, ssh-ed25519
mac
- hmac-md5, hmac-md5-96, hmac-sha1, hmac-sha1-96, hmac-sha2-256, hmac-sha2-512, hmac-ripemd160
compression
- zlib and zlib@openssh.com (delayed zlib)
private key files
- pkcs5, pkcs8, openssh-key-v1, ssh-rsa-cert-v01@openssh.com, ssh-dsa-cert-v01@openssh.com
Password Authentication
The first mechanism is to use automatically generated public-private key pairs to simply encrypt a network connection, and then use password authentication to log on. In this case you must provide a User Name and Password to connect to the endpoint.
| Unix Example | Windows Example (using Cygwin) |
|---|---|
|
|


MacOS
MacOS endpoints are supported using Unix Connection Type.
Public-Private Key Authentication
The second technique is to use a manually generated public-private key pair to perform the authentication, allowing the FlexDeploy server to connect to endpoints without having to specify a password. In this scenario, a public and private key pair are generated on the FlexDeploy server. The private key is kept secretly on the server by setting the permissions such that only the owner can read it (the userid which the FlexDeploy server is running as). The public key is copied to all endpoint computers which must allow access to the owner (user running FlexDeploy server) of the matching private key. While authentication is based on the private key, the key itself is never transferred through the network during authentication. SSH verifies whether the same person offering the public key also owns the matching private key. In this case you must provide the User Name, the path to the Private Key File on the server, and an optional Passphrase (an optional password assigned to the private key when it was generated).
Creating a Public-Private Key Pair
If you do not already have SSH keys generated for the host where FlexDeploy is installed, login (or switch user) as the user which FlexDeploy runs as, and run the following OpenSSH command.
- ssh-keygen –t <rsa | dsa> ** where rsa or dsa is the encryption algorithm you wish to use.
Here is the sample output (with interactive prompts) using rsa encryption.
Generating public/private rsa key pair.
Enter file in which to save the key (/home/oracle/.ssh/id_rsa):
Enter passphrase (empty for no passphrase):
Enter same passphrase again:
Your identification has been saved in /home/oracle/.ssh/id_rsa.
Your public key has been saved in /home/oracle/.ssh/id_rsa.pub.
The key fingerprint is:
e4:dd:6d:88:e0:64:9c:3e:9d:f7:7d:6f:2e:56:dd:6b oracle@devlnx12
The key's randomart image is:

+--[ RSA 2048]----+

|                 |

|       . .       |

|        B        |

|       B + + o   |

|        S = + o o|

|         . . o .+|

|              ..+|

|              oE+|

|             ..+o|

+-----------------+
It is typical to use the default file name and location to store the private key (which is in the .ssh subfolder of the user's home directory). You can optionally secure the private key file with a passphrase. It is an SSH requirement that the private key be readable only by its owner (e.g. oracle in the example above). So you must change the permissions accordingly (e.g. chmod 600 /home/oracle/.ssh/id_rsa). You will receive an error at connection time similar to the following if you omit this step.
Permissions 0777 for '/home/oracle/.ssh/id_rsa' are too open.
It is recommended that your private key files are NOT accessible by others otherwise private key will be ignored.
The /home/oracle/.ssh folder on the endpoint must have drw------- permissions. For example,
- chmod -R 700 $HOME/.ssh
- chmod 700 $HOME
Uploading the Public Key
We must now copy the contents of the public key to each endpoint host. This step can be performed manually or using FlexDeploy UI. To save time and avoid errors, use Upload Public Key button on FlexDeploy UI for specific Endpoint.
In order to copy public key manually copy the contents of the public key file on the FlexDeploy server and append it to the end of the following file on the endpoint:
- ~/.ssh/authorized_keys (Note that you will need to create this file if it does not already exist). You can scp public key file to endpoint and append it to authorized_keys file in .ssh folder of user's home folder. As explained above in Tip section, you must make sure that permissions are 700 for .ssh folder as well as user's HOME folder.
Sample contents of an authorized_keys file (containing two public keys):
ssh-rsa AAAAB3NzaC1yc2EANAADAQABAAABAQC9GvGjUyL1towJF5uxp3jqeFcwaBm0GhqXaPrhWH/iX1H1lalPmwR3N791lR7oTONl6TZShLX2sq64rGL+HYF+W1RxjZqydcWDEJsz2MD525NisTuXI2HjVMYablXobDtv5sc12iM8hdh6nJXAlTHQ1wA4izRX2via5nWWtZUqBTyicpR1odQb4pcoTjPOsEPrwS7/sU51kLqR+y1G5AM307VhLBLumS3gB/kj+pBoIZEk2LwwuMeaRhywe9N2+M+hO7c1TijseACmr0DHN9ZvZhoBBgl7xBUFqxxOrMktst7arpxEvQXz4aUh+58smWSA4iMHXvzMc/xSXUp9eIov comment1
ssh-rsa AAAAB3NzaC1yc2EAAAABIwAAAQEAwnP9Sahi0y1rypBq8i7MbV8QR21g+nC4AIrnSsoyh7T4DyjeScJS6SWzBLSNrv7bX+Lm7pUqMEOKwR68kk8SLcNOStPsyBoZJNeiE6R11rXOufN4aebc3aT4JW/qcb1nQwGnP9ubfGVAMEf3rvU0OBt18CAvNux2Gr8t1kpubZQyXtK9mvjcYPUgvUEQIwL+kShgRMQiqw6FOyUuE22jIqxnr0avALH32fB7B4p7DsfEC3M1+Yb9PptaUQpSkk0OyU3bQh3gCNojqOVMNZ+IJREyhh9TnlHf3/FVED29aC6DxB3bEERymXRSVFlV2dedlXjeTjsVdqurgD4CHF382Q== comment2
The public key can also be copied to the endpoint's authorized_keys file using the Upload Public Key button.
Validate that the derived name and location of the public key is correct, and enter the password for the Endpoint connection user (if not already provided on the Endpoint definition). Click the Upload button to upload the public key to the Endpoint.
Special Note for Oracle Java Cloud Service
The SSH connectivity for the Java Cloud Service is no different than when running on-premise. However, by default you will not know the password for the oracle user. You have two options for configuring endpoints on Java Cloud Service instances.
- Using PuTTy, connect to the Java Cloud Service instance VM using the opc user and the private key you generated when you created that instance. Sudo to root and change the oracle password. You can now use this password to configure the endpoint to connect using the oracle user.
- Manually copy the public key into the authorized_keys file within the .ssh folder of the oracle home (/u01/app/oracle/tools/paas/state/homes/oracle/.ssh/authorized_keys). You can also use the upload public key feature of FlexDeploy if you know the oracle password (e.g. by following the instructions in #1 above). Once the keys are in place you can configure the endpoint to reference the private key instead of the password.
- style