These instructions are for installing FlexDeploy on an existing Tomcat server. If you are installing a new server, see Installing FlexDeploy with included Tomcat for a simplified installation which includes the Tomcat 8.5.11 server. If you wish to use an existing Tomcat server, or to use a different version of Tomcat, please continue with this installation.
Requirements
- Tomcat 8+ Tomcat 8.5.x was rigorously tested, and therefore, recommended.
- There are known issues with Tomcat 7.
- 8GB of RAM
- 1 CPU
- JDK - refer to http://tomcat.apache.org/whichversion.html for selecting. Tomcat 8.5.x was tested with JDK 1.7_67, 1.8_60 and 1.8_101.
- FlexDeploy Working Directory and Artifact Repository folders are created.
Tomcat Setup
If FlexDeploy is being installed for first time, setup Tomcat server and a Data Source as explained in following steps. If only updating new war file, skip to WAR Installation.
Install jars into Tomcat lib
Some jars are needed to support running an ADF application on Tomcat. Please download the following and put in the lib folder inside where you downloaded Tomcat.
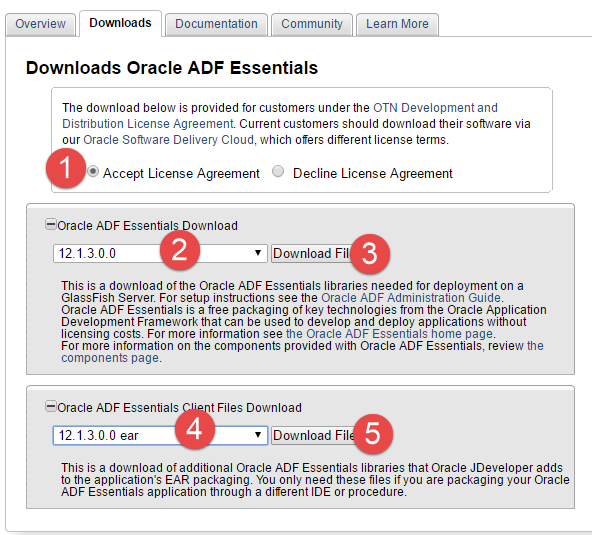
- Download 12.1.3 Oracle ADF Essentials and Oracle ADF Essentials Client Files from http://www.oracle.com/technetwork/developer-tools/adf/downloads/adf-download-1649592.html. Save download files in temporary folder.
- Extract zip files in flat structure using unzip -j (works on Windows and UNIX)
- cd <TOMCAT_HOME>/lib
- unzip -j <path to temp folder>/adf-essentials.zip
- unzip -j <path to temp folder>/adf-essentials-client-ear.zip
- You should see a large number of jars now in the <TOMCAT_HOME>/lib folder.
- ADF Essentials comes with the JDBC driver for Oracle 11g database (ojdbc6dms.jar). If you are using Oracle 12c database, you can download the driver from the Oracle Technology Network site.
If adding another JDBC driver, be sure to remove the default one which comes with the ADF Essentials libraries (ojdbc6dms.jar). If you leave multiple JDBC drivers in the lib folder, you could encounter the following exception on startup:
java.lang.SecurityException: sealing violation: package oracle.jdbc is sealed
at java.net.URLClassLoader.getAndVerifyPackage(Unknown Source)
at java.net.URLClassLoader.definePackageInternal(Unknown Source)
at java.net.URLClassLoader.defineClass(Unknown Source)
at java.net.URLClassLoader.access$100(Unknown Source)
at java.net.URLClassLoader$1.run(Unknown Source)
- Extract zip files in flat structure using unzip -j (works on Windows and UNIX)
- Copy following jar files from Tomcat_Complete.zip/apache-tomcat-flexdeploy/lib folder and place them in <TOMCAT_HOME>/lib.
- jta-1.1.jar
- jackson-core-lgpl-1.9.13.jar
- jersey-bundle-1.18.jar
- asm-3.3.1.jar
- mail-1.4.7.jar
- ant-salesforce.jar - If you will be using the Salesforce integration.
- If using IBM ClearCase, you will need to copy some jar files from your ClearCase server or ClearTeam Explorer installation to the FlexDeploy installation.
- Copy all of the jar files found in the com.ibm.rational.teamapi_8.0.1.vxxx folder of your ClearCase server or ClearTeam Explorer to <TOMCAT_HOME>/lib. (commons-codec-1.3.jar, commons-lang-2.3.jar, icu4j-4_8.jar, remote_core.jar, stpclientws.jar, stpcq.jar, teamapiextensions.jar, unicodetypemgr.jar, commons-httpclient-3.0.jar, commons-logging-1.0.4.jar, icu4j-charset-4_8.jar, stpcc.jar, stpcmmn.jar, stpwvcm.jar, ucleardiffmerge.jar)
Configure context.xml
Open context.xml for editing. It is located in the <TOMCAT_HOME>/conf folder.
Add the following text inside of the <Context> </Context> tags. change <password for fd_admin> to the actual password. Change url to your Database if necessary.
<!-- Prevent unnecessary warnings in the log.                                   -->
<JarScanner scanManifest="false"/>


<!-- Database Connection for the FlexDeploy Application                                   -->
<Resource name="jdbc/flexdbDS" auth="Container" type="oracle.jdbc.pool.OracleDataSource" factory="oracle.jdbc.pool.OracleDataSourceFactory"
url="jdbc:oracle:thin:@localhost:1521:xe" user="fd_admin" password="put password for fd_admin" maxActive="100" maxIdle="10" maxWait="60" validationQuery="select 1 from dual" testOnBorrow="true"/>
Configure Tomcat Environment
WINDOWS
Create file setenv.bat in the <TOMCAT_HOME>/bin folder. Edit the file to have following lines. Update location of JAVA_HOME as appropriate.
set JAVA_HOME=C:/installs/Java/jdk1.8.0_121
set CATALINA_OPTS=%CATALINA_OPTS% -verbose:gc -Xms1024m -Xmx2048m -Doracle.mds.cache=simple -Dorg.apache.el.parser.SKIP_IDENTIFIER_CHECK=true -Dflexagon.fd.repository.root=/opt/flexdeploy/repository -Dflexagon.fd.install.root=/opt/flexdeploy/application -Djava.awt.headless=true -Djava.security.egd=file:/dev/./urandom
UNIX
Create file setenv.sh in the <TOMCAT_HOME>/bin folder. Edit the file to have following line. Update location of JAVA_HOME as appropriate.
JAVA_HOME=/usr/jdk1.8.0_60
CATALINA_OPTS='-verbose:gc -Xms1024m -Xmx2048m -Doracle.mds.cache=simple -Dorg.apache.el.parser.SKIP_IDENTIFIER_CHECK=true -Dflexagon.fd.repository.root=/opt/flexdeploy/repository -Dflexagon.fd.install.root=/opt/flexdeploy/application -Djava.awt.headless=true -Djava.security.egd=file:/dev/./urandom'
Please make sure to modify the arguments for Server working directory (-Dflexagon.fd.install.root) and Artifacts repository (-Dflexagon.fd.repository.root) as per your installation. Be careful in copying details from browser due to potential character changes.
Setup Logger Configuration
If you are working with a new Tomcat instance that is only running FlexDeploy, you can simply download the logging.properties file and place it in the tomcat/conf folder.
If you are running multiple applications on Tomcat, you will want to edit the logging.properties file as suggested below.
Edit logging.properties in the Tomcat/conf folder.
Add a new handler to the handlers line (starts with handlers=) by adding an additional handler to the end of the list.
, 5fd.org.apache.juli.AsyncFileHandler
Add the following lines to the file:
.handlers = 5fd.org.apache.juli.AsyncFileHandler


5fd.org.apache.juli.AsyncFileHandler.level = ALL
5fd.org.apache.juli.AsyncFileHandler.directory = ${catalina.base}/logs
5fd.org.apache.juli.AsyncFileHandler.prefix = flexdeploy.
5fd.org.apache.juli.AsyncFileHandler.formatter = flexagon.fd.logging.FlexDeployLogFormatter

org.apache.catalina.core.ContainerBase.[Catalina].[localhost].[/flexdeploy].level = INFO
org.apache.catalina.core.ContainerBase.[Catalina].[localhost].[/flexdeploy].handlers = 5fd.org.apache.juli.AsyncFileHandler


.level=INFO
flexagon.level=INFO
org.apache.jasper.servlet.level = WARNING
oracle.adf.share.security.level=SEVERE
oracle.adf.share.jndi.ReferenceStoreHelper.level=SEVERE
WAR Installation
Put the flexdeploy.war file into the webapps folder. It is found in the FlexDeploy-Tomcat.zip file /apache-tomcat-flexdeploy/webapps folder.
If you will be using the Salesforce integration, copy ant-salesforce.jar from the Tomcat_Complete.zip file /apache-tomcat-flexdeploy/lib folder and place it in <TOMCAT_HOME>/lib
Start Tomcat.
Unix
cd <tomcat install>/bin
./startup.sh
Windows
Double click startup.bat in the <tomcat install>\bin folder.