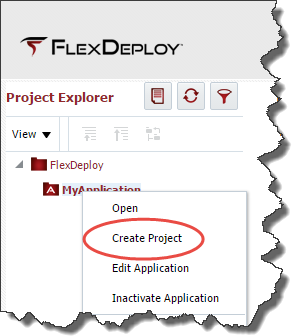
To create a project for Partial Deployment, right-click on the newly created application and select Create Project.
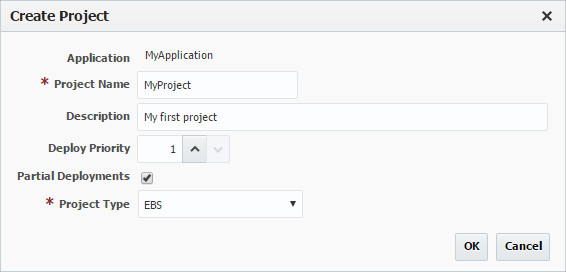
Enter a name and description for the project. Select the Partial Deployments checkbox to identify this project as using the Partial Deployment model described in the introduction, and select EBS as the Project Type.
Click the OK button to create the project. The newly created project will be opened in the editor.
Click the light-blue Configuration tab to enter the required configuration.
Enter the configuration information as shown in the image above.
- Enter the SCM type for your project
- Select the build workflow that was created for EBS
- Select the build instance on which to run the builds. If you are planning to build AOL objects from your development EBS instance, this instance must map to that EBS instance. If you are planning to source all objects from an SCM only then this instance need not be an EBS instance.
- Select the deploy workflow that was created for EBS
- Select your target EBS instance(s)
- Select the SCM instance containing the EBS customizations for this project
- Enter the required attributes for your SCM source code. Additional information on the SCM configuration is available in the FlexDeploy User's Guide.
Click Save to save your changes.
Click the purple Properties tab to enter further configuration.
Enter the Project Properties information as shown in the image above.
- Enter values for the project property that are relevant to your EBS Module. Notice the
FDEBS_APPLICAITON_SHORT_NAMEproperty, if you are deploying a module. If your folder structure in SCM matches the standard folder structure given in the EBS Plugin guide appendix, you can ignore the properties for*ROOT_SOURCE_DIRand*DESTINATION_SOURCE_DIR. Otherwise specify your folders. For destination folders, you can use environment variables defined in the .env script (e.g.$JAVA_TOP). - Click the Save button to save your changes
For more information regarding Project Properties refer to the EBS Plugin Guide.
Configure EBS Objects and their Attributes
For partial EBS deployments, you will have an additional Project Files tab, denoted by the icon. This tab gives you the ability to define the EBS files (candidates for creating packages) and verify their metadata attributes. You can also edit these attributes and build/deploy commands as required.
Note: You can choose to restrict these configurations to an Apps DBA group (or other) if desired. Review the Security section of the FlexDeploy User's Guide for more information.
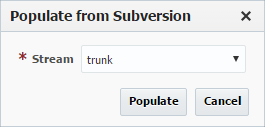
Click on the Project Files tab. Click the Populate from Subversion button (will say "Populate from Git/CVS/TFVC" depending on configured SCM Type). In the window, select the SCM stream you want to retrieve the files from and click the Populate button. All customization files will be retrieved from the SCM, and their metadata will be auto-discovered/defaulted.
For Git, the Git executable must be installed on FlexDeploy server and it must be accessible in its PATH. The Git executable version must be 1.7.9 or higher.
When populating for the first time it can take up to few minutes, depending on the number of files you are managing. After completion you will see the files as shown below.
Each of the files are identified as belonging to one of the supported EBS object types. Verify the metadata for each of your files according to its object type. You can click on the File Types drop down and view the files of different file types as shown below.
Make changes as required and click Save. As with Populate from SubVersion, it may take up to a few minutes the first time if you are managing very large sets of files. All the attributes are validated and error(s) will be displayed if there is any missing information. You can fix any errors and click Save again.
Source AOL files directly from EBS instance
You can directly create files by clicking on the Create button. This is useful if you would like to download AOL files from the source EBS instance at build time rather than sourcing from the SCM. To create a reference to an AOL file, click on the Create button.
The following form will be presented to create the new file. Enter the file name you would like to create (eg: XXHR_CP011.ldt – extension is required) and click the Evaluate button. By default, it generates all details for a Concurrent Program. If your AOL is another type, select the type from the Type dropdown and click Evaluate again.
- Enter the name of the file with extension
- Select the Type from the drop down. Eg: Program (for concurrent program), Menu, Form etc.
- Click on Evaluate button
- Verify all the details (change as needed) and click OK. (you can re-evaluate the calculated fields after modification by selecting the Keep Current Value checkbox, and clicking Evaluate).


