Workflow Creation
- Copy Page Tree
Analytics
At the completion of this section, you will:
- understand the use of workflows in the deployment process
- be able to create/modify a build workflow
- be able to create/modify a deploy workflow
- be able to configure a deployment config plan to manage environment specific urls
A workflow is an orchestration of configurable steps that define a process and determine how the deployment process will execute. Workflows are created once and then configured on multiple projects to define the execution for that project.
There are several types of workflows that can be created (only build and deploy will be used in this tutorial) :
build
Utilized for building a project. Building a project requires retrieving the composite files from the GIT repository using the cloneProjectSources operation of the installed GIT plugin and compiling and creating an SOA artifact using the soaBuild operation of the installed SOA plugin. The cloneProjectSources operation allows the GIT repository information for the composite to be defined once on the project and then retrieved from the project on execution.
deploy
Utilized for deploying a project. Deploying a project requires retrieving the SOA artifact created by the build workflow and deploying the artifact using the soaDeploy operation of the installed SOA plugin.
The workflows provide a consistent, repeatable and re-usable process that will be utilized for every SOA composite.
Create Build Workflow
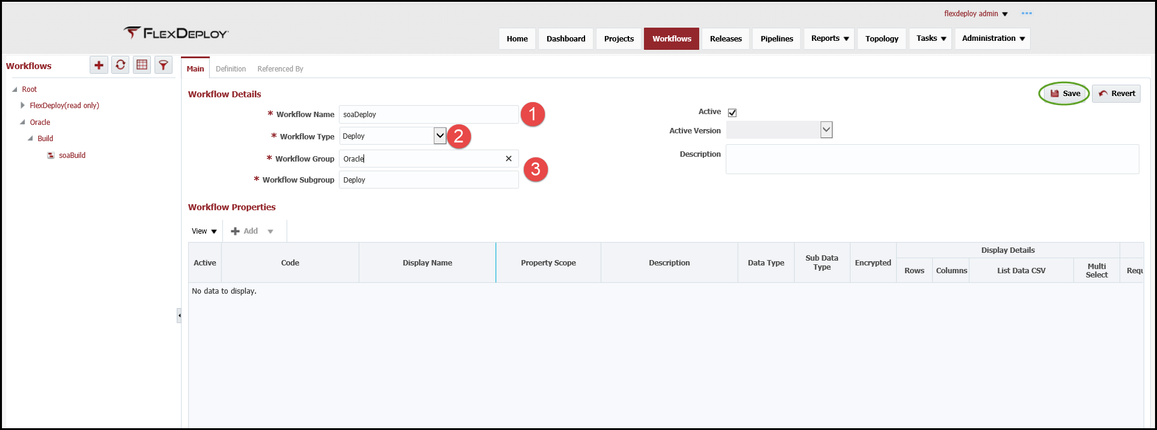
Now that we have a general understanding of why we need a build and deploy workflow, we can start to define the build workflow. Select Workflows from the main menu or from the Home page. Workflows are versioned and there is always a single active version that can be executed, this allows changes to be staged until ready to be activated. Select the + to create a new workflow.

The workflow details screen will allow for the configuration of the build workflow.
- Providing the workflow with a functional name will help find the correct workflow when the project is being created in a later section of the tutorial.
- Select Build as the Workflow Type
- The Workflow Group and Workflow Subgroup are organizational folders for the workflows and the values are completely controlled by the workflow developer, so use functional names that will help find the correct workflow easier.
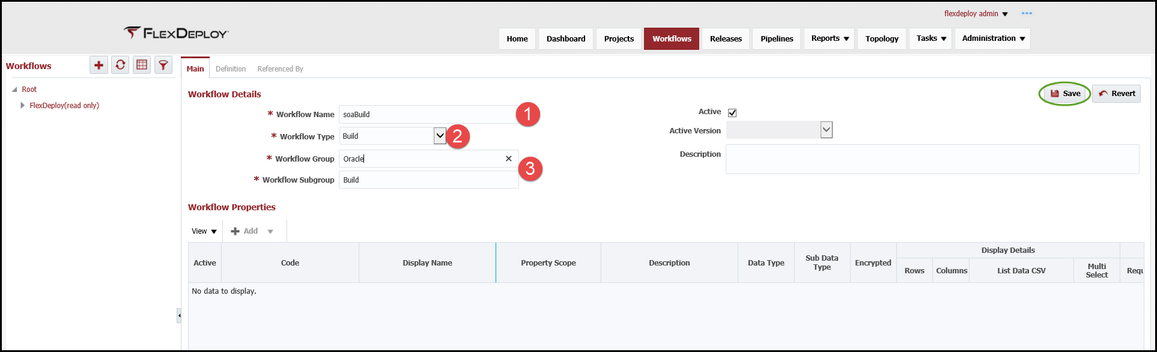
Save the Main configuration and the Definition tab will activate. The Definition is where the orchestration steps for the build will be configured. Configuration is accomplished by dragging the appropriate components from the Workflow Operations and/or the Plugin Operations pane into the center pane between the start arrow and end block (a drop zone will appear as you get close). There are several other features such an Workflow Inputs and Workflow Variables that will not be used in this tutorial.
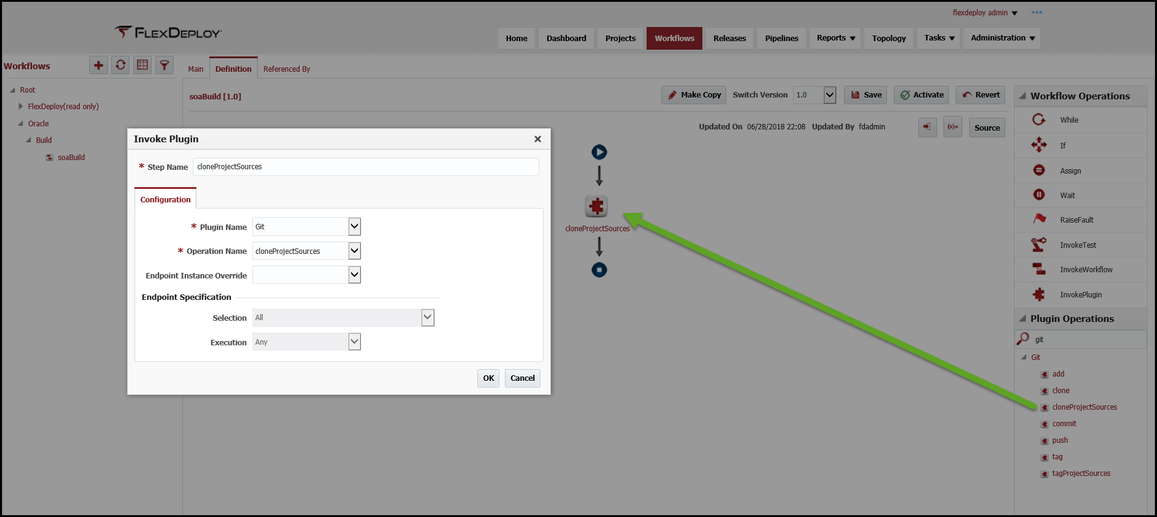
Configure the GIT cloneProjectSources operation by adding it to the center pane and the plugin will open for additional configuration. Since this is the cloneProjectSources operation, there is no configuration required and all composite based information will be retrieved from the project. Select OK. Clicking on any component in the workflow will open up the configuration screen for that component, if a change is needed.
GIT was chosen as the Source Code Management tool for this tutorial, however, FlexDeploy supports many other Source Code Management tools and any one can be used in place of GIT.
Configure the SOA soaBuild operation by adding it to the center pane and the plugin will open for additional configuration. Once again, the soaBuild operation requires no additional configuration. The soaBuild operation knows where the composite was cloned, so the developer doesn't have to worry about the details. At the successful completion of the soaBuild operation, a SAR file will be generated as an artifact and will automatically be pulled back to the artifact repository. Select OK..
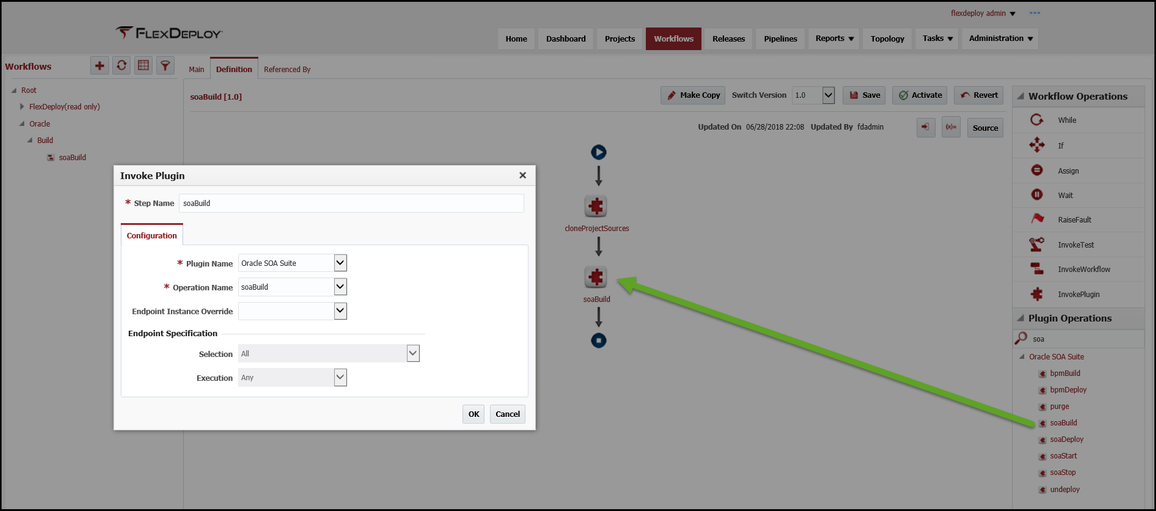
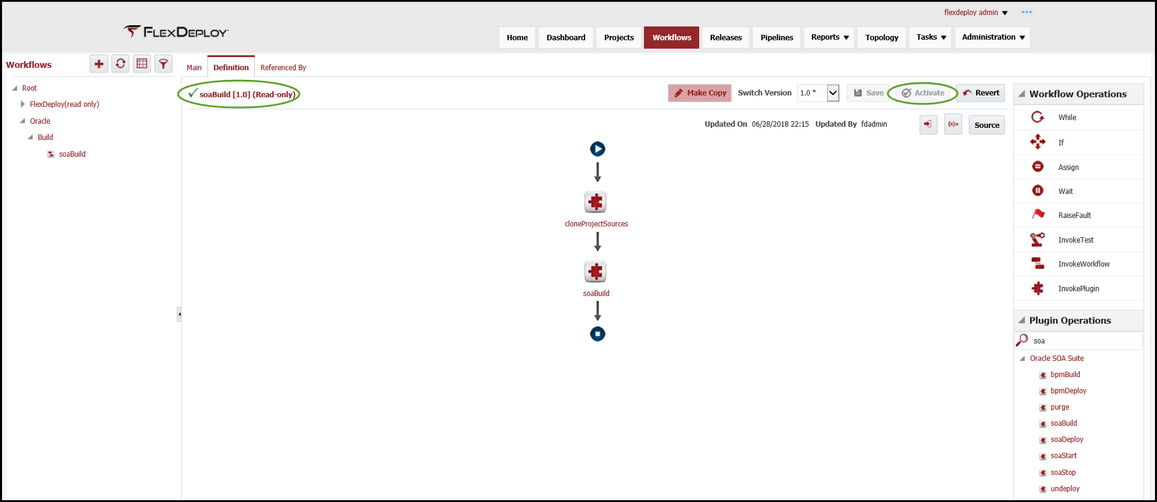
The plugins are intelligent and eliminate as much development work as possible from the developers. Once the components are added, the workflow needs to be saved and/or activated. Saving the workflow changes will only save the current configuration to the database and is used when the developer may not be quite ready to activate these changes. When the developer wants the changes to be executed by projects, the Activate button must be selected. Once the current version of the workflow is activated, the workflow will be marked as read-only and have a green check mark next to it. Active versions can't be modified and require the developer to select Make Copy. This will create a new version and open that version up for editing, the active version will not be changed.
Create Deploy Workflow
Create a new workflow for the deploy by selecting the +. The workflow details screen will allow for the configuration of the deploy workflow.
- Providing the workflow with a functional name will help find the correct workflow when the project is being created in a later section of the tutorial.
- Selecting Deploy for the Workflow type.
- The Workflow Group and Workflow Subgroup are organizational folders for the workflows and the values are completely controlled by the workflow developer, so use functional names that will help find the correct workflow easier.
Configure the SOA soaDeploy operation by adding it to the center pane and the plugin will open for additional configuration. Any composite that contains a URL based partnerLink, such as one composite calling another composite, must have the host name modified to point at the deployed environment. A config plan will be configured on the soaDeploy operation that will provide the host name translation. For the tutorial, three configuration plans have been created and saved with the composite project, one for each environment that will be created so the host names can be translation appropriately across environments. On the soaDeploy operation, we have configured the Deploy Config Plan input. The first thing to do is change the input from a text box to a Groovy script enabled script box by clicking on the red T next to the input and the icon will change to a function icon. Now we can utilize a Groovy script to keep this work generic and re-usable across all composites. The following script will maintain that re-usability but utilizing predefined FlexDeploy variables:
FD_PROJECT_NAME + "_cfgplan_" + FD_ENVIRONMENT_CODE + ".xml"
On deploy execution, the variables will be replaced with the appropriate values for that execution. Examples would look like:
HRSOAServices_cfgplan_DEV.xml
HRSOAServices_cfgplan_QA.xml
Config plans can be global, environment specific or composite specific, depending on customer needs.
The soaDeploy operation will automatically have the artifact generated by the build workflow available. Select OK and activate the workflow.

| Completed 2 of 10 Sections | Continue to End Point Creation | Back to Login |
|---|
Related content
- style