Building Packages (EBS)
We now have our first EBS project, and the catalog of project files populated from our GitHub repository. And finally we are ready to start building packages and deploy them across our topology!
At the completion of this section, you will:
- understand the concept and use of packages in FlexDeploy
- learn the different types of packaging mechanisms
- learn how to monitor and debug the details of build execution
Tip
Here is a good place to note that topology, workflows, project creation is generally performed once and adjusted as required. Populating new objects in the catalog will happen periodically as you create new files in your SCM. Creating packages, and building and deploying them, is an activity where you will live and breath on a daily basis.
If you do not already have the XXHR project open in FlexDeploy, locate it in the Project Explorer and double-click on it (or right-click→Open). There are a few different ways to create a package for the project.
Shopping Cart Style
The first mechanism is by selecting objects from the catalog, and initiating a build request containing those object. This approach is similar to adding objects to a shopping cart and proceeding to the checkout. Navigate to the Project Files (catalog) tab by clicking on the tab. Select the first two objects from the Oracle Application Framework (OAF) JAVA type.
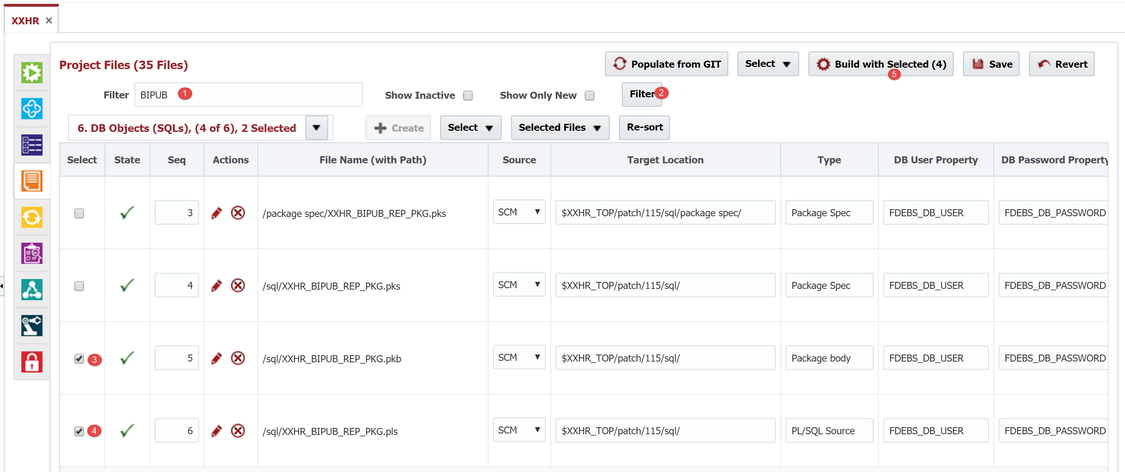
Next, switch to the DB Objects (SQLs) type. Enter BIPUB in the Filter field and click the Filter button. Select the third and fourth file as shown below.
Notice that the number of files selected are shown in the Build with Selected button. Click the button to proceed to the build request form.
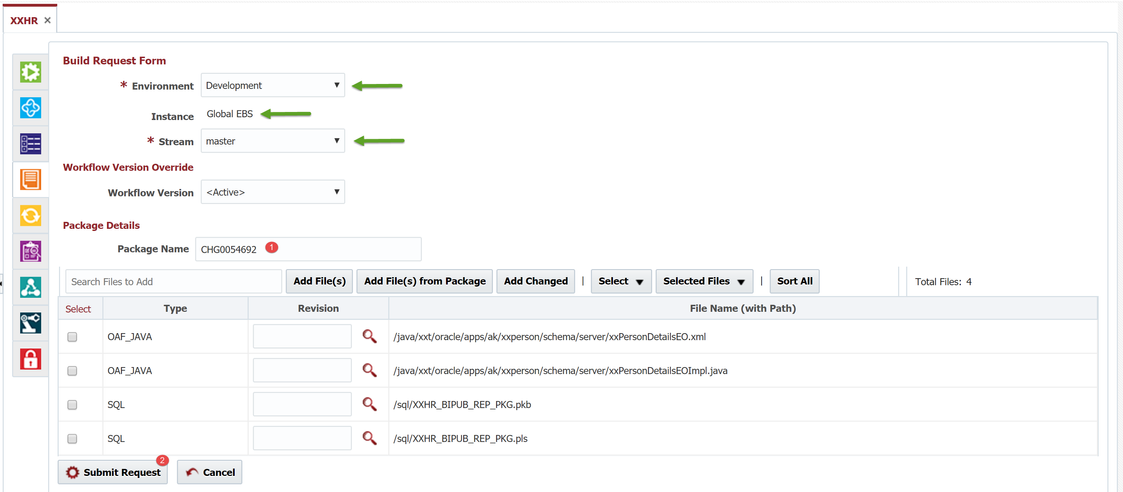
Make note of a few things on the build request form:
- The instance configured on our project is fixed - Global EBS
- Any build environments associated to the instance are available to select from (we only have the Development environment)
- Any streams associated with the project are available to select from (we only have master)
Optionally, enter a package name. If left empty, the package name will default to the generated build number. Naming the package will make it easier to identify and locate down the road.
Tips
The package can be any name or convention that is meaningful to your process. Common approaches are to use a change number from your Change Management System (CMS) or a CEMLI/RICEW identifier if using the Oracle AIM methodology. For this tutorial we will use a fictional change number - CHG0054692.
Selection on the build request form is only used to perform actions against them (e.g. move up/down, remove, etc). All files on the build request form will be included in the package, whether selected or not.
Deployment order can be specified by changing the order of the files listed in the request form. You can also search and add additional files, or remove them from the request form.
Each file allows selection of a particular SCM revision to extract during the build. If left blank, the HEAD (or latest) revision will be used by default.
Click Submit Request to initiate the build of this package. To monitor the execution, click on the Execution tab.
Here you can make note of the build request and build execution details for version 1.0.3 of our CHG0054692 package. To view more detail, click on the generated Execution Id.
On the Execution Steps tab we see the execution details of our build workflow. Notice the Initialize: Extract Project Files (Revisions) step. This is an implicit step that is injected into the build workflow when using partial deployment. This step extracts the source code for the package files from the configured SCM. These files are then available for the EBS Build step to assemble them into an artifact, which is versioned (1.0.3) in the artifact repository.
After the build completes we can see the artifact on the Artifacts tab, and see details of the files within it on the Files tab.
Searching for Objects by Name or Path
Another mechanism for creating and building a package is to select Build→Select Files from the execution tab.
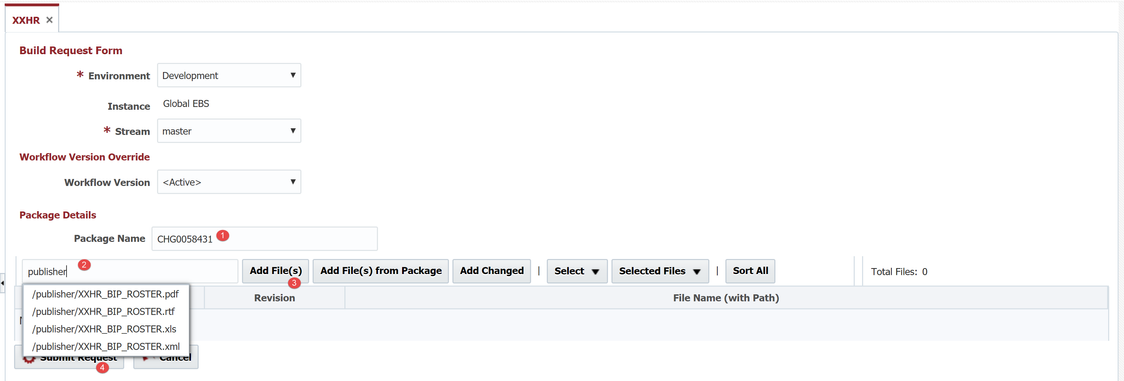
This option will take you to the same build request form, but will instead by empty. You can add files by searching by name/path and adding them to the request.
Enter a package name of CHG0058431. Search for publisher, and click Add File(s) to add all files matching the criteria to the request form. Click Submit Request to build the package. You can again monitor the build request and execution on the Execution tab.
Rebuilding an Existing Package
Now suppose you need to make a modification to one of the files in your package in GitHub. After pushing the change to the master branch, we need to initiate a new build. To rebuild an existing package, click on the single gear icon next to the project version you want to rebuild. Here we will rebuild project version 1.0.3 of the CHG0054692 package.
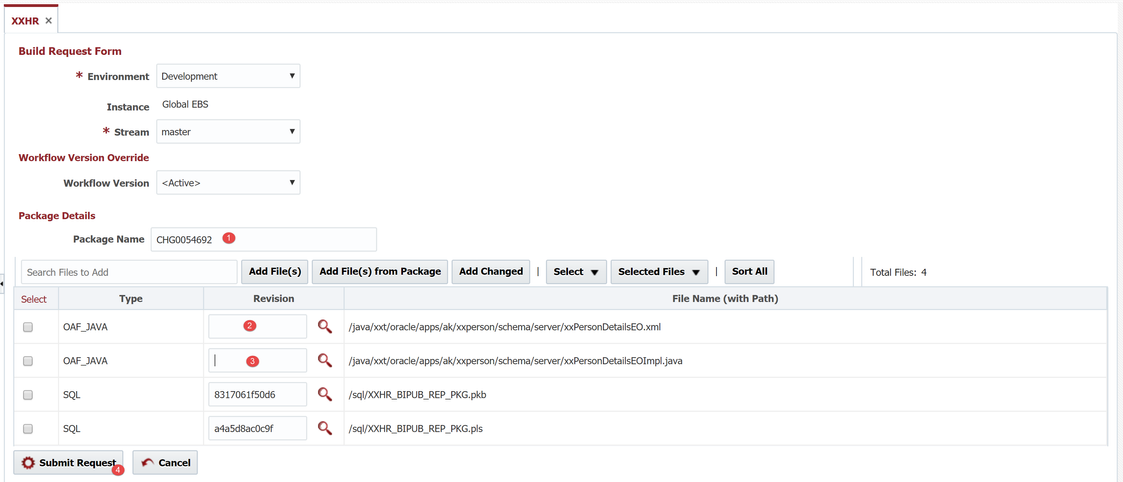
Clicking the gear icon will again launch the build request form with package name pre-filled and the same project files added. Also note that the request form selects the SCM revisions of the previous build. To pick up the latest revisions we will clear out the revision numbers of the changed files.
Click Submit Request to execute the build request. You can again monitor the build request and execution on the Execution tab.
Notice in the image above that you can view the execution detail even while it is still executing. Drilling into the execution id, you can watch the steps in the workflow progress and view the logs rolling in real-time.
| Completed 9 of 11 Sections | Continue to Deploying Packages | Back to Project Configuration |
|---|
- style


