An Instance is a logical concept representing a technology running in one or more environments. For example,
- You may have an Oracle SOA Suite instance (SOA1) for most composites, and a second instance (SOA2) for hosting composites which contain sensitive information such as financial or HR related data.In this case, you would create two Instances in FlexDeploy named SOA1 and SOA2. You can define Name and Code for instances as per what makes sense for your topology.
- You may have a requirement to perform builds using multiple versions of JDeveloper, such as JDeveloper 11.1.1.9 and JDeveloper 12.2.1. In which case you can create JDEV11119 and JDEV1221 instances. Then you can associate each instance with one or more environments, and describe which endpoints fit in each Environment/Instance combination.
Example #1 Instances for ADF Build/Deploy
| Instance Code | Instance Name | Notes |
|---|---|---|
| ADF11119 | ADF 11.1.1.9 | ADF runtime 11.1.1.9 installation with WebLogic 10.3.6 |
| ADF1221 | ADF 12.2.1 | ADF runtime 12.2.1 installation with WebLogic 12.2.1 |
| JDEV11119 | JDeveloper 11.1.1.9 | JDeveloper 11.1.1.9 installation |
| JDEV1221 | JDeveloper 12.2.1 | JDeveloper 12.2.1 installation |
Example #2 Instances for ADF Build/Deploy
This is simple variation from Example #1 above, where Build and Deploy instances are named so that users can easily match Build with Deploy instance.
| Instance Code | Instance Name | Notes |
|---|---|---|
| ADF11119 | ADF 11.1.1.9 | ADF runtime 11.1.1.9 installation with WebLogic 10.3.6 |
| ADF1221 | ADF 12.2.1 | ADF runtime 12.2.1 installation with WebLogic 12.2.1 |
| ADFBUILD11119 | ADF Build 11.1.1.9 | JDeveloper 11.1.1.9 installation |
| ADFBUILD1221 | ADF Build 12.2.1 | JDeveloper 12.2.1 installation |
There are 4 types of instances:
- Instances - represent a software technology that supports build and/or deploy.
- SCM (Source Code Management) Instances - represent a source code management system such as Subversion, Git, TFS, CVS, etc. Holds properties necessary to authenticate. The paths to specific projects in the SCM are contained in the project instead so that the instance can be used across many projects.
- Test Instances - represent a software test tool. Holds properties necessary to run tests, and allows the properties to be used wherever the test is run.
- Issue Tracking System Instances - represent an Issue Tracking System. Currently JIRA is supported. The settings on this instance allow FlexDeploy to authenticate and manage tickets in the issue tracking system.
Viewing Instances
To view the list of instances defined within FlexDeploy, select Topology -> Instances from the menu.
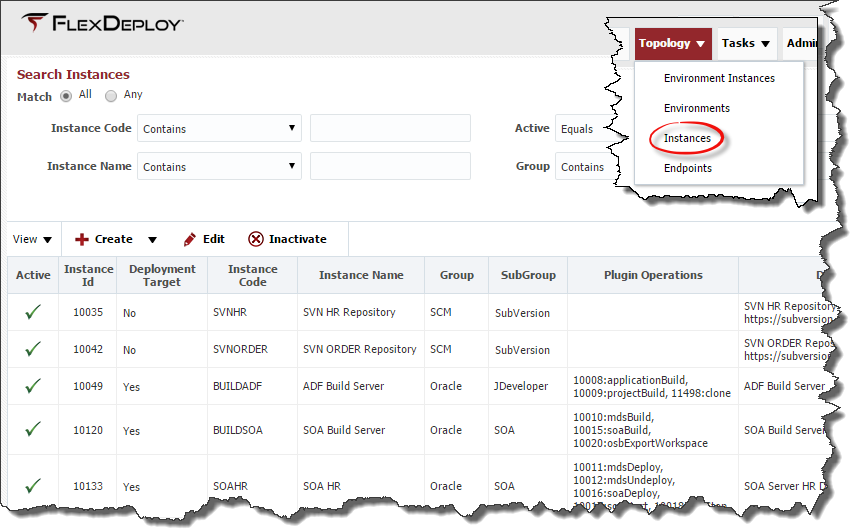
By default, all active instances are displayed in the search results. To refine the search results, select one or more criteria options and click on the Search button. Select the Any radio button to indicate the search results should include instances matching any of the specified criteria, or the All radio button to indicate that the search results should only include instances matching all of the specified criteria. Click on the Reset button to return to the default search criteria form.
Creating/Editing an Instance
Creating/Editing a Test Instance
To create a test instance, click the Create button and select Test Instance. To edit an existing instance, select an instance and click the Edit button.
Enter values for the fields as described in the table below.

Field Name | Required | Description |
|---|---|---|
Instance Code | Yes | Short name for the instance. |
Instance Name | Yes | Long display name for the instance. |
Testing Tool | No | The testing tool that will be run on this test instance. |
Description | Yes | A description of the instance. |
Active | Yes | Whether or not the instance is active in the system. Defaults to "Yes". |
If the selected testing tool has any properties defined, then you can set up values for those properties on the first screen of the wizard.
Click the Next button to associate Environments to this instance.

Shuttle environments from Available Environments to Selected Environments to associate them to this instance. To disassociate environments from the instance, shuttle the environments from Selected Environments back over to Available Environments. If you already associated the instance to one or more environments using the Environment Wizard you will notice that the association carries forward here, since it is bi-directional.
Click the Save button to save the changes.
Creating/Editing an Issue Tracking Instance
To create an Issue Tracking System instance, click the Create button and select Issue Tracking System Instance. To edit an existing instance, select an instance and click the Edit button.
Enter values for the fields as described in the table below.

Field Name | Required | Description |
|---|---|---|
Instance Code | Yes | Short name for the instance. |
Instance Name | Yes | Long display name for the instance. |
Issue Tracking System | No | The issue tracking system that will be used. |
Description | Yes | A description of the instance. |
Active | Yes | Whether or not the instance is active in the system. Defaults to "Yes". |
If the selected Instance Tracking System has any properties defined, then you can set up values for those properties on the first screen of the wizard.
Click the Save button to save the changes.
Inactivating/Activating Instances
To inactivate an Instance at any time, select an existing instance and click the Inactivate button. This will temporarily hide that instance until, a search is performed where the criteria for Active is switched to "No". To reactivate an instance, select the desired instance and click the Edit button. Then change the drop down menu for active to "Yes" and click Save. This instance is now active in the system again and ready for use.