This explanation is in context of EBS partial deployment project, but it would apply to other types of partial deploy projects as well.
- Packages are built as result of build workflow execution and can contain all files or selected files from project.
- Package name is optional but it is good idea to use package name for easier identification. All files package will always use auto generated name matching version name.
- Packages built using select files can be rebuilt using "Re-Build Package With Same File." button on Project activity. This allows for package refinement over course of delivery of the specific feature/fix.
- You can look for specific package using filter button on project activity. This will help you rebuild package easily.
Continuous Integration
Continuous Integration (i.e. polling or schedule based build) is only supported when using all files approach at this point. See below some examples of Project setup and implications on Continuous Integration.
- Project as per Option 1 on Source Control Folder Structure
- Single project is setup in FlexDeploy with all files of specific custom top.
- If you would like to perform build and deploy of all files then you will be able to setup CI. In this case you will be relying on SCM branching support to manage code being delivered.
- If you would like to maintain many packages for delivery then CI is not yet supported.
- Support in Release
- You can add this type of project to Release to deploy All Files or deploy one or more packages.
- If you use all files approach in Release, you can add project only once in Release as it contains all files. If you use package (select files) approach, then you can add same project multiple times in Release as different package name.
- If project is added to Release as package (select files), then select files can be defined on the release configurations. At build time, developers will see package name as list of values when working with Release.
- Project as per Option 4 defined on Source Control Folder Structure
- Using this approach you will setup many projects each containing specific set of files from SCM for specific custom top. You will need to maintain separate folder structure in SCM to achieve as explained in Source Control Folder Structure.
- Projects setup using this approach are more suitable for all files approach. You can still do select files but as only specific set of files from project but by definition as such projects contain less number of files, it would work fine with all files approach.
- As always when you use all files approach, you will be relying on SCM branching support to manage code being delivered. CI is supported when using all files approach only.
- Support in Release
- Release definition is mostly same except some subtle differences as we now have more projects with this setup.
- You can add project to Release to deploy All Files or deploy one or more packages.
- If you use all files approach in Release, you can add project only once in Release as it contains all files. If you use package (select files) approach, then you can add same project multiple times in Release as different package name.
- If project is added to Release as package (select files), then select files can be defined on the release configurations. At build time, developers will see package name as list of values when working with Release.
- As we are using finer grained projects, it makes sense to use all files approach and take advantage of CI support.
Build Package Procedures
There are many options available to initiate build packages (select files), but for all options you have access to modify files and/or revisions. For example,
- Use keywords to find and add files. If you type ldt in Search Files to Add and click Add File(s), you will be adding all files that contain text ldt.
- Add Files(s) from Package - this is similar to option 1, but it allows for adding files easily from previously built package.
- Add Changed - this option works well when you have committed new files that you want added to package.
- Select and Selected Files - these menu options allow for removal, move up/down or clear revision actions. Mostly used options are to remove specific files and clearing revisions column to pull new revision of files.
- Sort All - files are always appended to package but if you want to sort files based on files definition sequence then use Sort All button.
Use actions described above to refine your package details.
Build new package from scratch
This option is to create new package that is not part of Release.
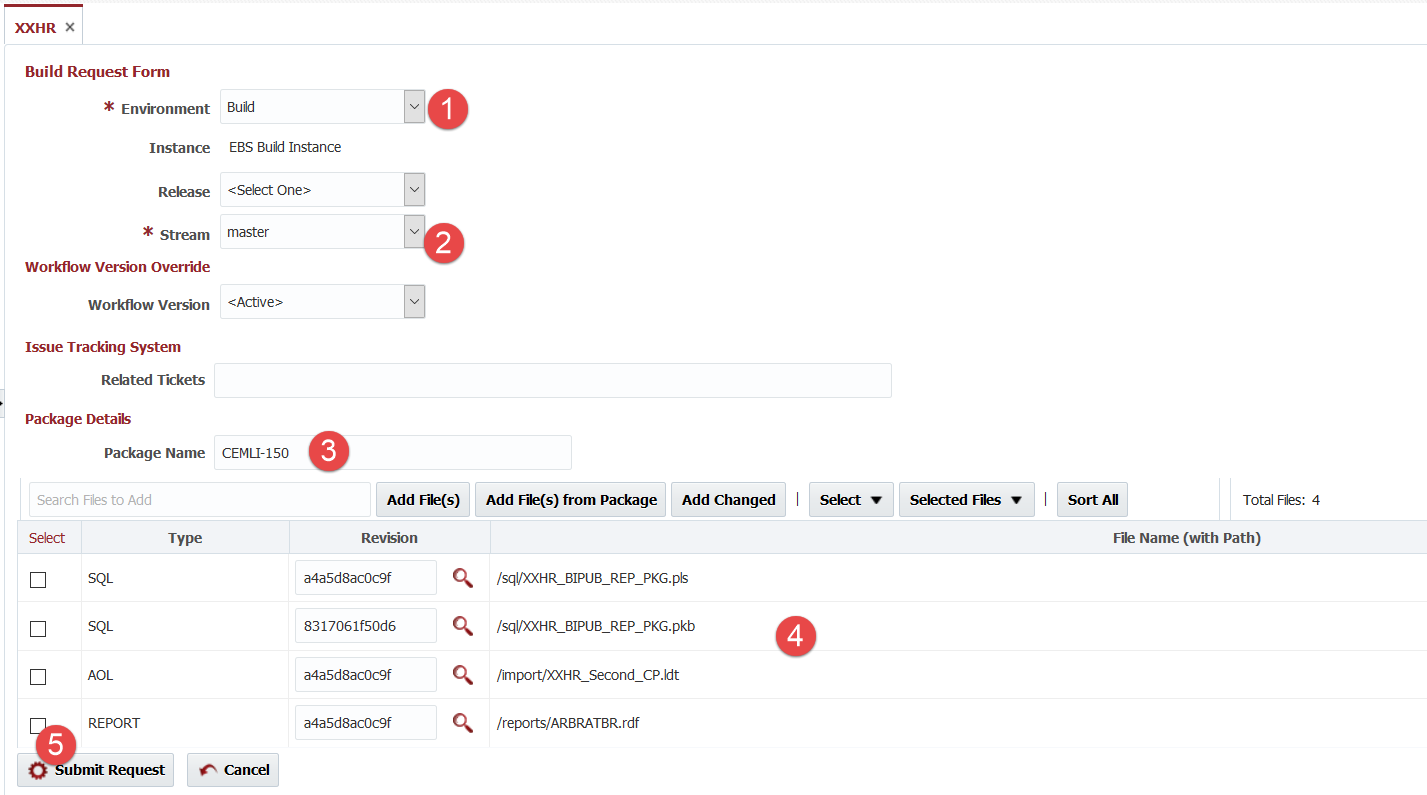
Start with Build - Select Files button on Project.
- Select appropriate values for Environment, Stream.
- Make sure to enter Package Name otherwise it will default to version name.
- Package name can be anything you like, but it can only contains letters, numbers, underscore, dash and dot. Package name can represent specific extension or feature request id or hotfix number.
- Add files necessary for this specific package.
- Click Submit Request.
- When build request completes successfully, you have package ready for deployment.
Package build is completed after some time.
Rebuild existing package
Start process by finding the package that you want to rebuild. If it is on the first page it is just easy to locate it, but you may have to use Filter option.
Once you have located package, you can use Rebuild option.
This will bring you back to build request form that is pre-populated with details of existing package.
As described earlier now you can adjust the files and/or revisions for package and click Submit Request. When build request is successful you will have new version of package. Keep in mind that package has version that uniquely identifies it from previous builds of same package.
Build new package for release
In this example, we will be using Release with packages. Let's look at an example of Release where we have few different packages for a project.
Each package has files defined which can be managed by Manage Files link.
Definition of files inside a package can be done when package is built as well.
We will start build process with Build - Select Files option.
As we are using Release, we will be selecting release for this package build. Note that in this case, package name is drop down of packages configured in Release. Click Submit Request to finish build of package.
When build completes, we will have new package built and ready for deployment.
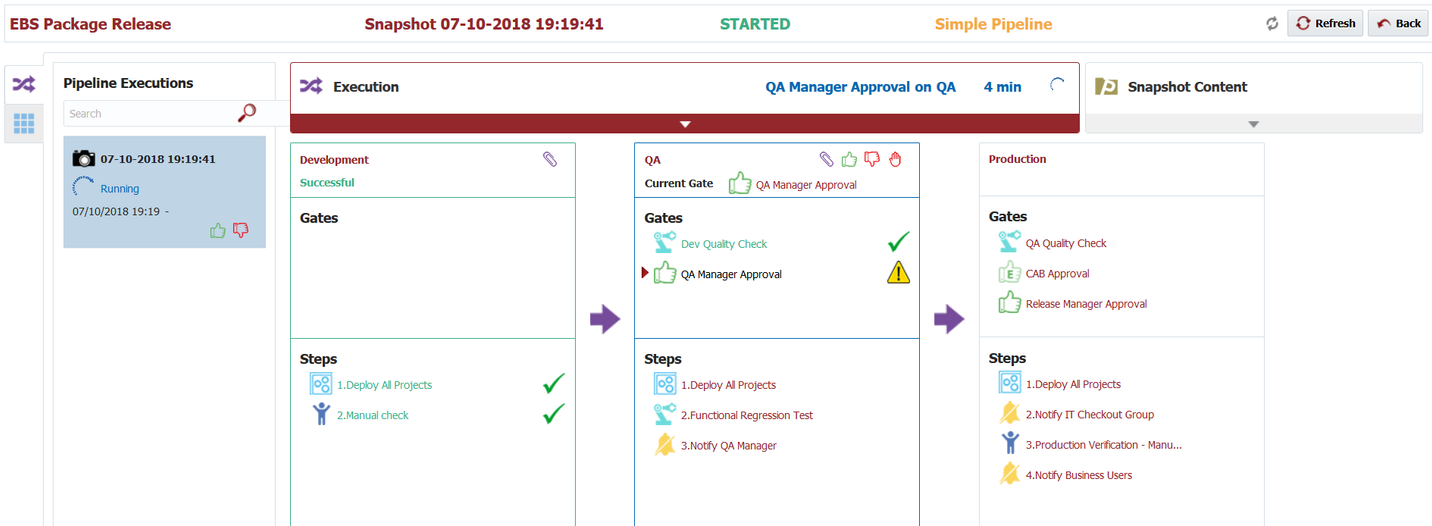
As we are using release and pipelines, new snapshot is created and ready for execution on completion of build.
At this point, we only have one package built for this release, so we have only one item in snapshot for release. As other packages are built, snapshot will evolve to contain new versions of packages.
Deployment is also finished as per pipeline that is selected on this release.
In this example, we have manual check for deployment (definition of pipeline is entirely up to you and it is good idea to avoid manual steps). Once manual check is completed, deployment is ready for next environment.
This process will continue as packages are built for first time and built again. FlexDeploy will perform change detection at file level for packages, so if file version was already deployed it will be skipped.
Release snapshot will deploy as a unit to specific environment, i.e. if it contains 3 packages all 3 packages and all of its files will deploy. Reason for setup of Pipeline is to create packages and deploy them consistently through pipeline stages.
Rebuild existing package for release
This process is same as Rebuild existing package when not using Release, only difference is that you will see Release selected as it was selected in previous build of the release package. As files are defined on package definition in release, you can also use Create Snapshot option for Release or Build new package for release and final result would be same.


