...
- Ensure Java 7 or Java 8 is installed on the server.
- Extract the zip file in the desired location (referred to as "FlexDeploy Home"). See example below, where zip was extracted in C:/installs/FlexDeploy folder.
Setup the database for FlexDeploy, if you have not already done so.
Modify the following Tomcat configuration files as follows:
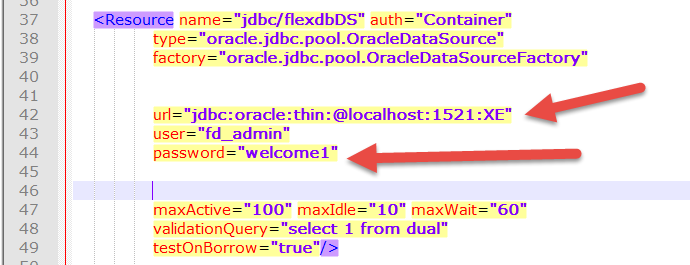
<FlexDeploy Home>/apache-tomcat-flexdeploy/conf/context.xml
Replace **CONNECT_STRING** with JDBC connect string of your database containing the FlexDeploy schemas
Replace **FD_ADMIN_PASSWORD** with the password of the FD_ADMIN database user. You would have supplied password when you ran Database installation scripts.
For example, a localhost XE connection will look like this. jdbc:oracle:thin@localhost:1521:XE
<FlexDeploy Home>/apache-tomcat-flexdeploy/conf/server.xml
By default, the Tomcat server is configured to run on port 8000. If this port is in use, change to some other unused port. Search for <Connector port="8000" protocol="HTTP/1.1" if you want to change it
<FlexDeploy Home>/apache-tomcat-flexdeploy/bin/setenv.sh (setenv.bat on windows)
Replace **FLEXDEPLOY_WORKING_DIR** with directory to use as the FlexDeploy working directory (See Create Folders for FlexDeploy Server - FlexDeploy Working Directory)
Replace **FLEXDEPLOY_ARTIFACT_DIR** with the directory to host the FlexDeploy artifact repository (See Create Folders for FlexDeploy Server - FlexDeploy Artifact Repository)Tip If JAVA_HOME isn't already set in your environment, it would be a good idea to set it in this file as well. Otherwise, it can be set manually before starting the server.
For example below, we created artifacts and work directories under C:/installs/FlexDeploy
For this example (Windows) we modified setenv.bat as shown below.
If you were also setting JAVA_HOME, this file would look like this.
Download- ADF Essentials comes with the Oracle
- JDBC driver and place in <FlexDeploy Home>/apache-tomcat-flexdeploy/lib
- for Oracle 11g drivers
- database ( ojdbc6
- ojdbc6dms.jar). If you are using Oracle 12c database, you can download the driver from the Oracle Technology Network site. (ojdbc7.jar)
Note If adding another JDBC driver, be sure to remove the default one which comes with the ADF Essentials libraries (ojdbc6dms.jar). If you leave multiple JDBC drivers in the lib folder, you could encounter the following exception on startup:
java.lang.SecurityException: sealing violation: package oracle.jdbc is sealed
at java.net.URLClassLoader.getAndVerifyPackage(Unknown Source)
at java.net.URLClassLoader.definePackageInternal(Unknown Source)
at java.net.URLClassLoader.defineClass(Unknown Source)
at java.net.URLClassLoader.access$100(Unknown Source)
at java.net.URLClassLoader$1.run(Unknown Source)
- If using IBM ClearCase, you will need to copy some jar files from your ClearCase server or ClearTeam Explorer installation to the FlexDeploy installation.
- Copy all of the jar files found in the com.ibm.rational.teamapi_8.0.1.vxxx folder of your ClearCase server or ClearTeam Explorer installation to <FlexDeploy Home>/apache-tomcat-flexdeploy/lib. (commons-codec-1.3.jar, commons-lang-2.3.jar, icu4j-4_8.jar, remote_core.jar, stpclientws.jar, stpcq.jar, teamapiextensions.jar, unicodetypemgr.jar, commons-httpclient-3.0.jar, commons-logging-1.0.4.jar, icu4j-charset-4_8.jar, stpcc.jar, stpcmmn.jar, stpwvcm.jar, ucleardiffmerge.jar)
- Copy all of the jar files found in the com.ibm.rational.teamapi_8.0.1.vxxx folder of your ClearCase server or ClearTeam Explorer installation to <FlexDeploy Home>/apache-tomcat-flexdeploy/lib. (commons-codec-1.3.jar, commons-lang-2.3.jar, icu4j-4_8.jar, remote_core.jar, stpclientws.jar, stpcq.jar, teamapiextensions.jar, unicodetypemgr.jar, commons-httpclient-3.0.jar, commons-logging-1.0.4.jar, icu4j-charset-4_8.jar, stpcc.jar, stpcmmn.jar, stpwvcm.jar, ucleardiffmerge.jar)
- Linux only - set the shell scripts executable with this command: chmod +x <FlexDeploy Home>/apache-tomcat-flexdeploy/bin/*.sh
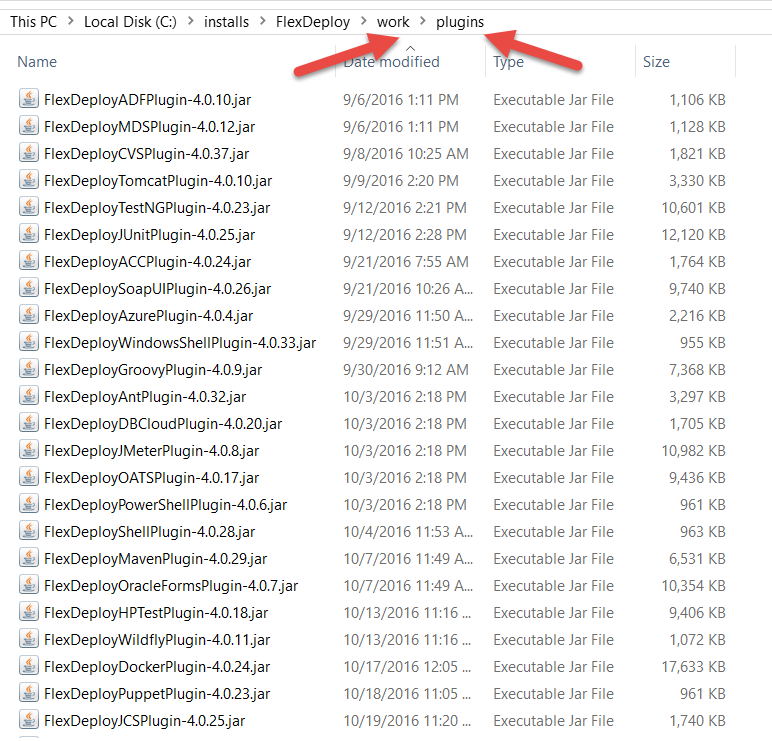
- At startup, FlexDeploy will load all the plugins. As per details provided in Loading FlexDeploy Plugins, create a folder called plugins inside your FlexDeploy working directory. Move or copy all the jar files from <FlexDeploy Home>/plugins to FLEXDEPLOY_WORKING_DIR/plugins. See the example below.
- Start tomcat by running the following script. Make sure to set JAVA_HOME to JDK 7 or JDK 8 if not already set in your environment.
- <FlexDeploy Home>/apache-tomcat-flexdeploy/bin/startup.sh (startup.bat on Windows)
- <FlexDeploy Home>/apache-tomcat-flexdeploy/bin/startup.sh (startup.bat on Windows)
- Launch FlexDeploy in your browser
- http://<hostname>:<port>/flexdeploy
- default credentials are fdadmin/welcome1


