- Create a user in IAM for FlexDeploy to connect with, and put that user in at least oneIAMgroup with any desired permissions.See Adding Users. You can skip this if the user exists already.
Prepare / gather necessary configuration items.
- RSA key pairin PEM format(minimum 2048 bits). See Generate an API Signing Key.
- Fingerprint of the public key. See How to Get the Key's Fingerprint.
- Tenancy's OCID and user's OCID. See Where to Get the Tenancy's OCID and User's OCID.
- Upload the public key from the key pair in the Console. See How to Upload the Public Key.
Create User in IAM
Create a user in IAM for FlexDeploy to connect with, and put that user in at least oneIAMgroup with any desired permissions.See Adding Users. You can skip this if the user exists already.
Prepare and Upload PEM Key
This key pair is not the SSH key that you use to access compute instances.
Both the private key and public key must be in PEM format (not SSH-RSA format). The public key in PEM format looks something like this.
-----BEGIN PUBLIC KEY-----
MIIBIjANBgkqhkiG9w0BAQE...
...
-----END PUBLIC KEY-----
Generate API Signing Key
You can use the following OpenSSL commands to generate the key pair in the required PEM format. If you're using Windows, you'll need to install Git Bash for Windows and run the commands with that tool.
Step 1. If you haven't already, create a .oci directory to store the credentials:
mkdir ~/.oci
Step 2. Generate the private key with one of the following commands.
Step 2.1. (Recommended) To generate the key, encrypted with a passphrase you provide when prompted.
openssl genrsa -out ~/.oci/oci_api_key.pem -aes128 2048
Note: For Windows, you may need to insert -passout stdin to be prompted for a passphrase. The prompt will just be the blinking cursor, with no text.
openssl genrsa -out ~/.oci/oci_api_key.pem -aes128 -passout stdin 2048
Step 2.2. To generate the key with no passphrase.
openssl genrsa -out ~/.oci/oci_api_key.pem 2048
Step 3. Ensure that only you can read the private key file:
chmod go-rwx ~/.oci/oci_api_key.pem
Step 4. Generate the public key.
openssl rsa -pubout -in ~/.oci/oci_api_key.pem -out ~/.oci/oci_api_key_public.pem
Note: For Windows, if you generated the private key with a passphrase, you may need to insert -passin stdin to be prompted for the passphrase. The prompt will just be the blinking cursor, with no text.
openssl rsa -pubout -in ~/.oci/oci_api_key.pem -out ~/.oci/oci_api_key_public.pem -passin stdin
Step 5. Copy the contents of the public key to the clipboard using pbcopy, xclip or a similar tool (you'll need to paste the value into the console later. For example:
cat ~/.oci/oci_api_key_public.pem | pbcopy
Your API requests will be signed with your private key, and Oracle will use the public key to verify the authenticity of the request. You must upload the public key to IAM which is explained later.
Get Fingerprint for Key
openssl rsa -pubout -outform DER -in ~/.oci/oci_api_key.pem | openssl md5 -c
When you upload the public key in the console, the fingerprint is also automatically displayed there. It looks something like this:.
12:34:56:78:90:ab:cd:ef:12:34:56:78:90:ab:cd:ef
Upload Public Key to IAM
You can upload the PEM public key in the console, located at https://console.us-ashburn-1.oraclecloud.com. If you don't have a login and password for the console, contact an administrator.
- Open the console, and sign in.
View the details for the user who will be calling the API with the key pair.
- If you're signed in as this user, click your username in the top-right corner of theConsole, and then clickUser Settings.
- If you're an administrator doing this for another user, instead clickIdentity, clickUsers, and then select the user from the list.
- ClickAdd Public Key.
- Paste the contents of the PEM public key in the dialog box and clickAdd.
The key's fingerprint is displayed (for example, 12:34:56:78:90:ab:cd:ef:12:34:56:78:90:ab:cd:ef).
Notice that after you've uploaded your first public key, you can also use theUploadApiKeyAPI operation to upload additional keys. You can have up to three API key pairs per user. In an API request, you specify the key's fingerprint to indicate which key you're using to sign the request.
Both OCIDs are in theConsole, which is located athttps://console.us-ashburn-1.oraclecloud.com. If you don't have a login and password for theConsole, contact an administrator. If you're not familiar with OCIDs, seeResource Identifiers.
Tenancy's OCID
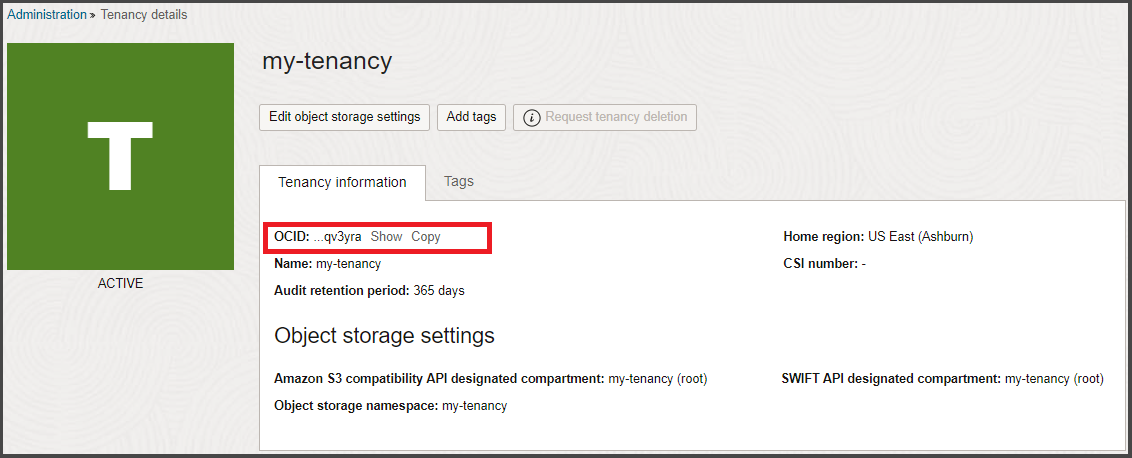
Get the tenancy OCID from theOracle Cloud InfrastructureConsoleon theTenancy Detailspage:
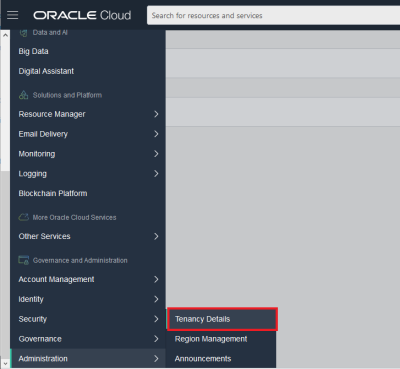
Open thenavigation menu, underGovernance and Administration, go toAdministrationand clickTenancy Details.
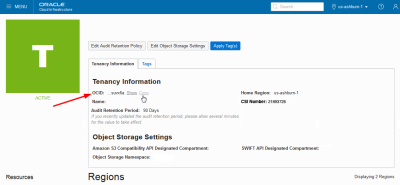
The tenancy OCID is shown underTenancy Information. ClickCopyto copy it to your clipboard.

User's OCID
Get the user's OCID in theConsoleon the page showing the user's details. To get to that page:
- If you're signed in as the user: Open theUsermenu (
 ) and clickUser Settings.
 - If you're an administrator doing this for another user: Open thenavigation menu. UnderGovernance and Administration, go toIdentityand clickUsers. Select the user from the list.