This page provides instructions for upgrading a FlexDeploy installation to the latest version.
Upgrade Instructions
Step 1. Stop the Tomcat server. Use shutdown.sh on Linux and shutdown.bat on Windows.
Step 2. Backup the FlexDeploy schemas and Artifact Repository. In case you need to back out FlexDeploy, you can use these backup data.
For back-out purposes, it is highly recommended that a database backup of the database be taken using standard tools like RMAN for Oracle. Another option would be to export the FD, FD_ADMIN, and FF schemas using data pump. The schemas can be exported using the following data pump command for Oracle as shown below. Follow standard procedures for PostgreSQL and MySQL for database backup.
Recommendation for Oracle database backup
expdp system directory=DATA_PUMP_DIR dumpfile=fd_bkup.dmp schemas=FD,FF,FD_ADMIN
If this database is exclusively used for just FlexDeploy application, you can rely on Database backup and recovery processes (RMAN)
instead of export data procedure.
It is recommended that a backup of the artifact repository file system be taken in case a back-out is required. The location of the artifact repository can be identified by looking at value of -Dflexagon.fd.repository.root in setenv.sh or setenv.bat file. This file will be in <FlexDeploy Home>/apache-tomcat-flexdeploy/bin/. Standard file backup procedures can be followed. Optionally, the following command (unix only) can be used to create a tar file backup of the entire directory.
Backup Artifact Repository
cd <artifact repository location>
tar –cvzf artifact.tar.gz <artifact repository location>
Step 3. Upgrade the FlexDeploy schemas
From the downloaded zip file, extract the /database/oracle/upgrade folder. This folder includes a number of folders containing migration.sql and patch release SQL files, which upgrade the FlexDeploy schemas.
FlexDeploy 5.1 migration includes updates to Unique Constraint for FF.DB_PROPERTIES_DATA. If you have duplicates then it needs to be fixed up prior to starting migration. Run following SQL to check if there are any duplicates. If there are duplicates, work with Flexagon support team to resolve prior to migration.
SELECT * FROM (SELECT DB_PROPERTIES_ID, SEQUENCE_NUMBER, COUNT(1) NUMROWS
FROM FF.DB_PROPERTIES_DATA
GROUP BY DB_PROPERTIES_ID, SEQUENCE_NUMBER)
WHERE NUMROWS>1;
You will need to execute one or more SQL script(s) from the version of FlexDeploy you currently have, up to the latest version. And they must be executed in that order.
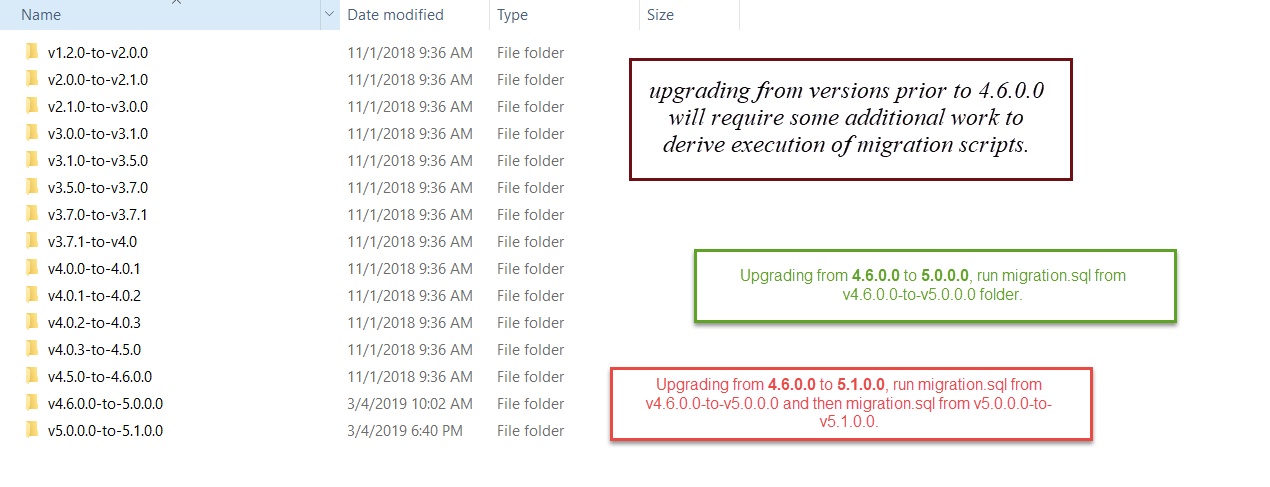
Follow this guideline when deriving SQL files to be executed.
Current version is 4.6.0.0 or higher
- Look at Build Version in About window.
Current version is before 4.6.0.0
- You can find which files that you may have already executed by doing "select version, created_on, created_by from fd.fd_flexdeploy_version order by created_on desc" database query.
- Or you can view list of patches by using Administration - FlexDeploy Patches in FlexDeploy.
See some examples below to help you understand database upgrade process.
v5.0.0.0-to-v5.1.0.0/migration.sql
The 4.0.2-to-4.0.3/migration.sql file includes all of the 403PatchRelease*.sql files in it. Patch Release SQL files are only necessary if you are on a 4.0.3 or 4.5.x Release.
If you are upgrading from a 4.0.3 Patch Release, follow the date based SQL files in sequence by Date. If you have already a applied specific Patch Release patch then skip it. You can make determination of which Patch Release files to run by looking at Build Time on the About window of your FlexDeploy installation that you saved from a previous step. After completing the last 403PatchRelease, run the migration4.0.3_to_4.5.0.sql file and v4.5.0-to-v4.6.0.0/migration.sql. Contact Flexagon support for details if you are not sure. See example below.
Executing migration files
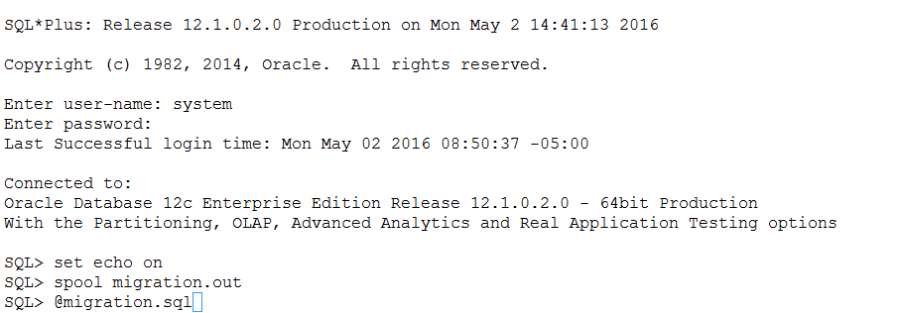
These scripts should be executed as system, sys, or another user which has privileges to create objects in other schemas, performs grants, etc. You can load and execute these scripts using other tools such as Toad or SQL Developer, but the instructions here are for using the sqlplus client. Following is example of script execution for Oracle, for PostgreSQL & MySQL use appropriate tools to execute migration scripts.
sqlplus
Oracle sqlus is part of the Oracle Client, and may be executed on any host which has it installed. If the Oracle Client is not installed on the same host as where you are installing FlexDeploy, you can copy the scripts to another host which has it installed.
Make sure to spool output to a file, so it can be analyzed later if necessary.
To launch sqlplus:
export ORACLE_HOME=<your Oracle Home directory>
export ORACLE_SID=<the SID of your database>
spool migration4.5.0.out #(change for each script execution so logs are preserved)
$ORACLE_HOME/bin/sqlplus #(login as sys or system when prompted)
SQL> <<execute scripts as shown above>>
If running on another host other than the database server, you must update your tnsnames file and and launch sqlplus as follows:
export ORACLE_HOME=<your Oracle Home directory>
export ORACLE_SID=<the SID of your database>
spool migration4.5.0.out #(change for each script execution so logs are preserved)
$ORACLE_HOME/bin/sqlplus system@<tnsname>
SQL> <<execute scripts as shown above>>
For example,
Step 4. From the FlexDeploy Tomcat distribution, copy /apache-tomcat-flexdeploy/webapps/flexdeploy.war into <FlexDeploy Home>/apache-tomcat-flexdeploy/webapps (overwrite existing file). If you want to take backup of existing file, please copy it outside of FlexDeploy installation folder to avoid confusion later.
Step 5. Review context.xml changes as per FlexDeploy Release Notes.
Step 6.
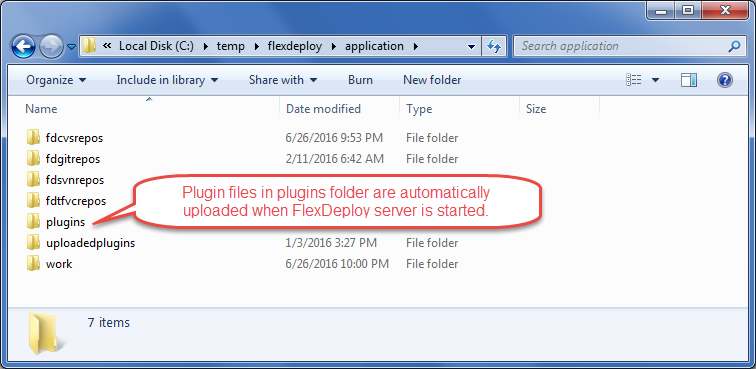
FlexDeploy download zip contains plugin jar files (application/plugins for Tomcat download and plugins for Weblogic download). You just need to copy plugins from download zip to plugins folder folder shown below & they will be automatically uploaded and activated on the Server startup.
This is very useful during initial install as well as when upgrading FlexDeploy, as there may be many new plugins or versions available as part of new FlexDeploy release, but you can use the procedure any time.
- Locate flexagon.fd.install.root folder for your FlexDeploy installation, which is FlexDeploy working directory. This is specified on the Java command line. For example, -Dflexagon.fd.install.root=c:/temp/flexdeploy/application.
- For Tomcat, you can look for this information in setenv.bat or setenv.sh file depending whether using Windows or Unix.
- For Weblogic, find it in the managed server startup settings.
- Create plugins folder, if it does not exist under this folder.
- Copy the desired plugins from the extracted zip file /plugins to this location. Tomcat and WebLogic download zip files have plugins stored in different locations.
- Tomcat Download - application/plugins
- WebLogic Download - plugins
Step 7 . Start tomcat by running the following script
<FlexDeploy Home>/apache-tomcat-flexdeploy/bin/startup.sh (startup.bat on Windows)
Step 8. Launch FlexDeploy in your browser - http://<hostname>:<port>/flexdeploy
Step 9. There is no need to activate plugins manually. FlexDeploy will automatically upload and activate new versions of plugins once they are copied to plugins folder. You will notice that plugins that you copied in Step 8 will eventually be uploaded automatically and folder will not have any jar files left. You can also look at Administration - Plugins in UI and see newer versions of plugins.