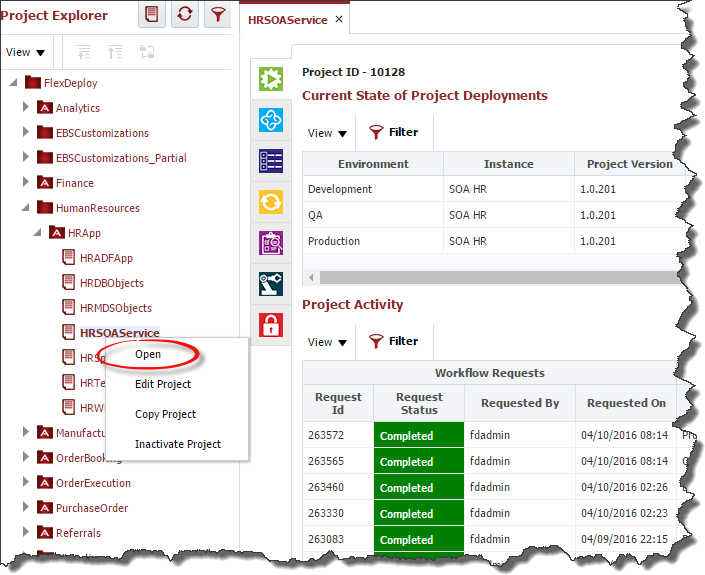
To build or deploy a project you must first open it in the Projects Explorer by double-clicking on the project or right-clicking and selecting Open.
On the Execute tab you will see two sections titled Current State of Project Deployments and Project Activity. Current State of Project Deployments section is not available on Partial Deployment Projects.
The Current State of Project Deployments indicates which environments contain which version of the project. If the project has not been deployed to an environment it will not appear in the list. This provides an easy to access summary of this project's current deployment state across all environments.
The Project Activity identifies all build and deployment requests along with the execution status for each request, whether completed/failed, pending approval, scheduled or in progress. The Workflow Request columns provides details pertaining to the build or deployment request that was submitted. Once a workflow request begins execution the Workflow Execution columns will provide details pertaining to its execution on the target instance. Figure 14.2 describes the status lifecycle of a workflow request and its workflow execution.
Object Type | Status | Description |
|---|---|---|
Workflow Request
| Initiated | The initial status that a request receives when it has first been submitted. |
Pending Approval | Indicates that one or more approvals are required before the request will be sent for execution. | |
Scheduled | Indicates that the request has been scheduled for execution at some time in the future. | |
Rejected | Indicates that an approval task or scheduled task for the request has been rejected/cancelled. | |
Ready | Indicates that the request has received any required approvals or reached the scheduled time and is ready to begin execution. | |
Submitted | Indicates that the request has been sent for execution. | |
Failed | Indicates that the request has failed. | |
Completed | Indicates that the request has been successfully executed. | |
Workflow Execution
| Queued | The initial status when a request is ready for execution. |
Running | Indicates that execution is in progress. | |
Failure | Indicates that the execution has failed. | |
Success | Indicates that the execution has completed successfully. |
Building a Standard Project
From the Execution tab, click the Build button.
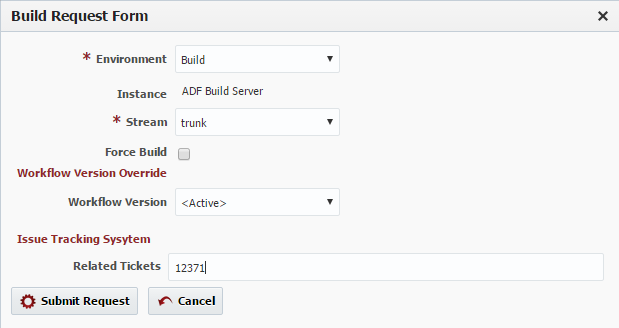
Enter values in the Build Request Form as described in the table below.
Field | Required | Description |
|---|---|---|
Environment | Yes | The environment to execute the build on. Note that if there is only one environment configured for the build, it will be preselected. |
Instance | Yes | The instance to execute the build on. Note that if there is only one instance configured for the build workflow it is preselected and marked and read-only. |
Stream | Yes | Select project stream to build from. Defaults to main stream (trunk). You can select any branch stream configured on the Project Configuration screen. |
Force Build | No | If selected, forces the build even though no changes detected in the source. By default only build if there is any change from last build. Currently only appears when SVN is selected as SCM Type in Project Configuration. |
Workflow Version Override | No | Optionally select the version of the workflow to execute. Defaults to the active version. Defaults to the active version. |
Workflow Inputs | Depends | Enter values for any inputs that are configured for the build workflow. The workflow itself defines whether each input is required or not. |
| Related Tickets | Depends | Optionally, a ticket for your issue tracking system may be required. |
Click the Submit Request button to submit the build request.
Deploying a Standard Project
From the Execution tab, click the Deploy button.
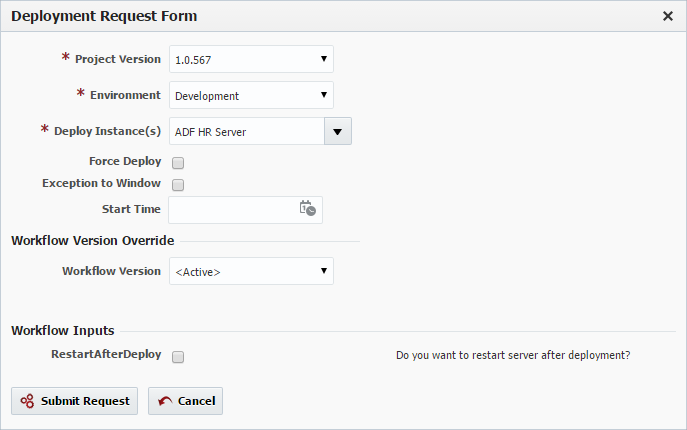
Enter values in the Deployment Request Form as described in the table below.
Field | Required | Description |
|---|---|---|
Project Version | Yes | The version of the project to submit for deployment. |
Environment | Yes | The environment to execute the deployment on. |
Deploy Instance(s) | Yes | The instance(s) to execute the deployment on. The list of instances which appear in the list are the deploy instances which are configured for the project. |
Force Deploy | Yes | Force a deployment to occur even if the project version is already current in the selected environment. Defaults to No. |
Exception To Window | Yes | Indicate that the deployment is being requested to run outside of any defined deployment window, triggering an approval. Defaults to No. |
Start Time | No | An optional delayed start time for the deployment. |
Workflow Version Override | No | Optionally select the version of the workflow to execute. Defaults to the active version. |
Workflow Inputs | Depends | Enter values for any inputs that are configured for the deploy workflow. |
Click the Submit Request button to submit the deployment request.
Building a Partial Deployment Project
From the Execution tab, click the Build button.
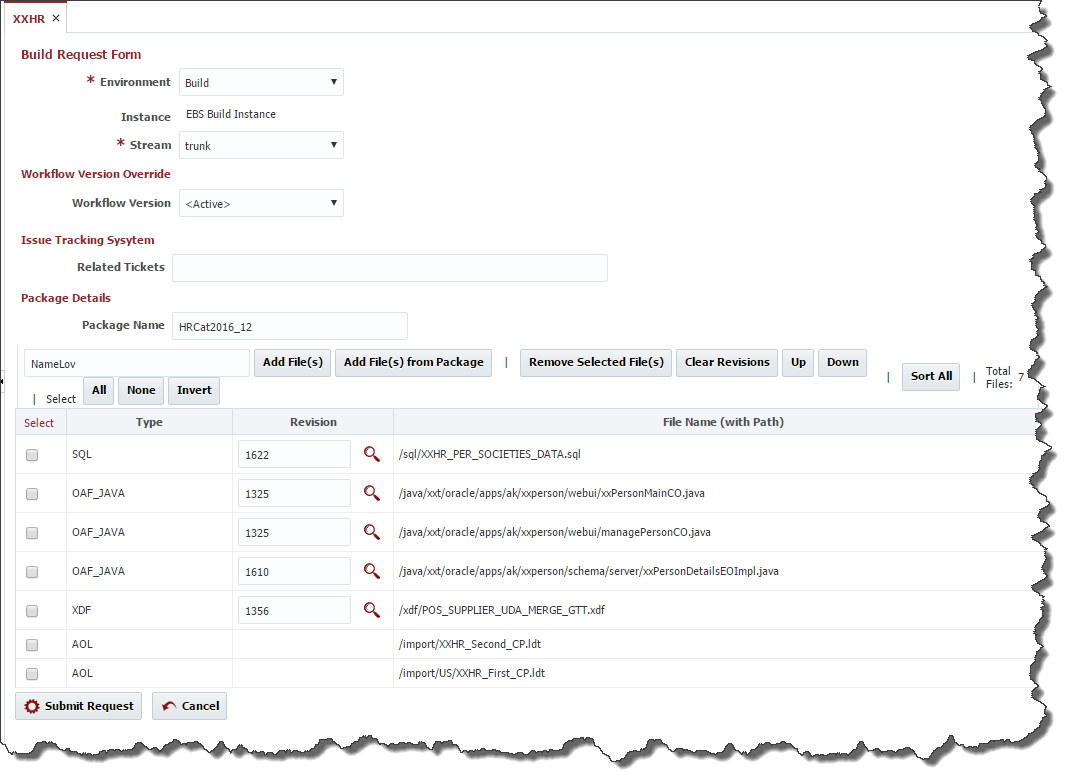
Enter values in the Build Request Form as described in the table below.
Field | Required | Description |
|---|---|---|
Environment | Yes | The environment to execute the build on. Note that if there is only one environment configured for the build, it will be preselected. |
Instance | Yes | The instance to execute the build on. Note that if there is only one instance configured for the build workflow it is preselected and marked and read-only. |
Stream | Yes | Select project stream to build from. Defaults to main stream (trunk). You can select any branch stream configured on the Project Configuration screen. |
Force Build | No | If selected, forces the build even though no changes detected in the source. By default only build if there is any change from last build. Currently only appears when SVN is selected as SCM Type in Project Configuration. |
Workflow Version Override | No | Optionally select the version of the workflow to execute. Defaults to the active version. Defaults to the active version. |
Workflow Inputs | Depends | Enter values for any inputs that are configured for the build workflow. The workflow itself defines whether each input is required or not. |
| Related Tickets | Depends | Optionally, a ticket for your issue tracking system may be required. |
Package Name | No | The name of the package. If no name is given, it will default to the Project Version. |
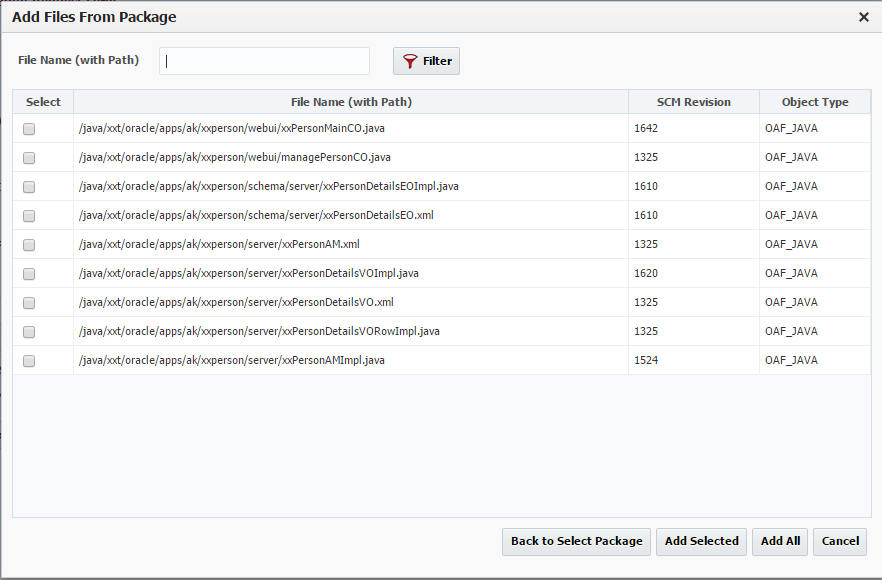
To update the files to be a part of this build, enter a portion of the File Name and select the Add File button. The files that contain this field will be added to the list. Alternatively, you can add files from a previous package. Select the Add Files(s) from Package button and the following screen pops up:
To remove files from the list of files to be included in the build, select the files and click the Remove Selected File(s) button.
To help with selecting and unselecting files the follow buttons are provided:
- All – Selects all the files in the list
- None – Unselects all the files in the list
- Invert - Unselects all the files that are currently selected and selects all the files that are currently unselected.
You may also manually check and uncheck the files with the check box at the start of each row.
At times, the order of both build and deploy can be important. You can control the order by the sequence of the files in the list. If you need to alter the order, use the Up Button to move the selected row(s) up one row. If multiple rows are selected, the top row is moved up by 1 row, the remaining selected rows are placed right below the highest selected row. Use the Down Button to move the selected row(s) down one row. If multiple rows are selected, the bottom row is moved down by 1 row, the remaining selected rows are placed right above the lowest selected row.
Click the Submit Request button to submit the build request.
Deploying a Partial Deployment Project
From the Execution tab, click the Deploy button.
Enter values in the Deployment Request Form as described in the table below.
Field | Required | Description |
|---|---|---|
Project Version | Yes | The version of the project to submit for deployment. |
Environment | Yes | The environment to execute the deployment on. |
Deploy Instance(s) | Yes | The instance(s) to execute the deployment on. The list of instances which appear in the list are the deploy instances which are configured for the project. |
Force Deploy | Yes | Force a deployment to occur even if the project version is already current in the selected environment. Defaults to No. |
Exception To Window | Yes | Indicate that the deployment is being requested to run outside of any defined deployment window, triggering an approval. Defaults to No. |
Start Time | No | An optional delayed start time for the deployment. |
Flex Fields | Depends | Optionally, you can create flex fields for the user to enter as a part of the request. In Figure 14.9, the Flex Field is Change. |
Workflow Version Override | No | Optionally select the version of the workflow to execute. Defaults to the active version. |
Workflow Inputs | Depends | Enter values for any inputs that are configured for the deploy workflow. |
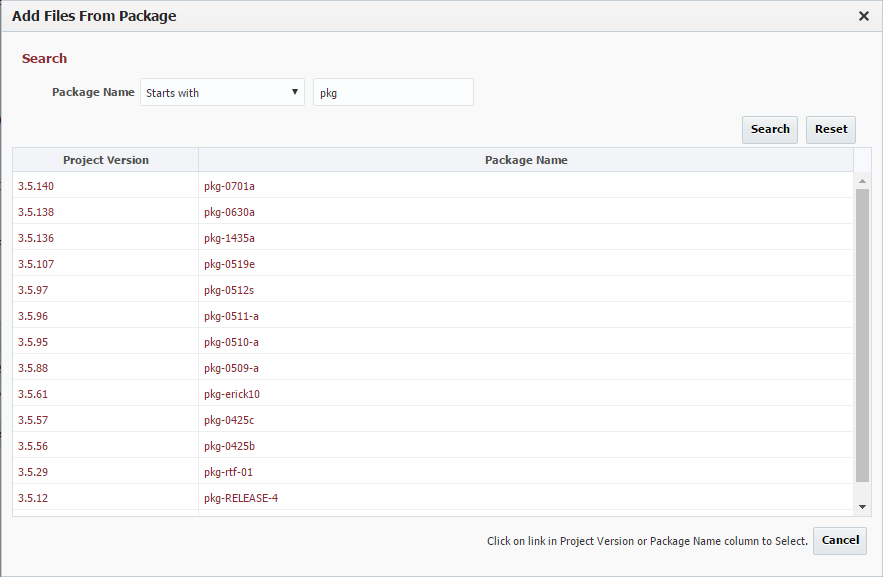
By default the Deployment Request Form will populate with the most recently built package. To modify the list of packages to be deployed, click the Select More Packages button and the screen in the figure below will pop up.
You can Search using Package and Project Version names by completing the fields as shown in Figure 14.12 and clicking the Search button. The search results will appear in the table.
Field | Required | Description |
|---|---|---|
Match | Yes | Select the Any radio button to indicate that the search results should include packages that contain either Project Version or Package Name search string, or the All radio button to indicate that the search results should only include packages that contain both the Project Version and Package Name search string. |
Project Version | No | The text to search for project versions |
Package Name | No | The instance(s) to execute the deployment on. The list of instances which appear in the list are the deploy instances which are configured for the project. |
If you would like to add a package to the deployment, click the Red + sign. To remove a package, click the red X. The green check mark indicates that the files have been added. Click the Save button to accept the files, or the Cancel button to cancel the changes.
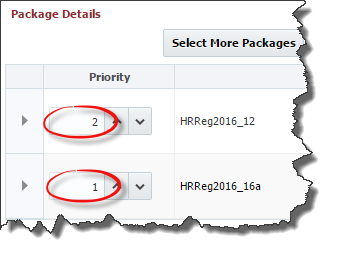
Finally, to control the order that the packages are deployed, enter the priority values as shown in Figure 14.13. If the priority is a lower value, it will deploy first. Higher values will deploy later. If they have the same priority, they may deploy at the same time.
When you have the set of packages you wish to deploy, click the Submit Request button to submit the deployment request.
Testing a Project
From the Execution tab, click the Test button.
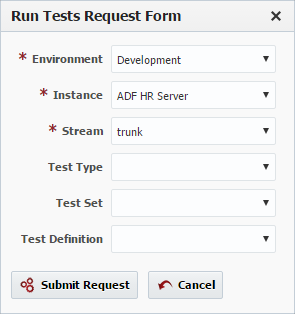
Enter values in the Run Tests Request Form as described below.
Field | Required | Description |
|---|---|---|
Environment | Yes | The environment to execute the test on. The environment, along with the instance, is used to determine the tests to execute based on strategy. |
Instance | Yes | The instance to execute the test against. The instance, along with the environment, is used to determine the tests to execute based on strategy. |
Stream | Yes | The stream to execute the test against. Along with strategy, the stream helps identify which tests will be executed. |
Test Type | Yes | Restricts the test type to execute within the strategy matching the given environment and instance. |
Test Set | Yes | Restricts the test set to be executed within the matching strategy and test type. |
Test Definition | Yes | Restricts the tests to be executed within the matching strategy, test type, and test set. |
Click the Submit Request button to submit the test execution.
Monitoring Project Workflow Requests
Once a project build or deployment request has been submitted it can be monitored by clicking on the Execution Id.
You can click on the Refresh button and watch the statuses progress throughout the lifecycle until it is either failed or completed. To see more details about an execution click on the id in the Execution Id column of the Project Activity section.
Execution Steps
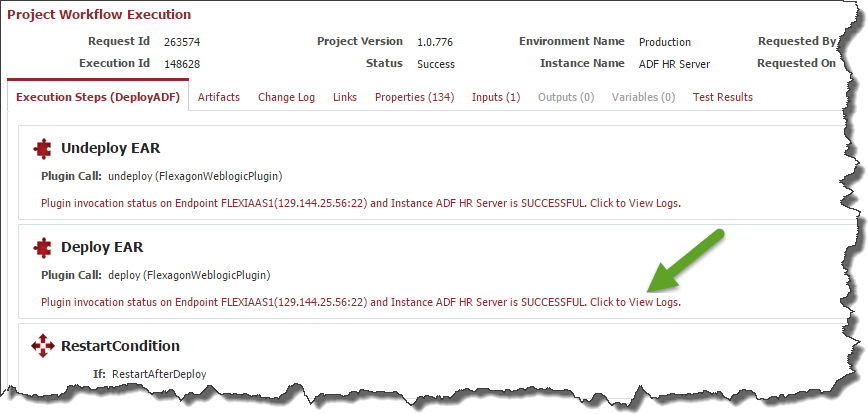
The Execution Steps tab provides a graphical representation of the steps which are either in progress or have completed. Each plugin step in the workflow reports its start time, duration, and status.
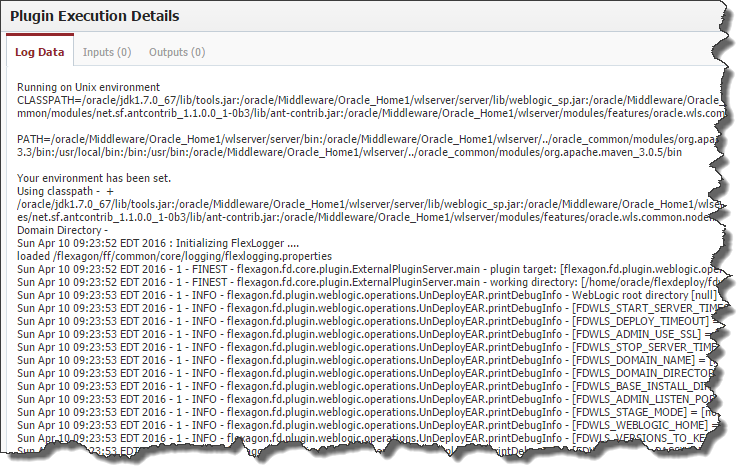
Underneath each workflow invoke plugin step is a link for each endpoint which the operation executed on, providing access to its logs. The logs provide valuable information to indicate progress, as well as data to help identify the cause of any errors. The Log Data tab lists the detailed logs as reported by the associated plugin. The Inputs and Outputs tab provide values for any inputs and outputs that were provided to or returned from the plugin operation execution. Click the Refresh button to refresh the logs. Click the OK button to close the log information dialog.
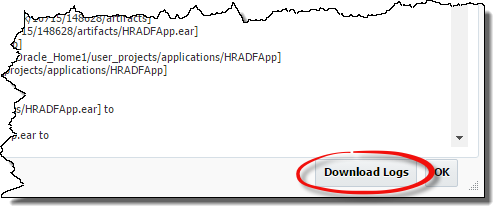
A text file of the Log Data from the plugin execution can be downloaded by clicking on the Download Logs button in the bottom right of the window.
Fault Data
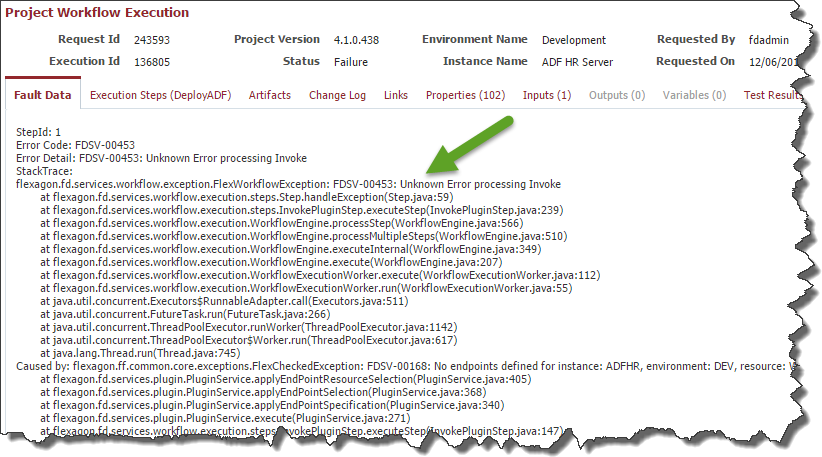
The Fault Data tab will appear in the event of a failed workflow execution. This will be the first tab after clicking on the Execution Id, and will provide any error messages. The information appearing here could be either the user defined details from the RaiseFault workflow operation, or a stack trace captured from a plugin operation invocation.
Artifacts
The Artifacts tab identifies the artifacts that were produced by a build workflow. These artifacts can be viewed on the build execution or any associated deployment execution. You can view the files and download all the artifacts as ZIP file or individual artifacts.
Change Log
The Change Log tab lists all source files modified since the last build.
- Number of commits
- Revision, date committed, Committer, Number of changes in this commit, comments entered during the commit
- Files with full path and action (Modified, Added or Deleted) for each Source.
Properties
The Properties tab lists the workflow properties and the values which were provided when the request was submitted. Likewise, the Inputs, Outputs, and Variables tabs provide values for any inputs, outputs, or variables that were provided to or produced from the workflow.
Files
The Files tab lists the details for the Partial Deployment. This tab is only visible for either a Partial Deployment Build or Deploy.
For a build, the Files tab display the list of files that were built by this workflow. The Seq Num column indicates the order the files will subsequently be deployed. The list can be filtered by entering a search string to find in the File Path column for each file you want displayed and clicking the Filter button.
For deploy, the Files tab display the list of files that were deployed by this workflow. The Seq Num column indicates the order the files were deployed. The Status indicates the status of the file deployment and is one of the following values:
- SUCCESS – The deployment Succeeded
- FAILED – The deployment Failed
- SKIPPED – The deployment was Skipped because this file version is already deployed
- NOT ATTEMPTED – In case of a serious plugin error, files may not be attempted to be deployed.
The list can be filtered by entering a search string into the File Name (with Path) field and/or choose a status from the Status dropdown then click the Filter button. The Filter will apply to the File Path column.
Test Results
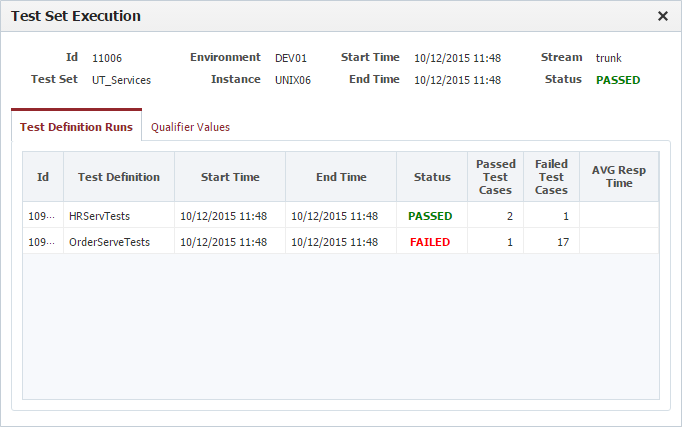
The Test Results tab lists the Test Sets that were executed in this test run and the associated results. By clicking on the small triangle at the front of the Test Set line, the line can be expanded to include all the Test Definitions that were run for the Test Set.
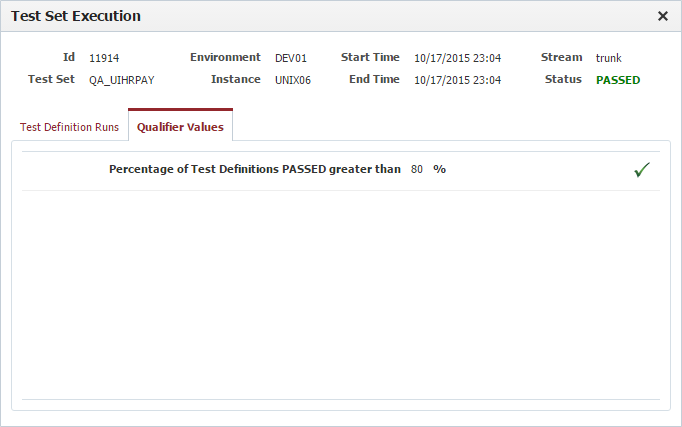
To see the details of the Test Set run, click on the Test Set name which will bring up the Test Set Execution screen. At the top of the screen there is a summary of the results for the Test Set and below are the details for each Test Definition Run. By clicking on the Qualifier Values tab, you can see detailed results for each Qualifier evaluation as shown in Figure 14.27. A qualifier that meets the criteria will be marked with a green checkmark, if it fails, it will be marked with a red checkmark.
Figure 14.27
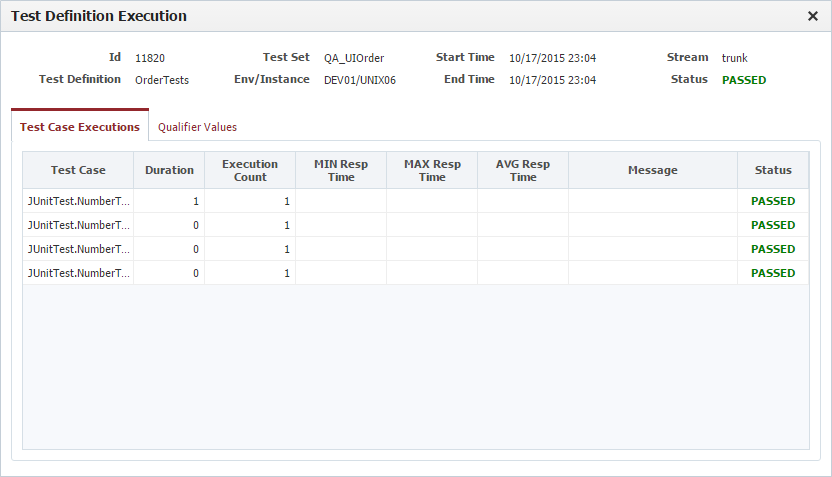
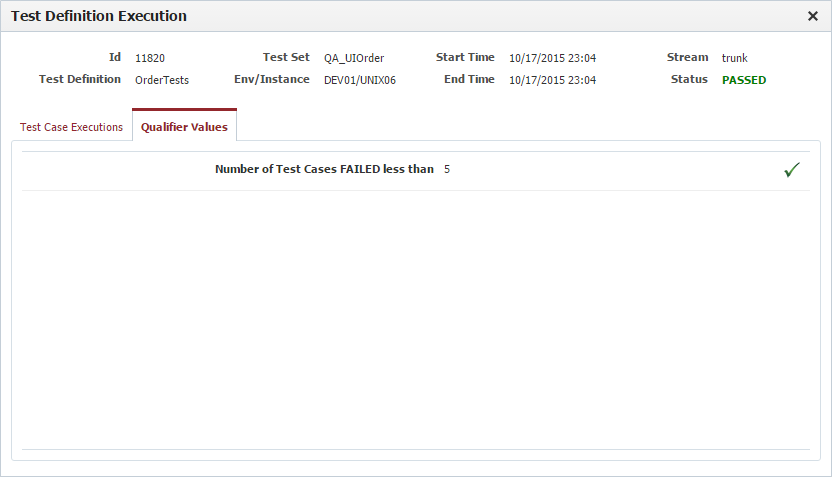
To see the details for a Test Definition, go to the view of the Test Results as shown in Figure 14.25 click on the triangle in front of the Test Set to display the Test Definitions and click on the Test Definition Name. This will open the window below with the Test Case details for the Test Definition. Clicking the Qualifier Values tab will open the view in Figure 14.29 to show the detailed results of each qualifier evaluation.
Figure 14.29
Click the Back button to return to the project's workflow execution screen.
