These instructions are for installing FlexDeploy on an existing Tomcat server. If you are installing a new server, see Installing FlexDeploy with included Tomcat for a simplified installation which includes the Tomcat 8.5.11 server. If you wish to use an existing Tomcat server, or to use a different version of Tomcat, please continue with this installation.
Requirements
- Tomcat 8.5.x
- 8GB of RAM
- 1 CPU
- JDK 8
- If you have not created FlexDeploy Working Directory and Artifact Repository folders, we will create in steps below. (See Create Folders for FlexDeploy Server)
- See Installation Instructions - Database Tier for requirements on Database tier.
- Optional - consider Java Cryptography Extension (JCE) unlimited strength policy files to avoid SSH issues when using strong ciphers.
Tomcat Setup
If FlexDeploy is being installed for first time, setup Tomcat server and a Data Source as explained in following steps. If only updating new war file, skip to Installing FlexDeploy on existing Tomcat#WAR Installation.
Install library jar files to Tomcat lib
Some jars are needed to support running an ADF application on Tomcat. Please download the following and put in the lib folder inside where you downloaded Tomcat.
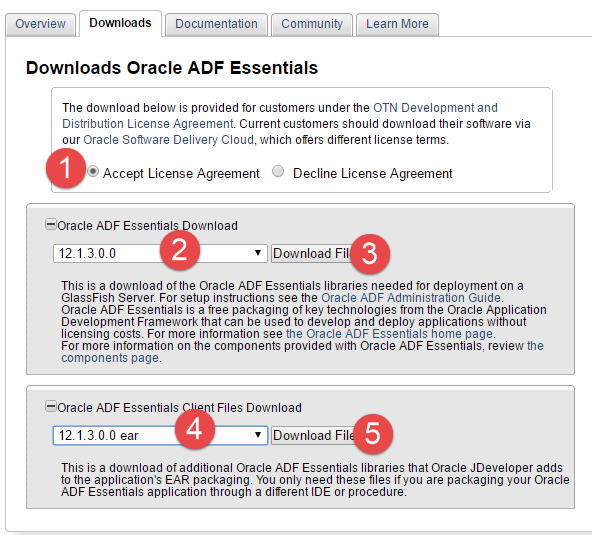
- Download 12.1.3 Oracle ADF Essentials and Oracle ADF Essentials Client Files from http://www.oracle.com/technetwork/developer-tools/adf/downloads/adf-download-1649592.html. Save download files in temporary folder.
- Extract zip files in flat structure using unzip -j (works on Windows and UNIX)
- cd <TOMCAT_HOME>/lib
- unzip -j <path to temp folder>/adf-essentials.zip
- unzip -j <path to temp folder>/adf-essentials-client-ear.zip
- You should see a large number of jars now in the <TOMCAT_HOME>/lib folder.
- ADF Essentials comes with the JDBC driver for Oracle 11g database (ojdbc6dms.jar). If you are using Oracle 12c database, you can download the driver from the Oracle Technology Network site.
If adding another JDBC driver, be sure to remove the default one which comes with the ADF Essentials libraries (ojdbc6dms.jar). If you leave multiple JDBC drivers in the lib folder, you could encounter the following exception on startup:
java.lang.SecurityException: sealing violation: package oracle.jdbc is sealed
at java.net.URLClassLoader.getAndVerifyPackage(Unknown Source)
at java.net.URLClassLoader.definePackageInternal(Unknown Source)
at java.net.URLClassLoader.defineClass(Unknown Source)
at java.net.URLClassLoader.access$100(Unknown Source)
at java.net.URLClassLoader$1.run(Unknown Source)
- Extract zip files in flat structure using unzip -j (works on Windows and UNIX)
- Copy following jar files from Tomcat_Complete.zip/apache-tomcat-flexdeploy/lib folder and place them in <TOMCAT_HOME>/lib.
- jta-1.1.jar
- jackson-core-lgpl-1.9.13.jar
- jersey-bundle-1.18.jar
- asm-3.3.1.jar
- mail-1.4.7.jar
- ant-salesforce.jar - If you will be using the Salesforce integration.
- If using PostgreSQL, also copy postgresql-42.2.5.jre7.jar
- If using MySQL, also copy mysql-connector-java-8.0.13.jar
- If using IBM ClearCase, you will need to copy some jar files from your ClearCase server or ClearTeam Explorer installation to the FlexDeploy installation.
- Copy all of the jar files found in the com.ibm.rational.teamapi_8.0.1.vxxx folder of your ClearCase server or ClearTeam Explorer to <TOMCAT_HOME>/lib. (commons-codec-1.3.jar, commons-lang-2.3.jar, icu4j-4_8.jar, remote_core.jar, stpclientws.jar, stpcq.jar, teamapiextensions.jar, unicodetypemgr.jar, commons-httpclient-3.0.jar, commons-logging-1.0.4.jar, icu4j-charset-4_8.jar, stpcc.jar, stpcmmn.jar, stpwvcm.jar, ucleardiffmerge.jar)
Configure context.xml
Open context.xml for editing. It is located in the <TOMCAT_HOME>/conf folder.
Add one of the following into your context.xml depending on your database type.
| Oracle | PostgreSQL | MySQL |
|---|---|---|
<Resource name="jdbc/flexdbDS" auth="Container" | <Resource name="jdbc/flexdbDS" auth="Container" | <Resource name="jdbc/flexdbDS" auth="Container" |
Configure Tomcat Environment
WINDOWS
Create file setenv.bat in the <TOMCAT_HOME>/bin folder. Edit the file to have following lines. Update location of JAVA_HOME as appropriate.
set JAVA_HOME=C:/installs/Java/jdk1.8.0_121
set CATALINA_OPTS=%CATALINA_OPTS% -verbose:gc -XX:+PrintGCDetails -XX:+PrintGCDateStamps -Xms1024m -Xmx2048m -Xloggc:%CATALINA_BASE%/logs/gc.log -XX:+UseGCLogFileRotation -XX:NumberOfGCLogFiles=5 -XX:GCLogFileSize=2M -Doracle.mds.cache=simple -Dorg.apache.el.parser.SKIP_IDENTIFIER_CHECK=true -Dflexagon.fd.repository.root=/opt/flexdeploy/repository -Dflexagon.fd.install.root=/opt/flexdeploy/application -Djava.awt.headless=true
UNIX
Create file setenv.sh in the <TOMCAT_HOME>/bin folder. Edit the file to have following line. Update location of JAVA_HOME as appropriate.
JAVA_HOME=/usr/jdk1.8.0_60
CATALINA_OPTS='-verbose:gc -XX:+PrintGCDetails -XX:+PrintGCDateStamps -Xms1024m -Xmx2048m -Xloggc:$CATALINA_BASE/logs/gc.log -XX:+UseGCLogFileRotation -XX:NumberOfGCLogFiles=5 -XX:GCLogFileSize=2M -Doracle.mds.cache=simple -Dorg.apache.el.parser.SKIP_IDENTIFIER_CHECK=true -Dflexagon.fd.repository.root=/opt/flexdeploy/repository -Dflexagon.fd.install.root=/opt/flexdeploy/application -Djava.awt.headless=true -Djava.security.egd=file:/dev/./urandom'
Please make sure to modify the arguments for Server working directory (-Dflexagon.fd.install.root) and Artifacts repository (-Dflexagon.fd.repository.root) as per your installation. Be careful in copying details from browser due to potential character changes.
Setup Logger Configuration
Follow these steps to implement custom format for FlexDeploy logs in Tomcat. All necessary files should be available in Tomcat_Complete.zip.
- Copy Tomcat_Complete.zip/apache-tomcat-flexdeploy/bin/FDLogFormatter.jar to <Tomcat Home>/bin folder.
- For Windows
Update <Tomcat Home>/bin/setenv.bat file, add following on first line.
set CLASSPATH=%CLASSPATH%;%CATALINA_HOME%\bin\FDLogFormatter.jar
- For Linux
Update <Tomcat Home/bin/setenv.sh file, add following on first line.
export CLASSPATH=$CLASSPATH:$CATALINA_HOME/bin/FDLogFormatter.jar
- Copy Tomcat_Complete.zip/apache-tomcat-flexdeploy/conf/logging.properties file to <Tomcat Home>/conf folder. You should take back up of existing logging.properties file. This is configured to have 10 backups each 10MB, you can adjust it as appropriate.
FlexDeploy Application Setup
Install WAR
- Copy Tomcat_Complete.zip/apache-tomcat-flexdeploy/webapps/flexdeploy.war file into <TOMCAT_HOME>/webapps folder.
Copy Plugins
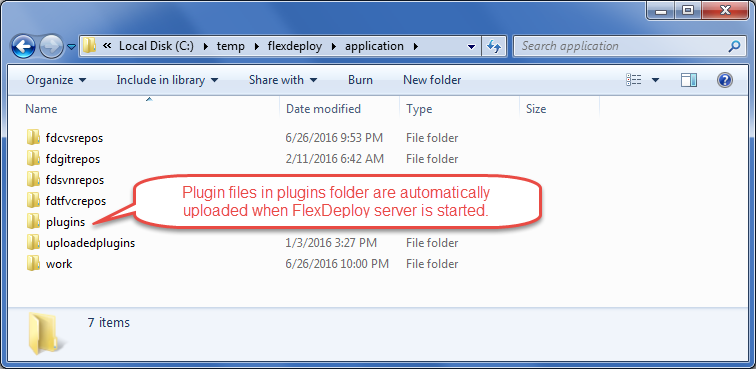
FlexDeploy download zip contains plugin jar files. You just need to 1) copy plugin jars from download zip to plugins folder in your installation (details explained below) and 2) all files will be automatically uploaded and 3) activated on the server startup.
- Plugin files to copy are in following location in download zip.
- Tomcat Download - application/plugins
- WebLogic Download - plugins
- Let's determine where to copy files in your installation now. Locate flexagon.fd.install.root folder for your FlexDeploy installation, which is FlexDeploy working directory. This is specified on the Java command line. For example, -Dflexagon.fd.install.root=/u01/flexdeploy/application.
- For Tomcat, you can look for this information in setenv.bat or setenv.sh file depending whether using Windows or Unix.
- For Weblogic, find it in the managed server startup settings.
- Create plugins folder if it does not exist under flexagon.fd.install.root folder. Copy files from download zip (#1 above) to this plugins folder.
Start Tomcat
- Unix
- cd <tomcat install>/bin
- ./startup.sh
- Windows
- Double click startup.bat in the <tomcat install>\bin folder.
Launch Application
- Launch FlexDeploy in your browser
- http://<hostname>:<port>/flexdeploy
- If using 4.6.0.2 or later version of FlexDeploy, you will need to complete Initial Registration process, where you will create admin user for login.
- If using 4.6.0.1 or prior version of FlexDeploy, default credentials are (note that this is application credentials and not database schema)
- User - fdadmin
- Password - welcome1