Credential store represents instance of specific type of credential store provider. You can have many such credential stores in FlexDeploy of same or different type. There is one credential store created by default, which is named Local. If you migrating from previous version of FlexDeploy, you will also notice migrated credentials under Local credential store.
Local credential store is based on Local credential store provider. There is only one Local credential store allowed, but you can create many other credential stores based on one or more credential store providers.
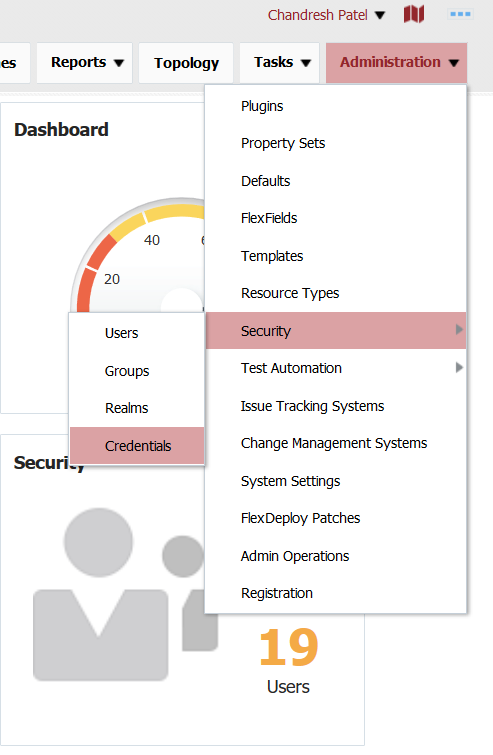
You can access credential stores by using Administration - Security - Credentials menu.
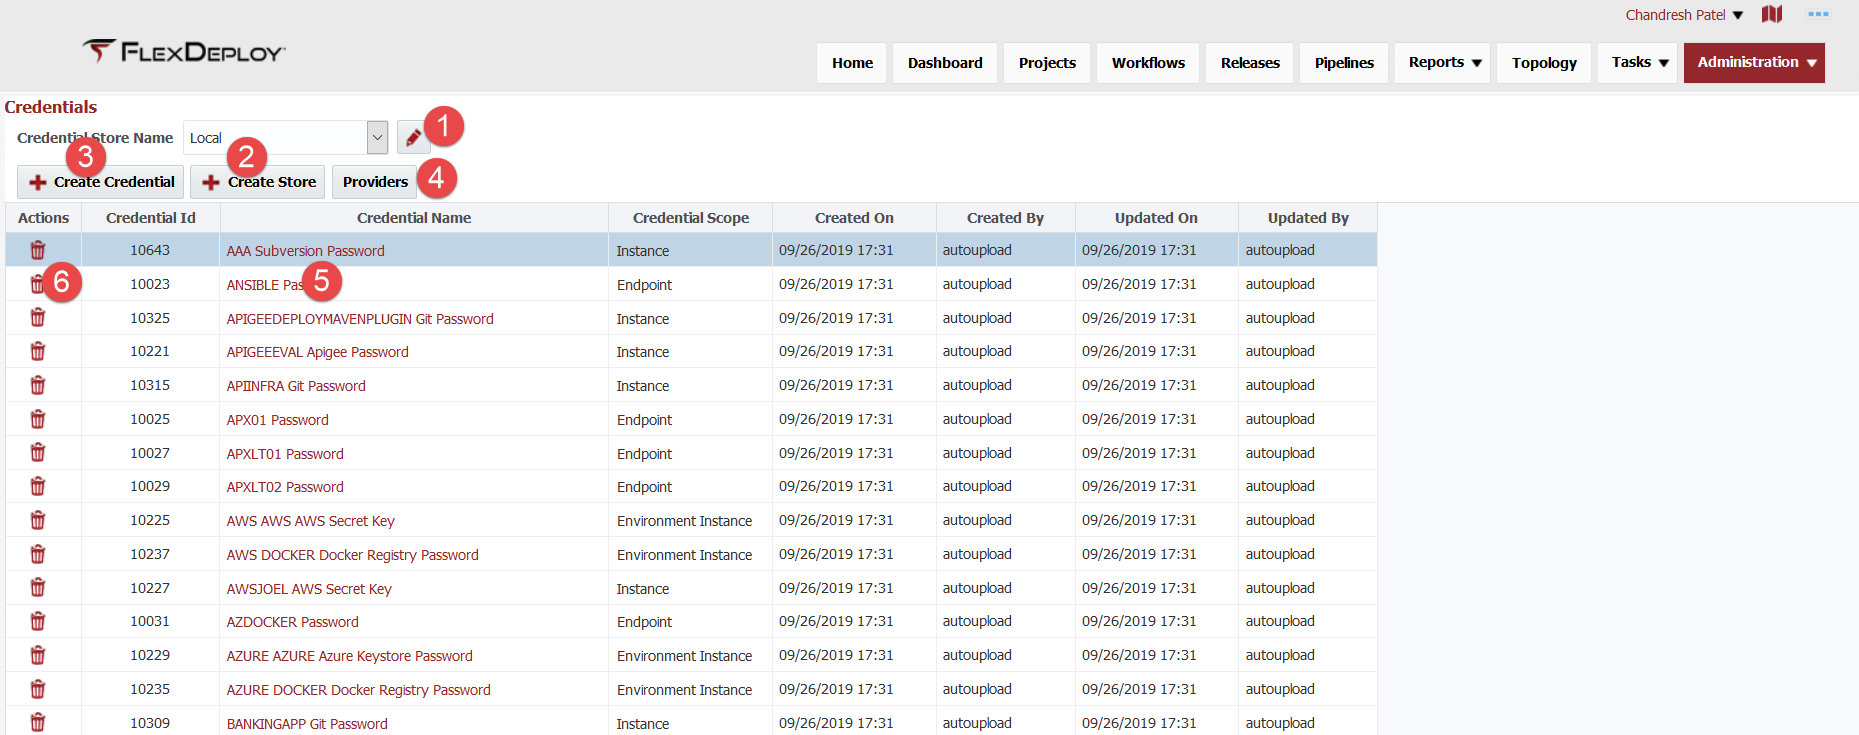
You will see following screen which lists credentials for each store. This screen allows you to
- View or Edit Credential Store - navigate to view or edit selected credential store (in this example Local).
- Create Store - navigate to create new store screen where you will selected desired provider and provide configuration properties for that specific credential store.
- Crete Credential - create new credential for selected credential store. You will select proper scope for credential, then provide name and other inputs for specific credential.
- Manage Providers - navigate to list of credential store providers screen, where you can view, edit or create credential store providers.
- Edit Credential - click on any credential name to edit it's name or other input values.
- Delete Credential - delete specific credential. If credential is used, you will not be able to delete it.
In this section we will talk about how to view/edit and create credential store. Note that credential store provider associated with specific store indicates type of store, and once created credential store can not be updated to be of different provider type.
Create Credential Store
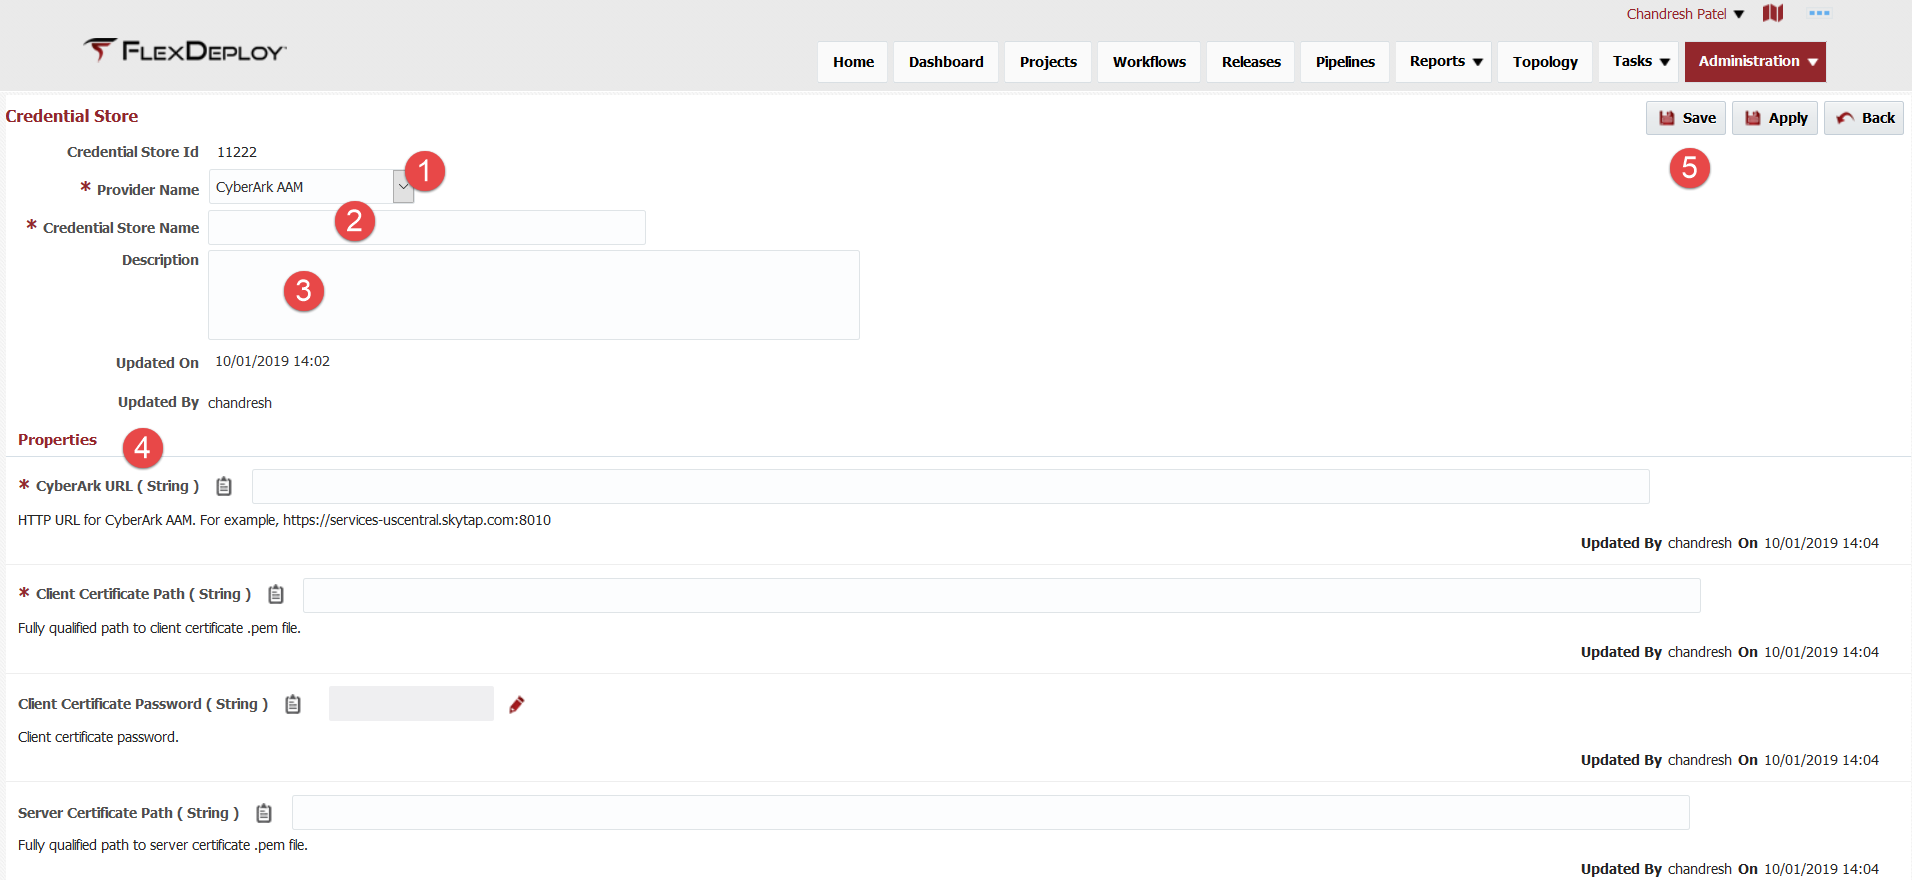
First click Create Store button on Credentials page. You will see screen as shown below. Now, select Provider Name.
Once you select Provider Name, you will see that necessary properties will be shown. At this point, you can still change Provider Name if you want but once you click Save or Apply successfully, you will not be able to change Provider Name for credential store.
Enter property values for this credential store and click Save or Apply. If you click Save, you will navigate to Credentials page after successful action. If you click Apply, you will stay on credential store page after successful save.
At any point, you can click Back to either discard all changes since last save or discard creation of new credential store.
View or Edit Credential Store
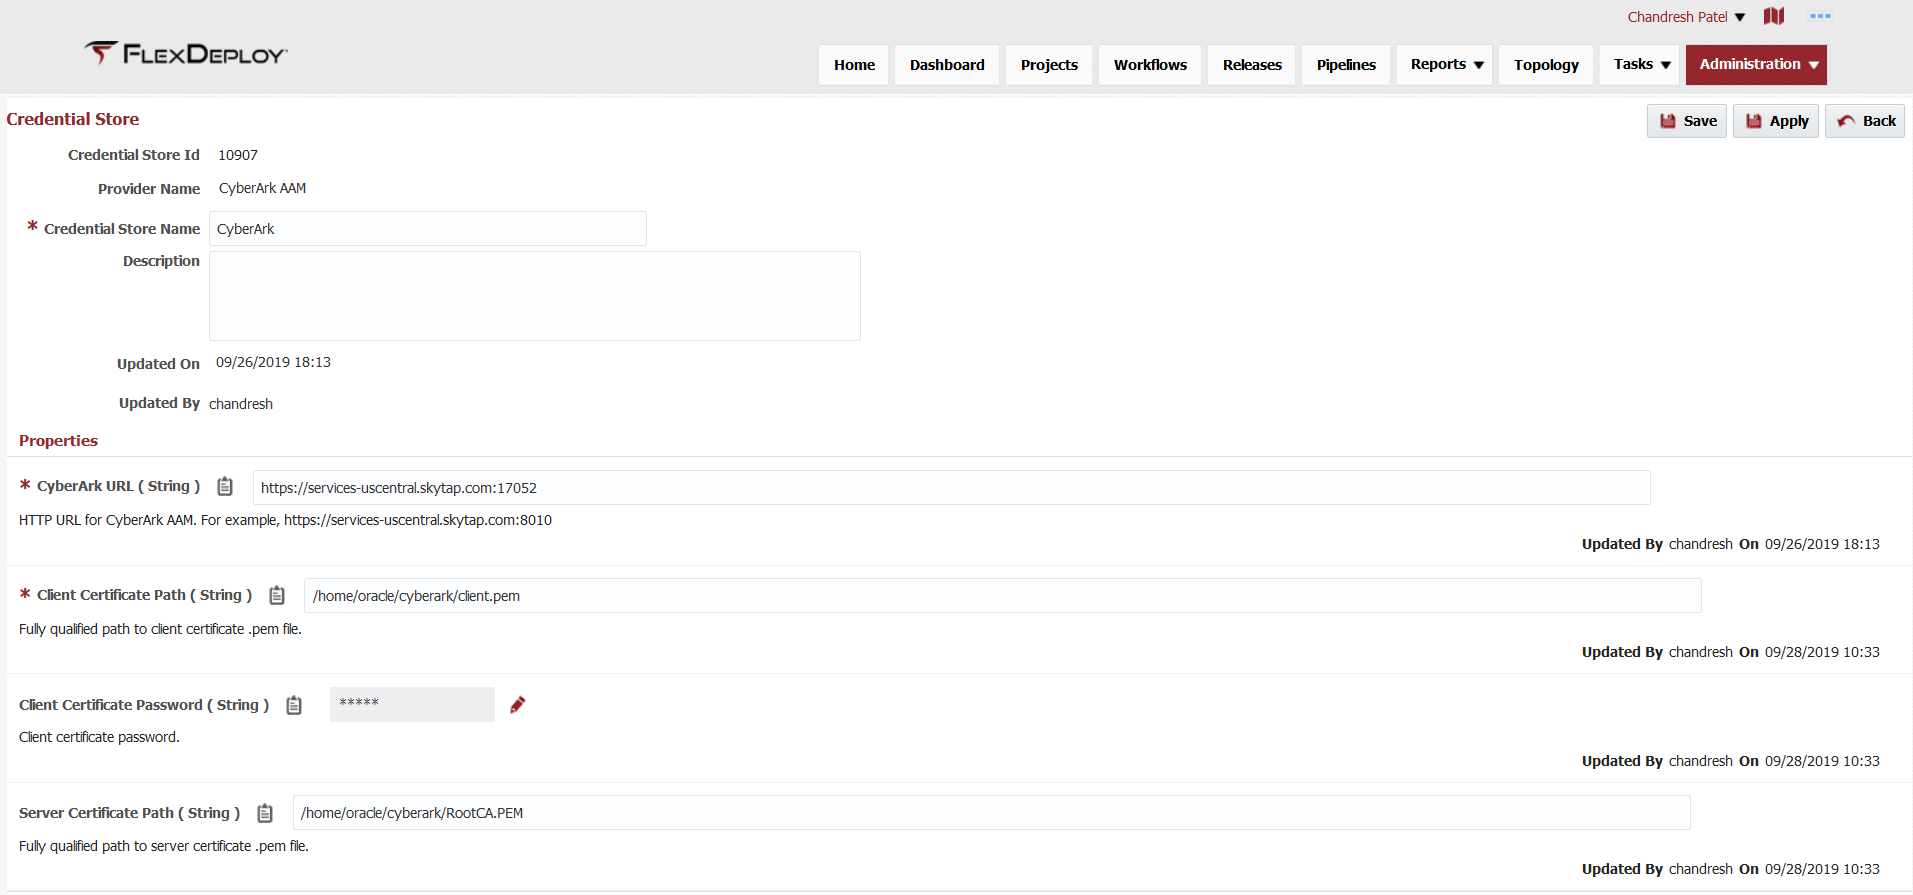
In order to view or edit specific credential store, 1) first select Credential Store Name and 2) click Edit icon next to it.
At this point, you can change Name and/or other Properties, but Provider Name can not be changed. Make necessary changes and click Save or Apply button to save.
Integrate with HashiCorp Vault
FlexDeploy provides out of box integration with HashiCorp Vault to retrieve secrets. FlexDeploy will authenticate using AppRole authentication method against vault.
HashiCorp Vault Setup
- You must first install and configure HashiCorp Vault if have not already done so.
- Now you can create specific AppRole for FlexDeploy authentication. Use proper role name, for example flexdeploy-role.
AppRole must have policy that allows FlexDeploy to read specific secrets necessary. Note that FlexDeploy only needs read permission. Example policy file
Examplay Policy Filepath "kv/*" { capabilities = ["read"] } path "sys/mounts" { capabilities = ["read"] } path "secret/*" { capabilities = ["read"] }- You will need role id and secret id for this AppRole for configuration in FlexDeploy.
FlexDeploy Setup
You must first create Credential Store in FlexDeploy by clicking Create Store button on Administration - Security - Credentials page. Credential store represents instance of specific type of credential store provider. If you have more than one HashiCorp Vault installations, you will create equal number of Credential Stores in FlexDeploy.
Here are the configurations necessary for this store.
| Property Name | Notes | Example |
|---|---|---|
| Vault URL | HTTP URL for REST service calls. If you use https protocol then make sure to configure KeyStore (default java or application server keystore) with proper certificates. | http://myvault.mycompany.com:8200 |
| App Role Path | App role path for authentication. This will default to approle and it should be sufficient. | approle |
| Role Id | You will create approle for FlexDeploy to authenticate against vault, provide role id here. | as per your Vault configurations |
| Secret Id | You will create approle for FlexDeploy to authenticate against vault, provide secret id here. | as per your Vault configurations |
| Engine Version | Engine version for secrets. This will default to 2, you can change if necessary. | 1 or 2 |
Now you are ready to create individual credential to be retrieved from Vault.
You can create or edit credentials from Credentials page or from where specific credential is used.
HashiCorp Credential requires two inputs as described below. Keep in mind that AppRole created for FlexDeploy must have read access to paths defined by various credentials.
| Input Name | Notes |
|---|---|
| Secrets Path | Path to secrets in HashiCorp Vault. For example, kv/DEV/Database/apps |
| Key Name | Key name for secret value. |
Here is how edit credential looks like.
Create credential looks similar except you need to provide Scope as well. Scope can not changed once credential is saved.
You can change credential inputs (Secrets Path, Key Name) at any point. FlexDeploy will use these inputs with credential store properties like URL, Role and Secret id to retrieve individual credential for use during Workflow Execution.
Integrate with CyberArk AAM (HTTP)
FlexDeploy provides out of box integration with CyberArk AAM to retrieve secrets. FlexDeploy will authenticate using client certificate or retrieve credentials using Agent. In this section we will talk about client certificate based authentication.
CyberArk Setup
- Create necessary Application Id(s) in CyberArk AAM.
- Configure safe and credentials.
- Configure Application Id(s) for specific client certificate authentication.
- If necessary, get PEM files for CyberArk server trust.
FlexDeploy Setup
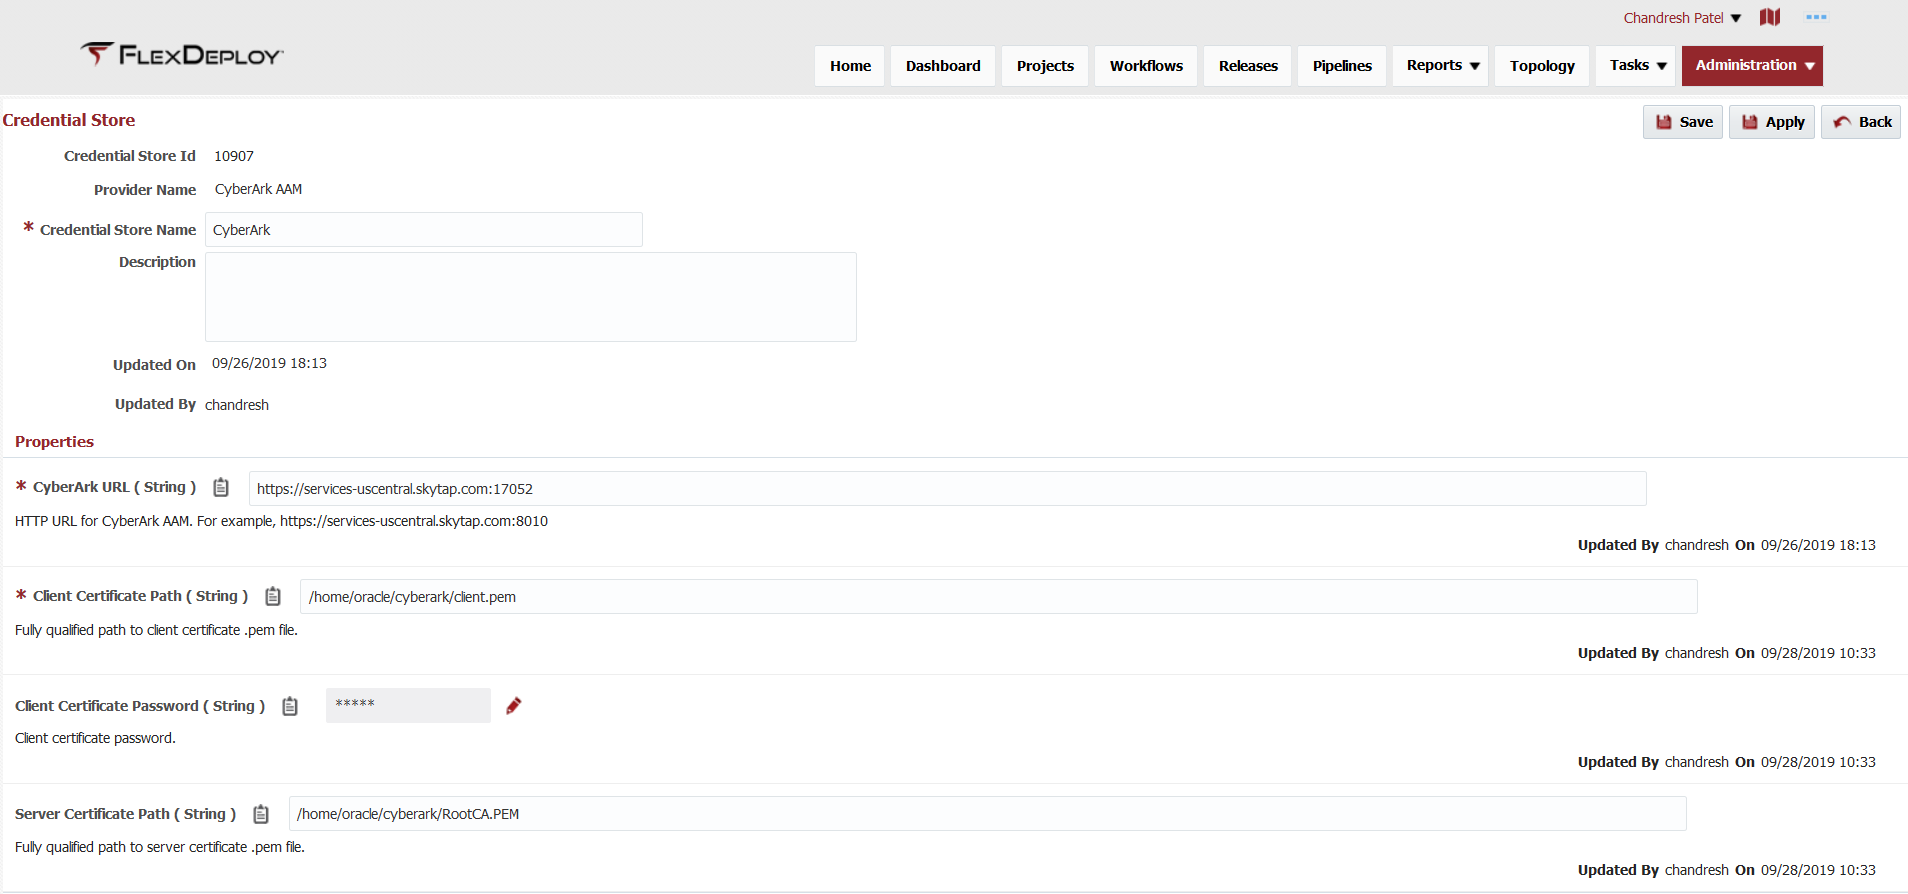
You must first create Credential Store in FlexDeploy by clicking Create Store button on Administration - Security - Credentials page. Credential store represents instance of specific type of credential store provider. If you have more than one CyberArk AAM installations, you will create equal number of Credential Stores in FlexDeploy. Use CyberArk AAM Provider when creating this store.
Here are the configurations necessary for this store.
| Property Name | Notes | Example |
|---|---|---|
| CyberArk URL | HTTP URL for CyberArk AAM. FlexDeploy will invoke HTTP GET to retrieve credential. If you use https protocol, then you may have to setup Server Certificate Path. GET is invoked with URL and path - AIMWebservice/api/Accounts | https://services-uscentral.skytap.com:17052 |
| Client Certificate Path | This private key and certificate is used to authenticate FlexDeploy against CyberArk AAM. Only PEM certificates are supported at this time. You must store PEM certificate file with private key and certificate on FlexDeploy server in secure location. | |
| Client Certificate Password | Client certificate password. | |
| Server Certificate Path | Optional, only needed if using https protocol. This certificate is used to setup trust for CyberArk server. Only PEM certificates are supported at this time. You must store PEM certificate file with certificate on FlexDeploy server in secure location. |
Now you are ready to create individual credential to be retrieved from CyberArk.
You can create or edit credentials from Credentials page or from where specific credential is used.
CyberArk credential requires two inputs as described below.
| Input Name | Notes |
|---|---|
| Application Id | Application id and Query Text are used to retrieve secret from CyberArk AAM. |
| Query | Query Text for credential. For example, Safe=Linux%20Accounts;Folder=root;Object=secret |
Here is how edit credential looks like.
Create credential looks similar except you need to provide Scope as well. Scope can not changed once credential is saved.
You can change credential inputs (Application Id, Query Text) at any point. FlexDeploy will use these inputs with credential store properties like URL, Certificate Path etc. to retrieve individual credential for use during Workflow Execution.
Integrate with CyberArk AAM (Agent)
FlexDeploy provides out of box integration with CyberArk AAM to retrieve secrets. FlexDeploy will authenticate using client certificate or retrieve credentials using Agent. In this section we will talk about retrieval of credentials using Agent.
CyberArk Setup
- Create necessary Application Id(s) in CyberArk AAM.
- Configure safe and credentials.
- Configure Application Id(s) for specific client certificate authentication.
- Install and configure CyberArk Agent on FlexDeploy server. You will need location of clipasswordsdk executable for configuration as well.
FlexDeploy Setup
You must first create Credential Store in FlexDeploy by clicking Create Store button on Administration - Security - Credentials page. Credential store represents instance of specific type of credential store provider. If you have more than one CyberArk AAM installations, you will create equal number of Credential Stores in FlexDeploy. Use CyberArk AAM Agent Provider when creating this store.
Here are the configurations necessary for this store.
| Property Name | Notes | Example |
|---|---|---|
| CLIPasswordSDK Executable Path | Fully qualified path for clipasswordsdk on Unix or CLIPasswordSDK.exe on Windows. FlexDeploy will invoke this agent script like this.
where APP_ID, QUERY and OUTPUT are inputs configured for each credential. | /u01/cyberark/clipasswordsdk |
Now you are ready to create individual credential to be retrieved from CyberArk.
You can create or edit credentials from Credentials page or from where specific credential is used.
CyberArk credential requires two inputs as described below.
| Input Name | Notes |
|---|---|
| Application Id | Application id and Query Text are used to retrieve secret from CyberArk AAM. |
| Query | Query Text for credential. For example, Safe=Linux%20Accounts;Folder=root;Object=secret |
| Output | This will default to Password. |
Here is how edit credential looks like.
Create credential looks similar except you need to provide Scope as well. Scope can not changed once credential is saved.
You can change credential inputs (Application Id, Query Text) at any point. FlexDeploy will use these inputs with clipasswordsdk to retrieve individual credential for use during Workflow Execution.
