An Environment is a logical name given to a group of servers, applications, and technologies which work together to provide a software solution for the purpose of development, testing, or a production implementation. Typical Environments include, but are not limited to, Development (DEV), System Integration Testing (SIT), User Acceptance Testing (UAT), and Production (PROD).
...
To view the list of Environments defined within FlexDeploy, select Topology -> Environments from from the menu, and then choose the Environments tab.
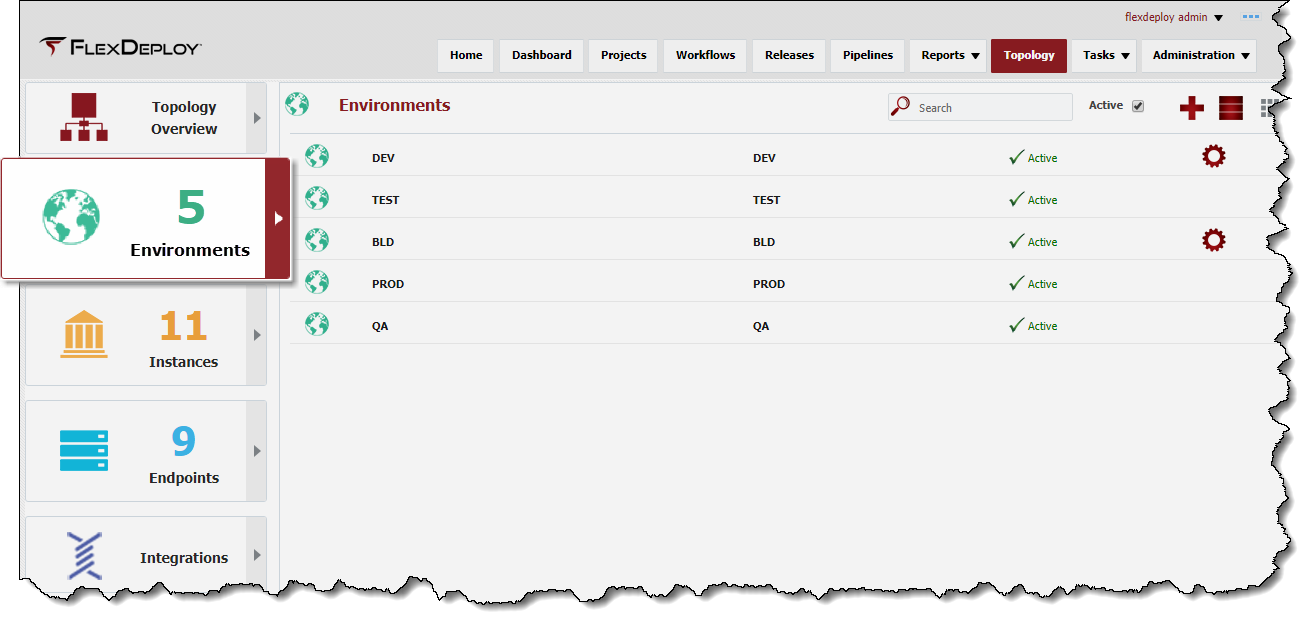
By default, all active Environments are displayed in the search results. To refine the search results, select one or more criteria options and click on the Search button. Select the Any radio button to indicate the search results should include Environments matching any of the specified criteria, or the All radio button to indicate that the search results should only include Environments matching all of the specified criteria. Click on the Reset button to return to the default search criteria form type all or part of the Environment name into the Search box, and the list will automatically filter. Select the Active checkbox to show the inactive environments as well.
Creating/Editing an Environment
To create an Environment, click the button. To edit an Environment, select click on an existing Environment and click the Edit buttonrow from the list.
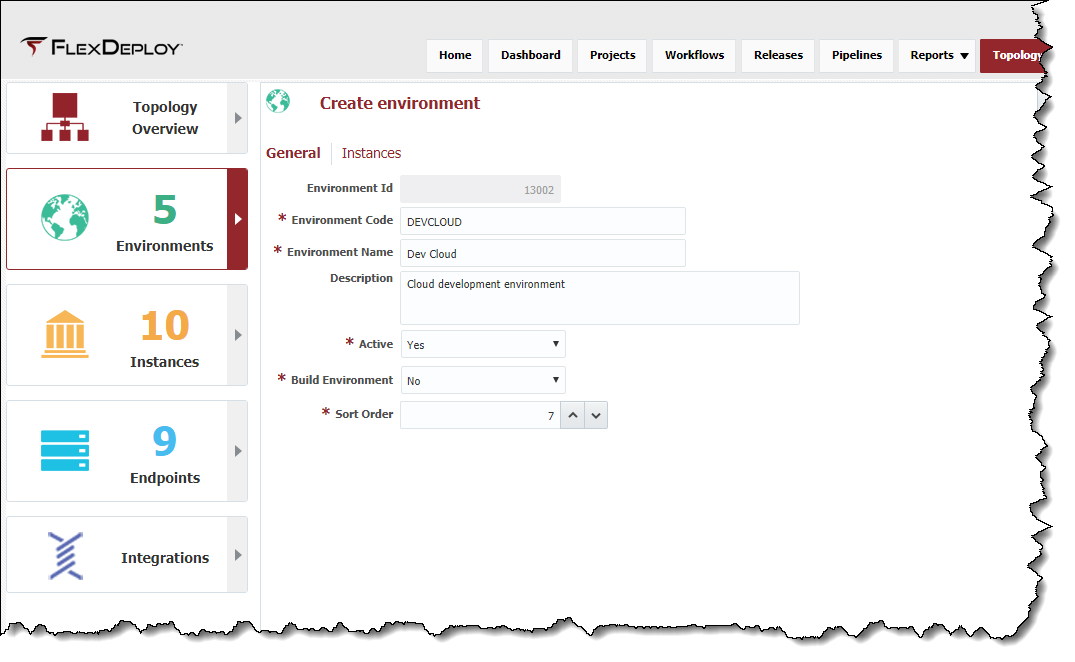
Enter values for the following fields.
Field Name | Required | Description |
|---|---|---|
Environment Id | N/A | System generated identifier (read-only). |
Environment Code | Yes | Short name for the Environment. |
Environment Name | Yes | Long display name for the Environment. |
Description | No | A description of the Environment. |
Active | Yes | Whether or not the Environment is active in the system. Defaults to "Yes". |
Build Environment | Yes | Identifies whether the Environment is used for builds. Defaults to "No". |
Sort Order | Yes | A sort index to control the order in which the Environment is displayed within lists. |
Click the Next button next tab is to optionally associate Instances to this Environment. Note that this is an optional step since there may not be any Instances created yet. In this case, simply save the Environment and perform the association when creating the Instance. Read about Creating Instances.
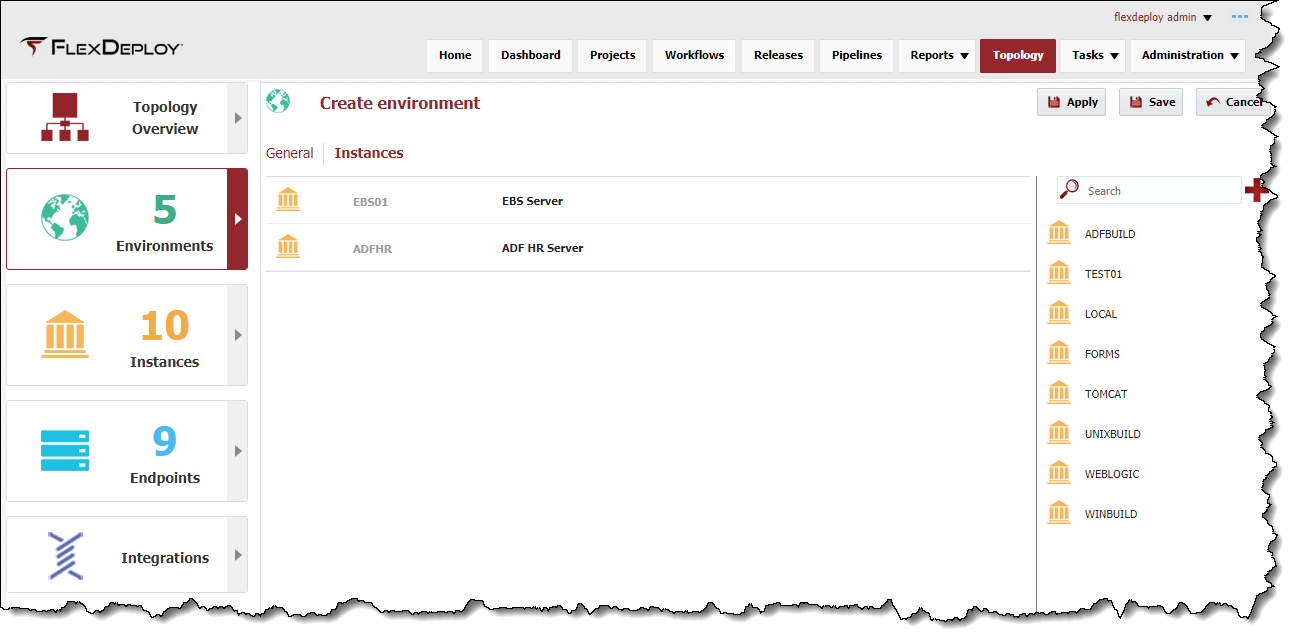
Shuttle Instances from Available Instances to Selected Instances Click and drag instances from the list on the right panel to the main mane pane to associate them to this Environment. To disassociate Instances from the Environment, shuttle the Instances from Selected Instances back over to Available Instancesdrag them back from the main pane to the list on the right. As you will see in the next section, you can also associate Environments to Instances through the Instance Wizard.
Click the Save button to save the changes to the Environment and return to the list of Environments.Optionally click the Apply button to save the changes, but remain on the current screen until the Cancel button is clicked.
To inactivate an Environment at any time, select an existing Environment and click the Inactivate buttonsclick the Active link on the desired Environment, and it will toggle to Inactive. This will temporarily hide that Environment until, a search is performed where the criteria for Active is switched to "No"after leaving the screen, until the Active checkbox is unchecked. To reactivate an Environment, select the desired Environment and click the Edit button. Then change the drop down menu for active to "Yes" and click Save. This click the Inactive link and it will toggle back to Active. This Environment is now active in the system again and ready for use.