...
To remove files from the list of files to be included in the build, select the files and select Remove from the Selected Files Drop Downdrop down.

Clear Revisions
It clear the revisions for the files that are selected, go to the Selected Files drop down and choose Clear Revisions.
Entering Revisions
On the Build Request Form, you can add revisions for each file you are building. Currently, these revisions all must be contained by the stream you selected for the build.
...
To help with selecting and unselecting files the follow buttons are providedthe Select drop down has the following options:
- All – Selects all the files in the list
- None – Unselects all the files in the list
- Invert - Unselects all the files that are currently selected and selects all the files that are currently unselected.
...
From the Execution tab of a partial deploy project, click the Deploy button.


Enter values in the Deployment Request Form as described in the table below.
...
Field | Required | Description |
|---|---|---|
Project Version | Yes | The version of the project to submit for deployment. |
Environment | Yes | The environment to execute the deployment on. |
Deploy Instance(s) | Yes | The instance(s) to execute the deployment on. The list of instances which appear in the list are the deploy instances which are configured for the project. |
Force Deploy | Yes | Force a deployment to occur even if the project version is already current in the selected environment. Defaults to No. |
Exception To Window | Yes | Indicate Indicates that the deployment is being requested to run outside of any defined deployment window, triggering an approval. Defaults to No. |
| Stop when Package Fails | Yes | When deploying multiple packages, if a prior package fails, the remaining packages will not be deployed. |
Start Time | No | An optional delayed start time for the deployment. |
Flex Fields | Depends | Optionally, you can create flex fields for the user to enter as a part of the request. In the Figure above, the Flex Field is Change #. |
Workflow Version Override | No | Optionally select the version of the workflow to execute. Defaults to the active version. |
Workflow Inputs | Depends | Enter values for any inputs that are configured for the deploy workflow. |
...
If you would like to add a package to the deployment, click the Red + sign. To remove a package, click the red X. The green check mark indicates that the files have been added. Click the Save button to accept the files, or the Cancel button to cancel the changes.
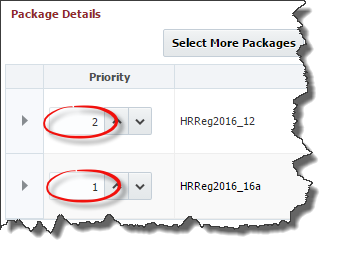
Finally, to control the order that the packages are deployed, enter the priority values as shown in the Figure below. If the priority is a lower value, it will deploy first. Higher values will deploy later. If they have the same priority, they may deploy at the same time.
If you would like to see the file details for a package, click on the arrow in front of the package:

When you have the set of packages you wish to deploy, click the Submit Request button to submit the deployment request. Each package will run as a separate workflow request and workflow execution in the Project Activity table.
...
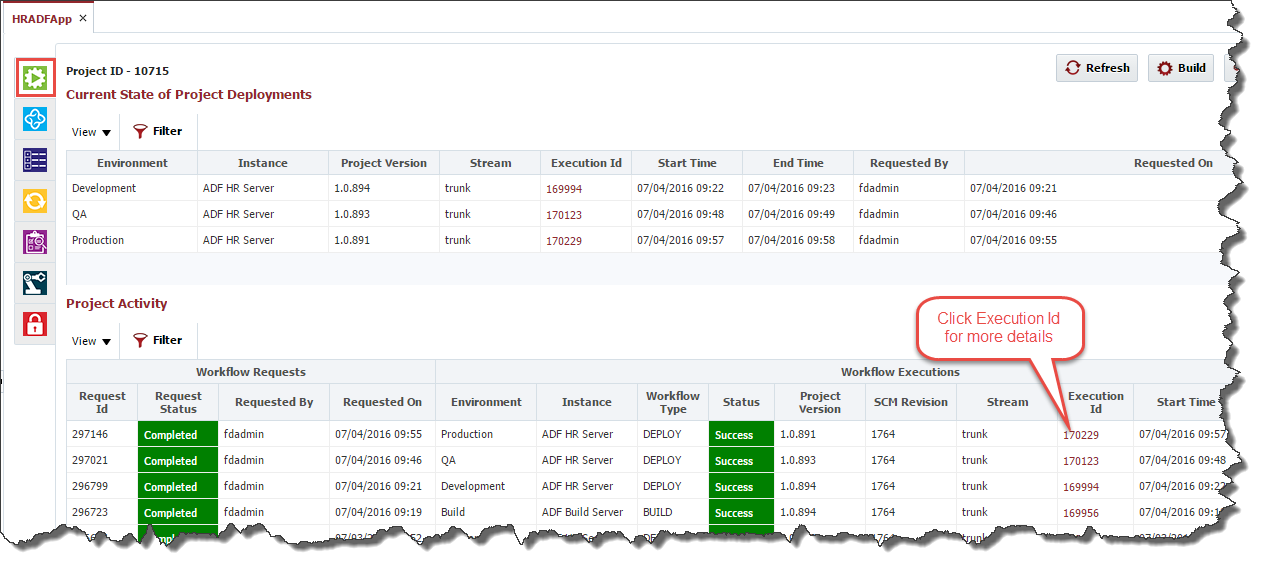
You can click on the Refresh button and watch the statuses progress throughout the lifecycle until it is either failed or completed. To see more details about an execution click on the id in the Execution Id column of the Project Activity section.
Execution Steps

The Execution Steps tab provides a graphical representation of the steps which are either in progress or have completed. Each plugin step in the workflow reports its start time, duration, and status.

Underneath each workflow invoke plugin step is a link for each endpoint which the operation executed on, providing access to its logs. The logs provide valuable information to indicate progress, as well as data to help identify the cause of any errors. The Log Data tab lists the detailed logs as reported by the associated plugin. The Inputs and Outputs tab provide values for any inputs and outputs that were provided to or returned from the plugin operation execution. Click the Refresh button to refresh the logs. Click the OK button to close the log information dialog.
...
The Fault Data tab will appear in the event of a failed workflow execution. This will be the first tab after clicking on the Execution Id, and will provide any error messages. The information appearing here could be either the user defined details from the RaiseFault workflow operation, or a stack trace captured from a plugin operation invocation.


Artifacts
The Artifacts tab identifies the artifacts that were produced by a build workflow. These artifacts can be viewed on the build execution or any associated deployment execution. You can view the files and download all the artifacts as ZIP file or individual artifacts.


Change Log
The Change Log tab lists all source files modified since the last build.
...