This page provides instructions for upgrading a FlexDeploy installation. These instructions will may upgrade Tomcat to the version included in the distribution zip depending on current version of FlexDeploy. FlexDeploy packages Tomcat version 9.0.54.
| Note |
|---|
Note that FlexDeploy now requires Java 8 for Tomcat, if you are upgrading from older version you may have to upgrade Java as well. It was also noticed that <JarScanner scanManifest="false"/> was missing in some older context.xml files, which caused java.io.FileNotFoundException: /opt/flexagon/tomcat/apache-tomcat-flexdeploy/lib/gdk_custom.jar (No such file or directory). |
Make sure you have downloaded new version of FlexDeploy and unzipped it in a temporary location, so it can be accessed during upgrade process. To prevent unwanted file(s) or folder(s) from being overridden, do not unzip the new version of FlexDeploy under the <FlexDeploy Home>.
Upgrade Instructions
Step 1. Stop the Tomcat server. Use shutdown.sh on Linux and shutdown.bat on Windows.
...
It is recommended that a backup of the artifact repository file system be taken in case a back-out is required. The location of the artifact repository can be identified by looking at value of -Dflexagon.fd.repository.root in setenvoverride.sh/setenv.sh or setenvoverride.bat/setenv.bat file. This file will be in <FlexDeploy Home>in <FlexDeploy Home>/apache-tomcat-flexdeploy/bin/. Standard file backup procedures can be followed. Optionally, the following command (See following example for unix only) , which can be used to create a tar file backup of the entire directory.
...
Step 4. Take a backup and delete entire apache-tomcat-flexdeploy folder (this will be replaced by new copy). It will be is required to take backup since the old configuration files will need to be referenced. See example below for Linux. This folder was updated as part of 5.6.0.4, but you can follow this process for every upgrade.
| Code Block | ||||
|---|---|---|---|---|
| ||||
# Assuming FLEXDEPLOY_HOME environment variable is set, it should be parent folder of apache-tomcat-flexdeploy # export FLEXDEPLOY_HOME=/u01/flexdeploy cd $FLEXDEPLOY_HOME # change version in backup folder as per version you are upgrading from mv apache-tomcat-flexdeploy/ apache-tomcat-flexdeploy-535603/ |
...
Step 5. Copy apache-tomcat-flexdeploy folder from distribution zip.If you had placed additional libraries in apache-tomcat-flexdeploy/lib folder (in 5.6.0.0 or before) or in the apache-tomcat-flexdeploy/libext folder, then you will need to copy them from backup folder into the apache-tomcat-flexdeploy/libext folder. This has changed since FlexDeploy 5.7.0.1. Examples might be JDBC driver (for Oracle drivers there is additional detail in step 6), CyberArk libraries for Tomcat connection pool provider etc.
| Code Block | ||||||
|---|---|---|---|---|---|---|
| ||||||
# let's say download zip was extracted in /u01/software/flexdeploy # export UNZIPPED_FLEXDEPLOY=/u01/software/flexdeploy cd $FLEXDEPLOY_HOME mkdir apache-tomcat-flexdeploy # assuming download zip has been unzipped in UNZIPPED_FLEXDEPLOY folder. cd $UNZIPPED_FLEXDEPLOY/apache-tomcat-flexdeploy cp -R * $FLEXDEPLOY_HOME/apache-tomcat-flexdeploy/ cd $FLEXDEPLOY_HOME/apache-tomcat-flexdeploy/ chmod +x ./bin/*.sh cp $FLEXDEPLOY_HOME/apache-tomcat-flexdeploy-535603/libext/* $FLEXDEPLOY_HOME/apache-tomcat-flexdeploy/libext/ |
Note on additional extension jar files : If you had placed additional libraries in apache-tomcat-flexdeploy/lib folder or in the apache-tomcat-flexdeploy/libext folder, then you will need to copy them from backup folder into the new apache-tomcat-flexdeploy/libext folder. Note that all extension jars should be kept in libext folder. Examples might be JDBC driver (for Oracle drivers there is additional detail in step 6), CyberArk libraries for Tomcat connection pool provider etc.
...
Step 6. Copy the context.xml file from the backup folder (step 4) into <FlexDeploy Home>/apache-tomcat-flexdeploy/conf.
| Code Block | ||||||
|---|---|---|---|---|---|---|
| ||||||
cd $FLEXDEPLOY_HOME/apache-tomcat-flexdeploy-535603/conf/ cp context.xml ../../apache-tomcat-flexdeploy/conf/ |
If using Oracle database, it is recommended to use UCP connection pool (see details below). If you are using Postgres, or already have UCP connection pool setup go to Step 7.
- Download the Oracle JDBC 8 driver from https://www.oracle.com/database/technologies/appdev/jdbc-ucp-19c-downloads.html. For . Click on the driver link matching your Oracle database version, and download the driver compatible with JDK8. For example,
ojdbc8-full.tar.gz. - Remove ojdbc jar files like ojdbc*.jar or ojdbc*dms.jar from <FlexDeploy Home>/apache-tomcat-flexdeploy/lib.
Copy ojdbc8.jar, ons.jar anducp.jar all jars from downloaded jdbc driver to <FlexDeploy Home>/apache-tomcat-flexdeploy/libext.
Note This has changed. All added libraries should now be placed in <FlexDeploy Home>/apache-tomcat-flexdeploy/libext not <FlexDeploy Home>/apache-tomcat-flexdeploy/lib.
- Update <FlexDeploy Home>/apache-tomcat-flexdeploy/conf/context.xml as shown below.
| Code Block | ||||||
|---|---|---|---|---|---|---|
| ||||||
<Resource name="jdbc/flexdbDS" auth="Container"
    type="oracle.ucp.jdbc.PoolDataSource"
    factory="oracle.ucp.jdbc.PoolDataSourceImpl"

    connectionFactoryClassName="oracle.jdbc.pool.OracleDataSource"
    minPoolSize="0"
    maxPoolSize="100"
    initialPoolSize="0"
    autoCommit="false"
    inactiveConnectionTimeout="300"

    url="jdbc:oracle:thin:@(DESCRIPTION=(ADDRESS_LIST=(ADDRESS=(PROTOCOL=tcp)(HOST=**HOSTNAME**)(PORT=**PORT**)))(CONNECT_DATA=(SERVICE_NAME=**SERVICE_NAME**)))"
    user="fd_admin"
    password="**FD_ADMIN_PASSWORD**"

    fastConnectionFailoverEnabled="true"

    validationQuery="select 1 from dual"
    testOnBorrow="true"

    useLocalSessionState="true"
defaultAutoCommit="false"/> |
- URL must be in the format listed in the example, the JDBC short format of host:sid:port should not be used.
- If RAC is used for the database, multiple nodes can be listed in the address list of the URL or it can point to the scan listener for the cluster.
- Sample URL for a RAC implementation that has a primary and secondary scan listener connecting to to a service name GOLD-CLOUD. This includes connection timeout, retry, and retry delay settings.
| Code Block | ||||
|---|---|---|---|---|
| ||||
url="jdbc:oracle:thin:@(DESCRIPTION = CONNECT_TIMEOUT=120) (RETRY_COUNT=20) (RETRY_DELAY=3) (TRANSPORT_CONNECT_TIMEOUT=3) (ADDRESS_LIST =(LOAD_BALANCE=on) (ADDRESS = (PROTOCOL = TCP) (HOST=primary-scan) (PORT=1521))) (ADDRESS_LIST =(LOAD_BALANCE=on) (ADDRESS = (PROTOCOL = TCP) (HOST=secondary-scan) (PORT=1521))) (CONNECT_DATA=(SERVICE_NAME = gold-cloud)))" |
- See
You may have done this already as part of Step 5.
- If using Oracle database and have not switched to using UCP conection pool, then see Implementing UCP connections with Tomcat and Oracle for more information. Look at type in context.xml, if it is
oracle.ucp.jdbc.PoolDataSource, then you are already setup to use UCP connection pool.
...
Step 7. Edit the <FlexDeploy Home>/apache-tomcat-flexdeploy/conf/server.xml and modify the HTTP/HTTPS ports to match that of the original file which was backed up in step 4. This file is located in the<FlexDeploy Home>/apache-tomcat-flexdeploy/conf folder. If you had setup keystore details, copy that as well from backup file. DO NOT simply copy over the backup file as there are may be other changes which must be preserved.
...
Step 8. Starting with FlexDeploy 5.7.0.1 changes will no longer be made in setenv.sh (or .bat). So
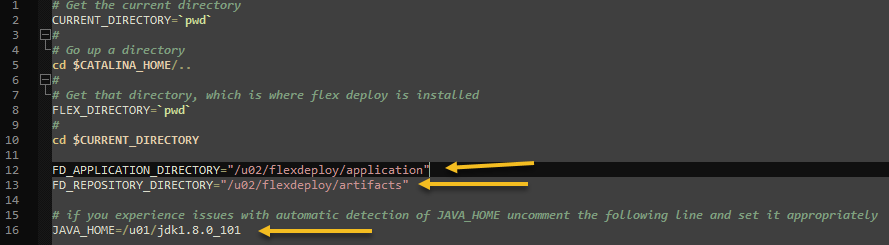
If you were already using setenvoverride.sh, then copy that from backup folder (Step 4), otherwise any changes previously made need to done for setenv.sh must be added to setenvoverride.sh (or .bat). For example, Artifact directory, application directory, and java_home changes will need to be transferred over from your old setenv.sh file. If your old file looks like this:


Your new setenvoverride.sh should look like this:
 The new setenv.sh should be un modified.
...
Step 9. Copy plugins from download zip for auto upload.
...