...
If you would like to see the file details for a package, click on the arrow in front of the package:
...
To build, deploy or execute a project you must first open it in the Projects Explorer by double-clicking on the project or right-clicking and selecting Open.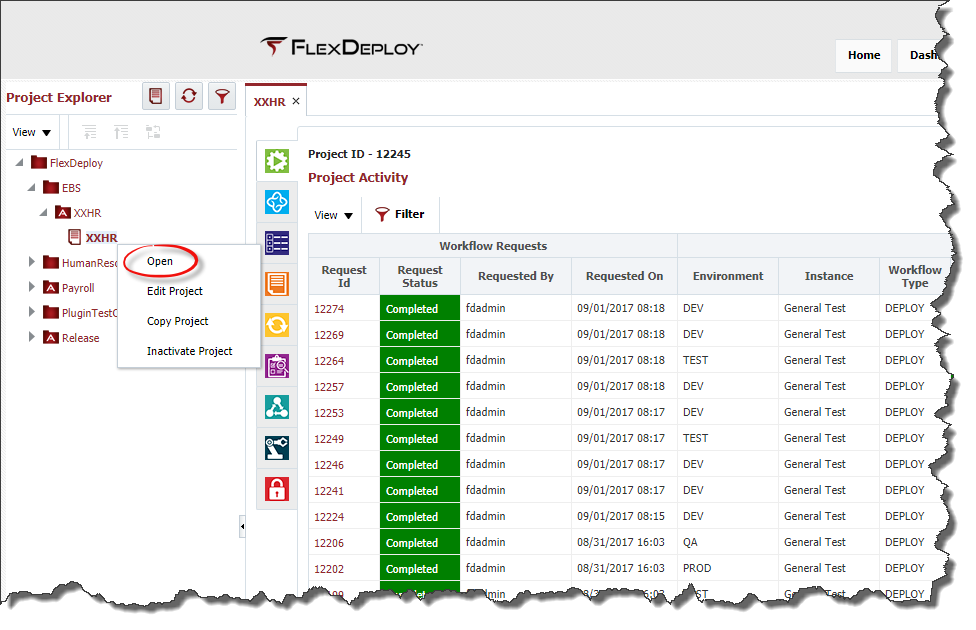
On the Execute tab you will see two sections titled Current State of Project Deployments and Project Activity. Current State of Project Deployments section is not available on Partial Deployment Projects or Utility Projects. The Current State of Project Deployments indicates which environments contain which version of the project. If the project has not been deployed to an environment it will not appear in the list. This provides an easy to access summary of this project's current deployment state across all environments. The Project Activity identifies all build and deployment requests along with the execution status for each request, whether completed/failed, pending approval, scheduled or in progress. The Workflow Request columns provides details pertaining to the build or deployment request that was submitted. Once a workflow request begins execution the Workflow Execution columns will provide details pertaining to its execution on the target instance. The Figure below describes the status lifecycle of a workflow request and its workflow execution.
...
Object Type
...
Status
...
Description
Workflow Request
...
Initiated
...
The initial status that a request receives when it has first been submitted.
...
Pending Approval
...
Indicates that one or more approvals are required before the request will be sent for execution.
...
Scheduled
...
Indicates that the request has been scheduled for execution at some time in the future.
...
Rejected
...
Indicates that an approval task or scheduled task for the request has been rejected/cancelled.
...
Ready
...
Indicates that the request has received any required approvals or reached the scheduled time and is ready to begin execution.
...
Submitted
...
Indicates that the request has been sent for execution.
...
Failed
...
Indicates that the request has failed.
...
Completed
...
Indicates that the request has been successfully executed.
Workflow Execution
...
Queued
...
The initial status when a request is ready for execution.
...
Running
...
Indicates that execution is in progress.
...
Failure
...
Indicates that the execution has failed.
...
Success
...
Indicates that the execution has completed successfully.
...
From the Execution tab, click the Build button.
...
Field
...
Required
...
Description
...
Environment
...
Yes
...
The environment to execute the build on. Note that if there is only one environment configured for the build, it will be preselected.
...
Instance
...
Yes
...
The instance to execute the build on. Note that if there is only one instance configured for the build workflow it is preselected and marked and read-only.
...
Stream
...
Yes
...
Select project stream to build from. Defaults to main stream (trunk). You can select any branch stream configured on the Project Configuration screen.
...
Force Build
...
No
...
If selected, forces the build even though no changes detected in the source. By default only build if there is any change from last build.
...
Workflow Version Override
...
No
...
Optionally select the version of the workflow to execute. Defaults to the active version. Defaults to the active version.
...
Workflow Inputs
...
Depends
...
Enter values for any inputs that are configured for the build workflow. The workflow itself defines whether each input is required or not.
...
From the Execution tab, click the Deploy button.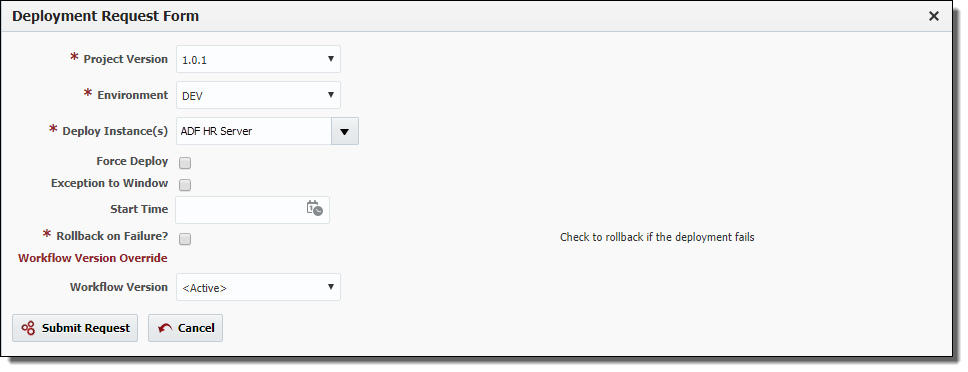
...
Field
...
Required
...
Description
...
Project Version
...
Yes
...
The version of the project to submit for deployment.
...
Environment
...
Yes
...
The environment to execute the deployment on.
...
Deploy Instance(s)
...
Yes
...
The instance(s) to execute the deployment on. The list of instances which appear in the list are the deploy instances which are configured for the project.
...
Force Deploy
...
Yes
...
Force a deployment to occur even if the project version is already current in the selected environment. Defaults to No.
...
Exception To Window
...
Yes
...
Indicate that the deployment is being requested to run outside of any defined deployment window, triggering an approval. Defaults to No.
...
Start Time
...
No
...
An optional delayed start time for the deployment.
...
Workflow Version Override
...
No
...
Optionally select the version of the workflow to execute. Defaults to the active version.
...
Workflow Inputs
...
Depends
...
Enter values for any inputs that are configured for the deploy workflow.
...
Two options available for partial project types.
- All Files
- Select Files.
Build All Files option will display the Build request form same as standard project's Build request form. Once submitted, it will perform Populate from SCM operation and adds all new files populated from SCM and all existing files and creates package. The package name is same as Project Version. Build All Files option will be disabled, if you don't have permission to Populate from SCM for the project as it auto populates the files.
Build Selected Files option will display the following Build request form and gives option to select one or more files.

...
Field
...
Required
...
Description
...
Environment
...
Yes
...
The environment to execute the build on. Note that if there is only one environment configured for the build, it will be preselected.
...
Instance
...
Yes
...
The instance to execute the build on. Note that if there is only one instance configured for the build workflow it is preselected and marked and read-only.
...
Stream
...
Yes
...
Select project stream to build from. Defaults to main stream (trunk). You can select any branch stream configured on the Project Configuration screen.
...
Force Build
...
No
...
If selected, forces the build even though no changes detected in the source. By default only build if there is any change from last build. Currently only appears when SVN is selected as SCM Type in Project Configuration.
...
Workflow Version Override
...
No
...
Optionally select the version of the workflow to execute. Defaults to the active version. Defaults to the active version.
...
Workflow Inputs
...
Depends
...
Enter values for any inputs that are configured for the build workflow. The workflow itself defines whether each input is required or not.
...
Package Name
...
No
...
The name of the package. If no name is given, it will default to the Project Version.
Adding Files
To update the files to be a part of this build, enter a portion of the File Name and select the Add File button. The files that contain this field will be added to the list.
You can also select the button to add any files that have changed since the last build.
Alternatively, you can add files from a previous package. Select the Add Files(s) from Package button and the following screen pops up:
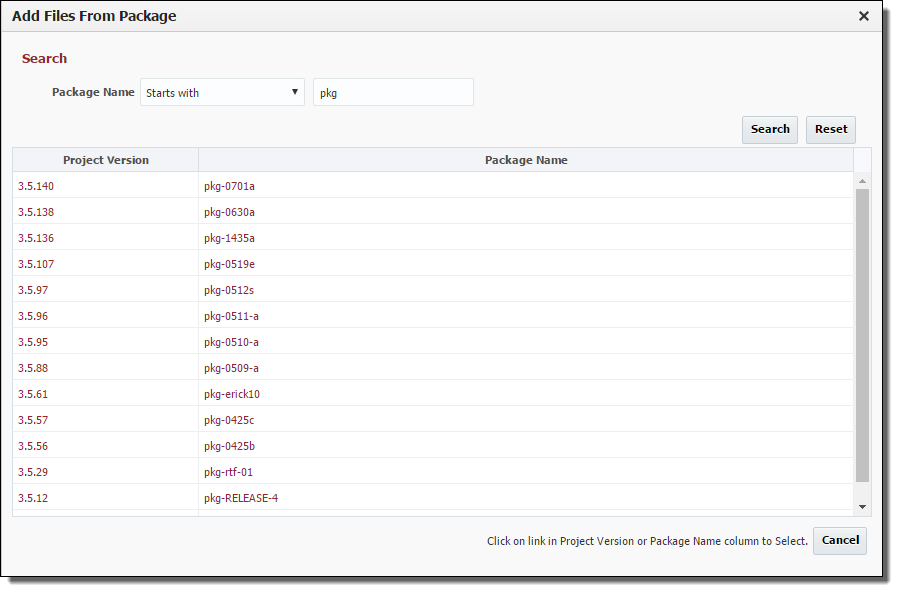
You can filter the list of packages by entering a portion of the name and select one of the search options (Starts with, Ends with, Contains, Equals) and press the Search button. To remove the search criteria, press the Reset button. Choose the package you would like to add files from by clicking on the Project Version or Package Name link. The following screen will pop up allowing you to select the files from that package:

Filtering the list of files can be done by entering a portion of the name and clicking the Filter button. Then only the files containing the filter string will be displayed.
You may either add the selected files by pressing the Add Selected button or add all the currently filtered files by pressing the Add All button. To return to the Add Files from Package Screen, press the Back to Select Package button. The Cancel button will return you to the Build Request Form.
Note: The revision in the package may be blank for 2 reasons, either the package was created before revisions were tracked or the files is Sources from EBS and not SCM. If it is sourced from EBS, the build will once again take the file available in EBS and not the file that was built in the package you selected.
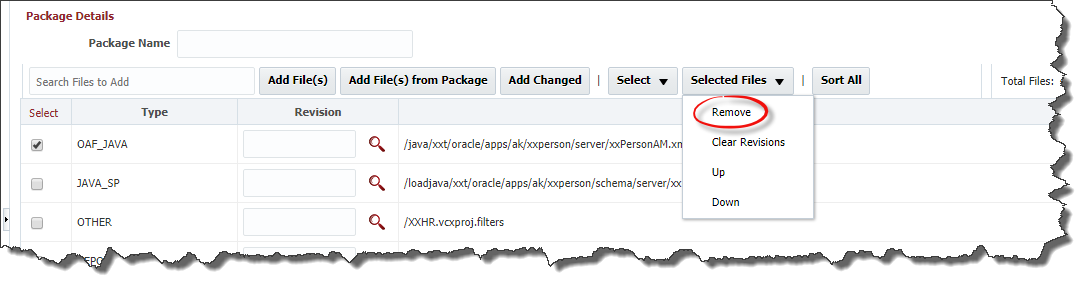
Removing Files
To remove files from the list of files to be included in the build, select the files and select Remove from the Selected Files drop down.
Clear Revisions
Clears the revisions for the files that are selected, go to the Selected Files drop down and choose Clear Revisions.
Entering Revisions
On the Build Request Form, you can add revisions for each file you are building. Currently, these revisions all must be contained by the stream you selected for the build.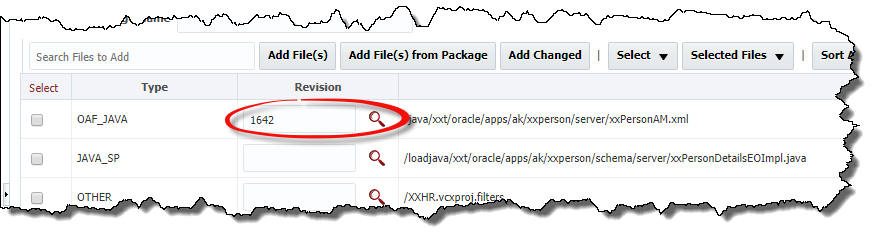
You may enter the revision in the text box or click the magnifying glass to look up the revision. When looking up the revision, the following screen will pop up:
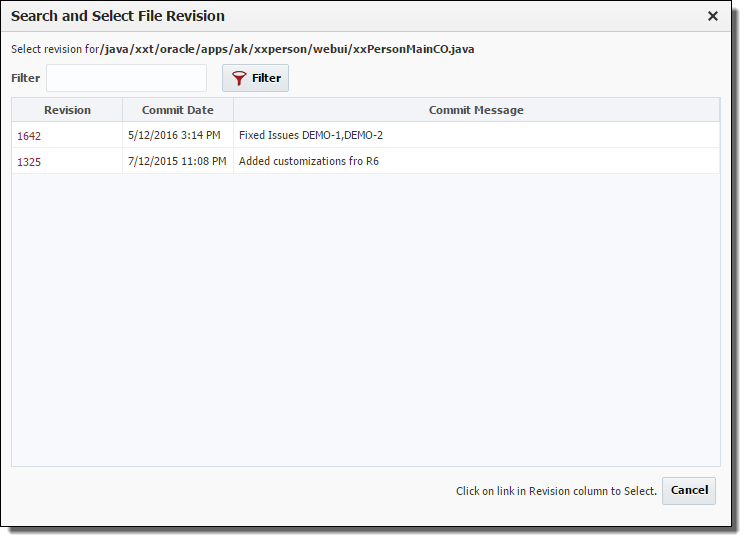
You may enter a filter text which will show those revisons that either the Revison or Commit Message contain the Filter Text. To select the revision you want, click on the Revision link.
A empty revision will default to the Head revision on the selected stream.
...
To help with selecting and unselecting files the Select drop down has the following options:
- All – Selects all the files in the list
- None – Unselects all the files in the list
- Invert - Unselects all the files that are currently selected and selects all the files that are currently unselected.
You may also manually check and uncheck the files with the check box at the start of each row.
Ordering Files
At times, the order of both build and deploy can be important. You can control the order by the sequence of the files in the list. If you need to alter the order, use the Up Button to move the selected row(s) up one row. If multiple rows are selected, the top row is moved up by 1 row, the remaining selected rows are placed right below the highest selected row. Use the Down Button to move the selected row(s) down one row. If multiple rows are selected, the bottom row is moved down by 1 row, the remaining selected rows are placed right above the lowest selected row.
Submitting
Click the Submit Request button to submit the build request.
Deploying a Partial Deployment Project
...
Field
...
Required
...
Description
...
Project Version
...
Yes
...
The version of the project to submit for deployment.
...
Environment
...
Yes
...
The environment to execute the deployment on.
...
Deploy Instance(s)
...
Yes
...
The instance(s) to execute the deployment on. The list of instances which appear in the list are the deploy instances which are configured for the project.
...
Force Deploy
...
Yes
...
Force a deployment to occur even if the project version is already current in the selected environment. Defaults to No.
...
Exception To Window
...
Yes
...
Indicates that the deployment is being requested to run outside of any defined deployment window, triggering an approval. Defaults to No.
...
Start Time
...
No
...
An optional delayed start time for the deployment.
...
Flex Fields
...
Depends
...
Optionally, you can create flex fields for the user to enter as a part of the request. In the Figure above, the Flex Field is "Rollback on Failure?".
...
Workflow Version Override
...
No
...
Optionally select the version of the workflow to execute. Defaults to the active version.
...
Workflow Inputs
...
Depends
...
Enter values for any inputs that are configured for the deploy workflow.
...
Field
...
Required
...
Description
...
Match
...
Yes
...
Select the Any radio button to indicate that the search results should include packages that contain either Project Version or Package Name search string, or the All radio button to indicate that the search results should only include packages that contain both the Project Version and Package Name search string.
...
Project Version
...
No
...
Select the search option (either Starts with, Ends with, Equals, or Contains) and enter the text to search for project versions.
...
Package Name
...
No
...
Select the search option (either Starts with, Ends with, Equals, or Contains) and enter the text to search for package names.
To build, deploy or execute a project you must first open it in the Projects Explorer by double-clicking on the project or right-clicking and selecting Open.
On the Execute tab you will see two sections titled Current State of Project Deployments and Project Activity. Current State of Project Deployments section is not available on Partial Deployment Projects or Utility Projects.
The Current State of Project Deployments indicates which environments contain which version of the project. If the project has not been deployed to an environment it will not appear in the list. This provides an easy to access summary of this project's current deployment state across all environments.
The Project Activity identifies all build and deployment requests along with the execution status for each request, whether completed/failed, pending approval, scheduled or in progress. The Workflow Request columns provides details pertaining to the build or deployment request that was submitted. Once a workflow request begins execution the Workflow Execution columns will provide details pertaining to its execution on the target instance. The Figure below describes the status lifecycle of a workflow request and its workflow execution.
Object Type | Status | Description |
|---|---|---|
Workflow Request | Initiated | The initial status that a request receives when it has first been submitted. |
Pending Approval | Indicates that one or more approvals are required before the request will be sent for execution. | |
Scheduled | Indicates that the request has been scheduled for execution at some time in the future. | |
Rejected | Indicates that an approval task or scheduled task for the request has been rejected/cancelled. | |
| Aborted | The workflow execution was aborted by the user for this request. | |
Ready | Indicates that the request has received any required approvals or reached the scheduled time and is ready to begin execution. | |
Submitted | Indicates that the request has been sent for execution. | |
Failed | Indicates that the request has failed. | |
Completed | Indicates that the request has been successfully executed. | |
Workflow Execution | Queued | The initial status when a request is ready for execution. |
Running | Indicates that execution is in progress. | |
| Aborted | The workflow execution was aborted by the user. | |
Failure | Indicates that the execution has failed. | |
Success | Indicates that the execution has completed successfully. |
| Anchor | ||||
|---|---|---|---|---|
|
From the Execution tab, click the Build button.

Enter values in the Build Request Form as described in the table below.
Field | Required | Description |
|---|---|---|
Environment | Yes | The environment to execute the build on. Note that if there is only one environment configured for the build, it will be preselected. |
Instance | Yes | The instance to execute the build on. Note that if there is only one instance configured for the build workflow it is preselected and marked and read-only. |
| Release | Depends | Select the release the build should be associated to if applicable. If a release is selected, the build will create a snapshot for the release. |
Stream | Yes | Select project stream to build from. Defaults to main stream (trunk). You can select any branch stream configured on the Project Configuration screen. |
Force Build | No | If selected, forces the build even though no changes detected in the source. By default only build if there is any change from last build. |
| FlexFields | Depends | Change # above is an example of a FlexField configured on the Administration Tab. Any FlexFields that are configured for a Build Request will display here. |
| Related Tickets | Depends | Issue tracking tickets related to the build. |
Workflow Version Override | No | Optionally select the version of the workflow to execute. Defaults to the active version. Defaults to the active version. |
Workflow Inputs | Depends | Enter values for any inputs that are configured for the build workflow. The workflow itself defines whether each input is required or not. |
| Related Tickets | Depends | Optionally, a ticket for your issue tracking system may be required. |
Click the Submit Request button to submit the build request.
| Anchor | ||||
|---|---|---|---|---|
|
From the Execution tab, click the Deploy button.
Enter values in the Deployment Request Form as described in the table below.
Field | Required | Description |
|---|---|---|
Project Version | Yes | The version of the project to submit for deployment. |
Environment | Yes | The environment to execute the deployment on. |
Deploy Instance(s) | Yes | The instance(s) to execute the deployment on. The list of instances which appear in the list are the deploy instances which are configured for the project. |
Force Deploy | Yes | Force a deployment to occur even if the project version is already current in the selected environment. Defaults to No. |
Exception To Window | Yes | Indicate that the deployment is being requested to run outside of any defined deployment window, triggering an approval. Defaults to No. |
Start Time | No | An optional delayed start time for the deployment. |
| FlexFields | Depends | Rollback on Failure? above is an example of a FlexField configured on the Administration Tab. Any FlexFields that are configured for Deploy / Utility Request will display here. |
Workflow Version Override | No | Optionally select the version of the workflow to execute. Defaults to the active version. |
Workflow Inputs | Depends | Enter values for any inputs that are configured for the deploy workflow. |
Click the Submit Request button to submit the deployment request.
Anchor buildPartialDeployProj buildPartialDeployProj
Building a Partial Deployment Project
| buildPartialDeployProj | |
| buildPartialDeployProj |
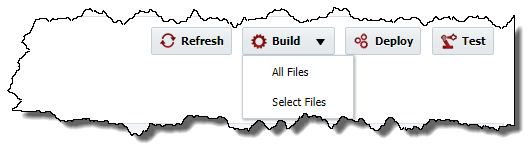
Two options available for partial project types.
- All Files
- Select Files.
Build All Files option will display the Build request form same as standard project's Build request form. Once submitted, it will perform Populate from SCM operation and adds all new files populated from SCM and all existing files and creates package. The package name is same as Project Version. Build All Files option will be disabled, if you don't have permission to Populate from SCM for the project as it auto populates the files.
Build Selected Files option will display the following Build request form and gives option to select one or more files.
Enter values in the Build Request Form as described in the table below.
Field | Required | Description |
|---|---|---|
Environment | Yes | The environment to execute the build on. Note that if there is only one environment configured for the build, it will be preselected. |
Instance | Yes | The instance to execute the build on. Note that if there is only one instance configured for the build workflow it is preselected and marked and read-only. |
| Release | No | Select the release the build should be associated to, if applicable. If a release is selected, the build will create a snapshot for the release. |
Stream | Yes | Select project stream to build from. Defaults to main stream (trunk). You can select any branch stream configured on the Project Configuration screen. |
Force Build | No | If selected, forces the build even though no changes detected in the source. By default only build if there is any change from last build. Currently only appears when SVN is selected as SCM Type in Project Configuration. |
| FlexFields | Depends | Change # above is an example of a FlexField configured on the Administration Tab. Any FlexFields that are configured for a Build Request will display here. |
Workflow Version Override | No | Optionally select the version of the workflow to execute. Defaults to the active version. Defaults to the active version. |
Workflow Inputs | Depends | Enter values for any inputs that are configured for the build workflow. The workflow itself defines whether each input is required or not. |
| Related Tickets | Depends | Optionally, a ticket for your issue tracking system may be required. |
Package Name | No | The name of the package. If no name is given, it will default to the Project Version. |
Adding Files
To update the files to be a part of this build, enter a portion of the File Name and select the Add File button. The files that contain this field will be added to the list.
You can also select the button to add any files that have changed since the last build.
Alternatively, you can add files from a previous package. Select the Add Files(s) from Package button and the following screen pops up:
You can filter the list of packages by entering a portion of the name and select one of the search options (Starts with, Ends with, Contains, Equals) and press the Search button. To remove the search criteria, press the Reset button. Choose the package you would like to add files from by clicking on the Project Version or Package Name link. The following screen will pop up allowing you to select the files from that package:
Filtering the list of files can be done by entering a portion of the name and clicking the Filter button. Then only the files containing the filter string will be displayed.
You may either add the selected files by pressing the Add Selected button or add all the currently filtered files by pressing the Add All button. To return to the Add Files from Package Screen, press the Back to Select Package button. The Cancel button will return you to the Build Request Form.
Note: The revision in the package may be blank for 2 reasons, either the package was created before revisions were tracked or the files is Sources from EBS and not SCM. If it is sourced from EBS, the build will once again take the file available in EBS and not the file that was built in the package you selected.
Removing Files
To remove files from the list of files to be included in the build, select the files and select Remove from the Selected Files drop down.
Clear Revisions
Clears the revisions for the files that are selected, go to the Selected Files drop down and choose Clear Revisions.
Entering Revisions
On the Build Request Form, you can add revisions for each file you are building. Currently, these revisions all must be contained by the stream you selected for the build.
You may enter the revision in the text box or click the magnifying glass to look up the revision. When looking up the revision, the following screen will pop up:
You may enter a filter text which will show those revisons that either the Revison or Commit Message contain the Filter Text. To select the revision you want, click on the Revision link.
A empty revision will default to the Head revision on the selected stream.
Selecting Files
To help with selecting and unselecting files the Select drop down has the following options:
- All – Selects all the files in the list
- None – Unselects all the files in the list
- Invert - Unselects all the files that are currently selected and selects all the files that are currently unselected.
You may also manually check and uncheck the files with the check box at the start of each row.
Ordering Files
At times, the order of both build and deploy can be important. You can control the order by the sequence of the files in the list. If you need to alter the order, use the Up Button to move the selected row(s) up one row. If multiple rows are selected, the top row is moved up by 1 row, the remaining selected rows are placed right below the highest selected row. Use the Down Button to move the selected row(s) down one row. If multiple rows are selected, the bottom row is moved down by 1 row, the remaining selected rows are placed right above the lowest selected row.
Submitting
Click the Submit Request button to submit the build request.
Deploying a Partial Deployment Project
From the Execution tab of a partial deploy project, click the Deploy button.
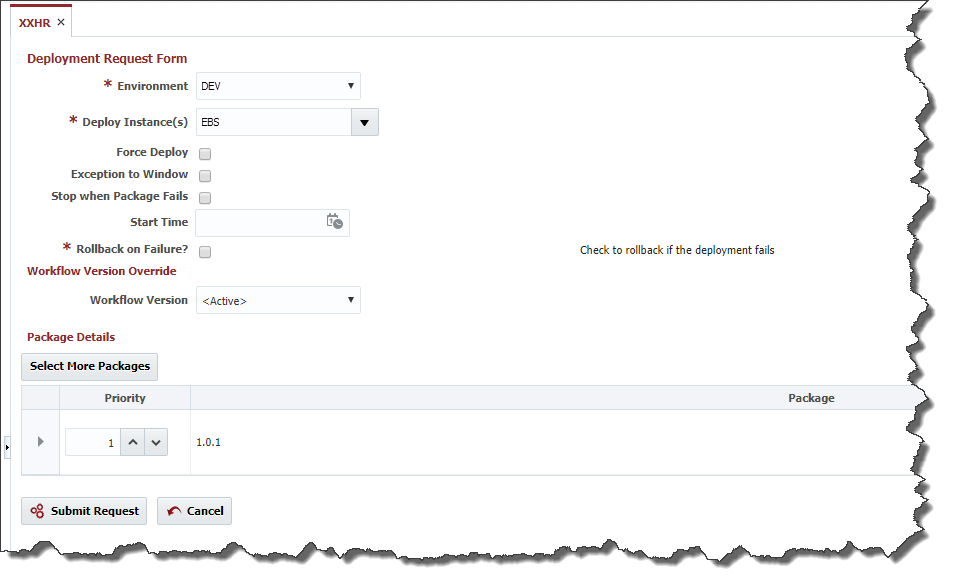
Enter values in the Deployment Request Form as described in the table below.
Field | Required | Description |
|---|---|---|
Project Version | Yes | The version of the project to submit for deployment. |
Environment | Yes | The environment to execute the deployment on. |
Deploy Instance(s) | Yes | The instance(s) to execute the deployment on. The list of instances which appear in the list are the deploy instances which are configured for the project. |
Force Deploy | Yes | Force a deployment to occur even if the project version is already current in the selected environment. Defaults to No. |
Exception To Window | Yes | Indicates that the deployment is being requested to run outside of any defined deployment window, triggering an approval. Defaults to No. |
| Stop when Package Fails | Yes | When deploying multiple packages, if a prior package fails, the remaining packages will not be deployed. |
Start Time | No | An optional delayed start time for the deployment. |
Flex Fields | Depends | Optionally, you can create flex fields for the user to enter as a part of the request. In the Figure above, the Flex Field is "Rollback on Failure?". |
Workflow Version Override | No | Optionally select the version of the workflow to execute. Defaults to the active version. |
Workflow Inputs | Depends | Enter values for any inputs that are configured for the deploy workflow. |
By default the Deployment Request Form will populate with the most recently built package. To modify the list of packages to be deployed, click the Select More Packages button and the screen in the figure below will pop up. 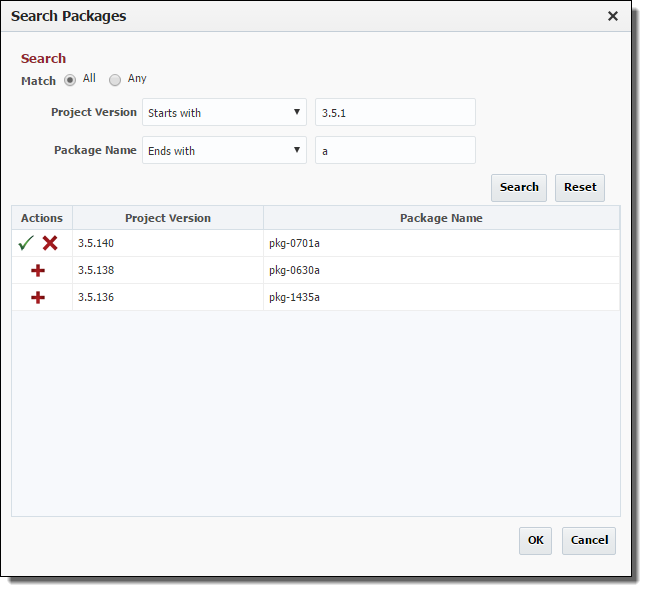
You can Search using Package and Project Version names by entering the text and selecting the search option (either Starts with, Ends with, Equals, or Contains) as shown above and clicking the Search button. The search results will appear in the table.
Field | Required | Description |
|---|---|---|
Match | Yes | Select the Any radio button to indicate that the search results should include packages that contain either Project Version or Package Name search string, or the All radio button to indicate that the search results should only include packages that contain both the Project Version and Package Name search string. |
Project Version | No | Select the search option (either Starts with, Ends with, Equals, or Contains) and enter the text to search for project versions. |
Package Name | No | Select the search option (either Starts with, Ends with, Equals, or Contains) and enter the text to search for package names. |
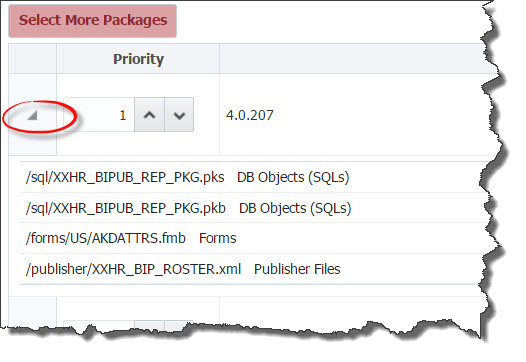
If you would like to add a package to the deployment, click the Red + sign. To remove a package, click the red X. The green check mark indicates that the files have been added. Click the Save button to accept the files, or the Cancel button to cancel the changes.
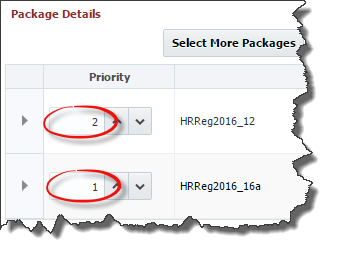
Finally, to control the order that the packages are deployed, enter the priority values as shown in the Figure below. If the priority is a lower value, it will deploy first. Higher values will deploy later. If they have the same priority, they may deploy at the same time.
If you would like to see the file details for a package, click on the arrow in front of the package:
When you have the set of packages you wish to deploy, click the Submit Request button to submit the deployment request. Each package will run as a separate workflow request and workflow execution in the Project Activity table.
Executing a Utility Project
From the Execution tab, click the Execute button.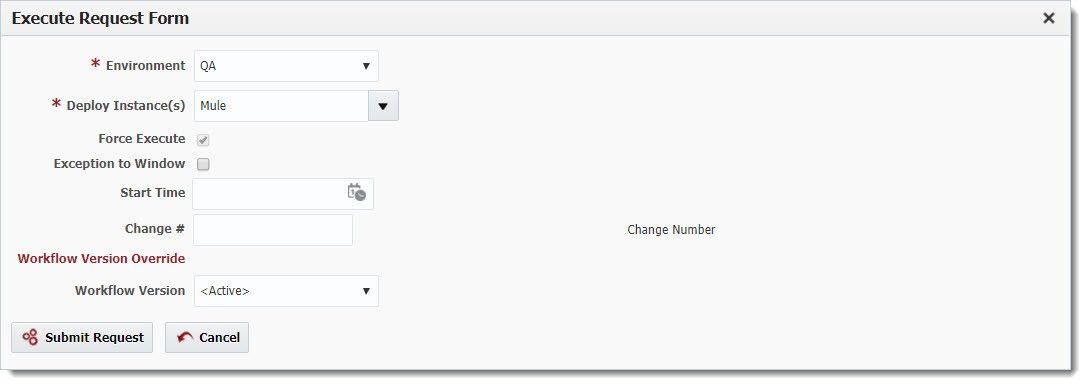
Enter values in the Execute Request Form as described in the table below.
Field | Required | Description |
|---|---|---|
Environment | Yes | The environment to execute the deployment on. |
Deploy Instance(s) | Yes | The instance(s) to execute the deployment on. The list of instances which appear in the list are the deploy instances which are configured for the project. |
Force Execute | Yes | Force the execute to occur even if the project version is already current in the selected environment. Defaults to No. |
Exception To Window | Yes | Indicate that the deployment is being requested to run outside of any defined deployment window, triggering an approval. Defaults to No. |
Start Time | No | An optional delayed start time for the deployment. |
| FlexFields | Depends | Rollback on Failure? above is an example of a FlexField configured on the Administration Tab. Any FlexFields that are configured for Deploy / Utility Request will display here. |
Workflow Version Override | No | Optionally select the version of the workflow to execute. Defaults to the active version. |
| Related Tickets | Depends | Issue tracking tickets related to the execution. |
Workflow Inputs | Depends | Enter values for any inputs that are configured for the deploy workflow. |
Click the Submit Request button to submit the execute request.
Testing a Project
From the Execution tab, click the Test button.
...